Have you ever wished you could control your light and fan separately but found only one switch doing both? It can be frustrating when you want to cool the room without turning off the light or vice versa.
Luckily, separating light and fan switches is easier than you think. You’ll discover simple, clear steps to make your switches work independently. By the end, you’ll have the freedom to control your fan and light exactly how you want. Keep reading, and let’s make your home more comfortable and convenient!
Tools And Materials Needed
Separating light and fan switches requires some specific tools and materials. Having the right items makes the job safer and easier. This section lists all essentials for the task.
Gathering tools before starting saves time. It helps avoid interruptions during work. Each tool has a clear purpose in the process.
Safety Gear
Safety is the top priority. Wear insulated gloves to protect from electric shock. Use safety goggles to shield eyes from dust and debris.
Basic Tools
A screwdriver set is necessary for removing and installing switch covers. A voltage tester checks if the power is off. Wire strippers help prepare wires for new connections.
Electrical Supplies
Purchase separate switches for light and fan control. Use wire nuts to connect wires securely. Electrical tape keeps connections insulated and safe.
Additional Materials
Have a flashlight or headlamp for better visibility. A small container holds screws and tiny parts. A voltage detector pen adds extra safety checks.
Safety Precautions
Safety is the top priority when separating light and fan switches. Working with electrical wiring carries risks. Taking the right steps protects you from shocks and accidents.
Always prepare before starting any electrical work. Being careful prevents injuries and damage. Follow these safety tips to ensure a safe process.
Turn Off The Power
Switch off the circuit breaker that controls the light and fan. Double-check by testing the switch with a voltage tester. Never start without confirming the power is off.
Use Proper Tools
Use insulated screwdrivers and wire strippers. Avoid using tools that can conduct electricity. Good tools make the job safer and easier.
Wear Protective Gear
Wear rubber-soled shoes and gloves. These reduce the chance of electric shock. Keep your hands dry during the work.
Work In A Well-lit Area
Good lighting helps you see wires clearly. It reduces mistakes and accidents. Use a portable lamp if the room is dark.
Label Wires Carefully
Mark wires before disconnecting. This helps when reconnecting switches. Clear labels avoid confusion and errors.
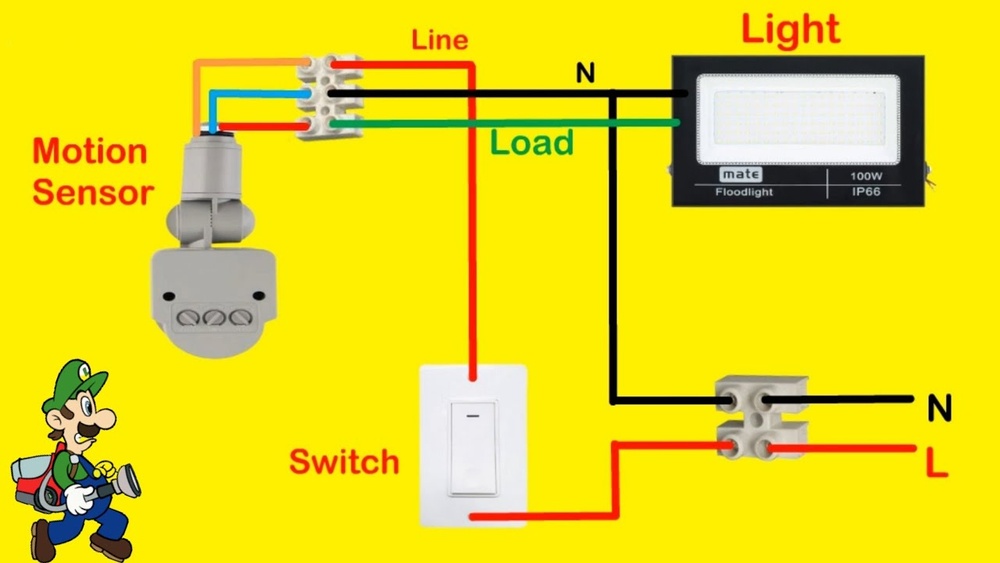
Identify Existing Wiring Setup
Before separating light and fan switches, identify the existing wiring setup. This step helps you understand how wires connect inside the switch box. It prevents mistakes and ensures safe work.
Take time to examine the wires carefully. Note their colors, positions, and connections. This information guides the separation process and keeps your work organized.
Turn Off Power At The Circuit Breaker
Always start by turning off power to the switch. This stops electric shocks or short circuits. Use a circuit tester to confirm no current flows before touching wires.
Remove The Switch Cover Plate
Unscrew the cover plate to see the switches and wiring. Keep screws safe to reuse later. This step gives clear access to wires behind the switches.
Identify Wire Colors And Functions
Look at wire colors. Black usually means hot wire, white is neutral, and green or bare is ground. Confirm these roles using a voltage tester for accuracy.
Check How Wires Connect To Switches
Notice if wires connect to one or both switches. Some setups use a shared hot wire for both light and fan. Others have separate wires for each device.
Note Any Wire Nuts Or Connectors
Spot wire nuts or connectors inside the box. These join wires together and can indicate shared circuits. Document these connections to separate circuits properly.

Credit: www.electrical-online.com
Turn Off Power Supply
Turning off the power supply is the first and most important step before separating light and fan switches. This step keeps you safe from electric shocks. It also prevents damage to your electrical system.
Always treat electrical work with caution. Do not skip this step. Safety must come first to avoid accidents.
Locate The Circuit Breaker
Find the circuit breaker panel in your home. It is usually in the basement or utility room. Look for the switch that controls the power to the light and fan.
The breaker will often have labels. These labels can help identify the correct switch to turn off.
Turn Off The Correct Breaker
Flip the switch for the light and fan circuit to the OFF position. This stops electricity from flowing to the switches.
Double-check that the power is off by trying the light or fan switch. They should not work.
Use A Voltage Tester
Use a voltage tester to confirm no power is running to the switches. This tool detects live electrical current.
Touch the tester to the wires in the switch box. No light or sound means power is off and safe to work.
Remove Old Switch Plate
Removing the old switch plate is the first step to separate light and fan switches. It lets you see the wiring behind the plate. This step is simple but must be done carefully to avoid damage or injury.
Turn off the power at the circuit breaker before you start. This stops any risk of electric shock. Safety is the top priority in this process.
Gather The Needed Tools
Get a screwdriver suitable for your switch plate screws. Usually, a flathead or Phillips screwdriver works. Have a flashlight ready to see inside the switch box if needed.
Unscrew The Switch Plate
Locate the screws holding the switch plate. Use the screwdriver to turn each screw counterclockwise. Keep the screws in a safe place for later use.
Carefully Remove The Plate
Gently pull the switch plate away from the wall. Do not force it to avoid damage. If it sticks, check for any hidden screws or paint sealing it.
Inspect The Switches And Wiring
Look inside the switch box. Identify the wires connected to the light and fan switches. Take note or a picture to help with separation later.
Credit: www.protoolreviews.com
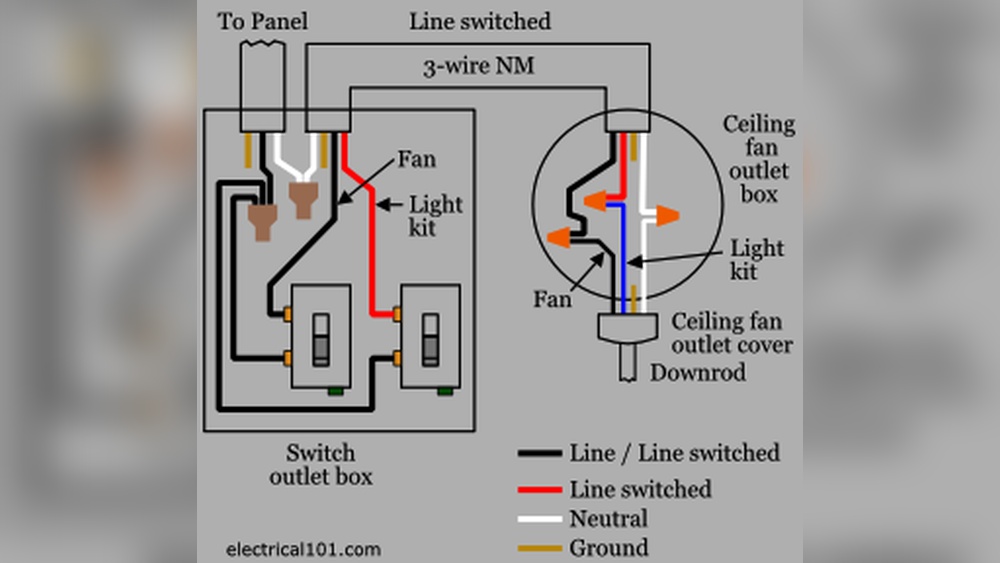
Separate Wiring For Light And Fan
Separate wiring lets you control lights and fans independently. This setup uses different switches for each device. It helps save energy and adds convenience.
Separate wiring for a light and fan allows each to work independently. It means you can control the light without turning on the fan. This setup adds convenience and saves energy. It also helps avoid wear on the fan motor by keeping it off when not needed.
Using separate wires means running two sets of cables from the switch box. One set connects to the light, the other to the fan. Each switch controls its own device. This method gives you full control over both fixtures.
Prepare these tools: wire strippers, screwdrivers, voltage tester, and electrical tape. You will also need wire nuts and a dual switch plate. Use wires rated for your home’s electrical system. Safety is the top priority.
Step-by-step Wiring Process
Turn off power at the circuit breaker. Confirm no electricity flows using a tester. Run separate wires from the ceiling box to the switch box. Connect wires from the light to one switch terminal. Connect wires from the fan to the other switch terminal. Secure all connections with wire nuts and tape. Attach the dual switch plate. Turn power back on and test each switch.
Benefits Of Separate Wiring
Separate wiring reduces energy waste. It extends the life of both the fan and the light. It gives better control over room lighting and airflow. This setup is safer and meets electrical codes. Many homeowners find it a smart upgrade.
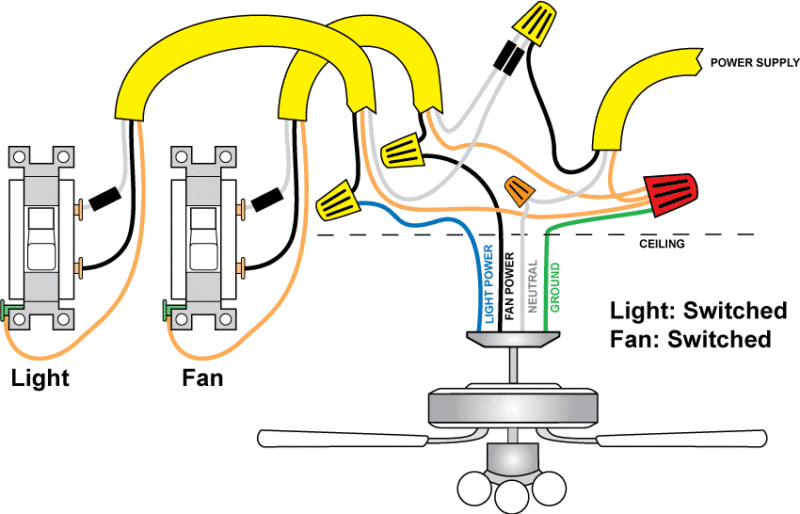
Install Individual Switches
Separate light and fan controls by installing individual switches for each device. This setup allows independent operation and better convenience. Wiring each switch separately keeps functions clear and easy to manage.
Gather Necessary Tools And Materials
Start by collecting all tools and materials for the job. You will need a screwdriver, wire cutters, voltage tester, electrical tape, and new switches. Also, get wire nuts and a faceplate for the switches. Having everything ready makes the process smooth and safe.
Turn Off The Power
Safety is the top priority. Switch off the power at the circuit breaker before touching any wires. Use a voltage tester to confirm no electricity flows to the switch box. Never skip this step to avoid electric shock or injury.
Remove The Existing Switch
Unscrew the faceplate covering the current switch. Carefully pull out the switch from the wall box. Note how wires connect to the old switch. Label the wires with tape if needed. This helps during reinstallation and avoids mistakes.
Separate The Wires
Identify wires for the light and fan. Usually, the fan and light share a power wire and two switched wires. Disconnect the wires carefully. Separate the pairs to connect each to its own switch. Keep wire ends neat and straight for easy connection.
Install The Individual Switches
Connect the fan wires to one switch and the light wires to the other. Attach the power wire to both switches using wire nuts if needed. Secure the switches in the wall box with screws. Make sure the wires are tight and no copper is exposed.
Attach The Faceplate And Test
Place the new faceplate over the switches and screw it in place. Turn the power back on at the breaker. Test each switch to ensure it controls the correct device. The fan should operate independently from the light. Fix any issues before finishing.
Test The New Switches
Testing the new switches is an important step after installation. It ensures that both the light and fan switches work correctly and safely. This step helps you avoid electrical problems later.
Always test switches before closing the wall box or reinstalling the cover plate. This saves time and effort if adjustments are needed.
Turn On The Power
First, restore power at the circuit breaker. Check that electricity flows to the new switches. Use caution to avoid shocks during this step.
Check Each Switch Separately
Flip the light switch and see if the light turns on. Then, flip the fan switch and check if the fan runs. Each switch must control its device only.
Observe For Any Issues
Listen for unusual sounds or flickering lights. These signs may indicate wiring problems. If something feels off, turn off the power and recheck connections.
Use A Voltage Tester
A voltage tester confirms proper wiring and power flow. Test both switches to verify safe operation. This tool adds an extra layer of safety.
Final Adjustments
If a switch does not work, double-check the wiring. Tighten loose connections or reposition wires as needed. Test again until both switches function well.
Tips For Troubleshooting
Troubleshooting separate light and fan switches can feel tricky. Small mistakes cause big problems.
Following clear steps helps find issues fast. Checking wiring, power, and switch function matters most.
Check The Power Supply
First, ensure the power is off at the breaker. Use a voltage tester to confirm no current flows.
Power may be cut off accidentally. Testing keeps you safe from electric shocks.
Inspect The Wiring Connections
Loose or wrong wires cause switches to fail. Remove the switch cover to check wires closely.
Look for disconnected or damaged wires. Tighten screws holding wires firmly in place.
Test The Switches Separately
Turn on one switch at a time. Notice if the fan or light responds correctly.
Switches that do not control their device need replacement. This step isolates the problem clearly.
Use A Multimeter For Detailed Testing
A multimeter measures electrical flow and resistance. Test each switch to see if it works properly.
High resistance or no continuity means the switch is faulty. Replace or repair as needed.
Consult A Professional When Needed
Some problems require expert help. Electrical work can be dangerous without proper skills.
Call a licensed electrician if unsure. Safety always comes first in electrical repairs.
When To Call A Professional
Separating light and fan switches can be a simple task for some. Yet, some situations demand expert help. Safety matters most when dealing with electrical wiring. Knowing when to call a professional saves time and avoids hazards.
Signs Of Complex Wiring
Wiring that looks unusual or tangled needs expert care. Old homes often have hidden wiring problems. If wires do not match colors or seem damaged, stop and call an electrician. Mistakes can cause sparks or fires.
Electrical Code Compliance
Building codes require certain wiring standards. A professional knows these rules. They ensure your switches meet local safety laws. This prevents fines and keeps your home safe.
Lack Of Proper Tools Or Experience
Working without the right tools risks injury. Professionals have special tools for safe installation. Experience helps avoid common mistakes. If unsure, hiring a pro is best.
Frequent Circuit Breaker Trips
If your circuit breaker trips often after switch work, call a professional. This signals wiring issues or overloads. Experts quickly find and fix these problems.
Uncertainty About Electrical Safety
Feeling unsure about handling wires means it is time to call help. Electricity is dangerous if mishandled. A professional can do the job safely and correctly.

Credit: community.smartthings.com
Frequently Asked Questions
How Do I Separate Light And Fan Switches Easily?
To separate switches, turn off power first. Identify wires for light and fan. Disconnect and rewire each to its switch for independent control.
Can I Use One Switch Box For Light And Fan?
Yes, you can use one box. Install a double switch plate. Wire the fan and light separately to each switch.
What Tools Are Needed To Separate Fan And Light Switches?
You need a screwdriver, voltage tester, wire stripper, and electrical tape. Safety gloves and wire nuts help secure connections safely.
Is It Safe To Separate Light And Fan Switches Myself?
Yes, if you follow safety steps. Turn off power, test wires, and use proper tools. If unsure, consult a licensed electrician.
Conclusion
Separating light and fan switches can make your home more convenient. It helps control each device easily and saves energy. Always turn off the power before starting any work. Use the right tools and follow safety steps carefully. If unsure, ask a professional for help.
Small changes like this improve comfort and functionality in your room. Take your time and work safely for the best results.