Are you tired of fumbling in the dark or relying on your phone’s flashlight every time you need a little extra light? Installing a switch light can change that in minutes.
Imagine controlling your room’s lighting with a simple flick, making your space more comfortable and convenient. If you’ve never done it before, don’t worry—this guide will walk you through each step clearly and safely. By the end, you’ll have the confidence to install your own switch light and brighten up your home exactly how you want.
Ready to get started? Let’s dive in.
Tools And Materials Needed
Installing a switch light is a simple task. The right tools and materials make the job easier and safer. Preparing these items before starting saves time and avoids frustration.
Gather everything in one place. Check each item to ensure it is in good condition. This helps the installation process run smoothly and prevents mistakes.
Basic Tools
A screwdriver set is essential. Flathead and Phillips screwdrivers work best for most switches. A voltage tester helps check if wires are live. Wire strippers remove insulation cleanly. Pliers help twist wires securely. A drill may be needed for mounting screws.
Materials Needed
Choose a switch light that fits your needs. Electrical tape secures wire connections. Wire nuts join wires safely. Use electrical boxes to hold the switch. Make sure the wires are the correct gauge for your circuit.
Safety Equipment
Wear insulated gloves to protect against shocks. Safety glasses shield your eyes from debris. Turn off power at the breaker before starting. Keep a flashlight handy if lighting is off.
Safety Precautions
Safety is the top priority when installing a switch light. Taking the right precautions protects you from electric shocks and accidents. It also ensures the switch works correctly after installation. Follow simple safety steps to keep the process smooth and secure.
Turn Off The Power
Always switch off the power at the circuit breaker. Double-check by testing the wires with a voltage tester. Never trust the switch’s off position alone. This step prevents electric shock during installation.
Use Proper Tools
Select tools made for electrical work. Insulated screwdrivers and pliers reduce the risk of shock. Avoid using damaged or worn tools. Proper tools help you work faster and safer.
Wear Safety Gear
Wear rubber-soled shoes to reduce electric shock risk. Use safety glasses to protect your eyes from sparks or debris. Gloves can help but choose ones designed for electrical work.
Work In A Dry Area
Never install a switch light in wet conditions. Water and electricity are a dangerous mix. Make sure your hands and the work area are dry. This lowers the chance of accidents.
Follow Instructions Carefully
Read the switch’s manual before starting. Follow every step as shown. Do not skip or guess any part of the process. Proper installation avoids damage and safety hazards.
Turn Off Power Supply
Turning off the power supply is the first and most important step before installing a switch light. It keeps you safe from electric shocks and prevents damage to the electrical system. Always make sure the power is completely off before starting any work on electrical devices.
Safety cannot be stressed enough. Many accidents happen because the power is still on. Taking a few minutes to turn off the power supply can save you from serious injury or costly repairs.
Locate The Main Circuit Breaker
Find the main circuit breaker in your home. It is usually inside the electrical panel or breaker box. This is the switch that controls power to the entire house or specific areas.
Switch Off The Correct Breaker
Identify the breaker that controls the light switch you want to install. Flip it to the off position. This stops electricity from flowing to that circuit.
Double Check The Power Is Off
Use a voltage tester or a simple light to check. Touch it to the wires or switch terminals. No light or beep means the power is off and safe to work on.
Credit: www.hometips.com
Remove Existing Switch
Removing the existing switch is the first step in installing a new light switch. It lets you work safely and prepare for the new device. Take your time and follow safety rules carefully. Always turn off the power before touching anything electrical.
Use a voltage tester to check that no electricity is flowing. This step is very important to avoid shocks. Once the power is off, you can start removing the old switch.
Turn Off The Power At The Circuit Breaker
Find the circuit breaker that controls the light switch. Flip it off to cut power to the switch. Confirm by testing the switch or nearby light to ensure no power flows.
Remove The Switch Cover Plate
Use a screwdriver to take off the switch cover plate. Keep the screws safe for later use. Removing the plate exposes the switch and wiring behind it.
Unscrew The Existing Switch
Locate the screws holding the switch to the wall box. Unscrew them carefully. Pull the switch out gently to see the wires attached at the back.
Disconnect The Switch Wires
Note how the wires connect to the switch. Loosen the screws or release any clips holding the wires. Remove the wires from the old switch carefully.
Identify Wiring Connections
Identifying wiring connections is the first step in installing a switch light. This step ensures the switch works safely and correctly. Knowing which wire does what helps avoid mistakes and hazards.
Electric wires usually come in different colors. Each color has a special role in the circuit. Understanding these roles makes the process clearer and easier to follow.
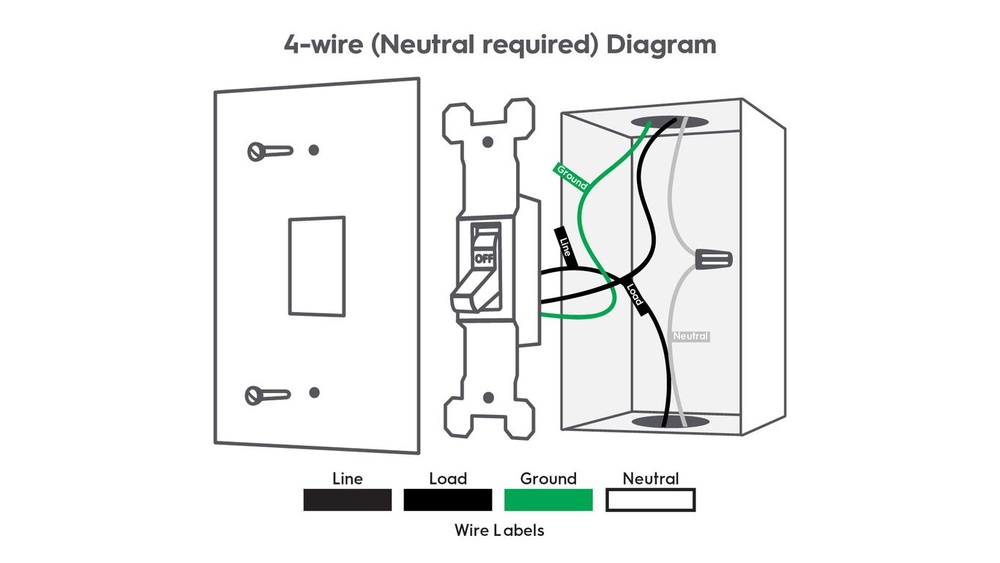
Identify The Power Source Wire
The power source wire brings electricity from your home’s main supply. It is often black or red. This wire connects to the switch to control the light’s power.
Locate The Load Wire
The load wire carries electricity to the light fixture. Usually, this wire is black or red as well. It links the switch to the light, turning it on or off.
Find The Neutral Wire
The neutral wire completes the electrical circuit. It is typically white. This wire does not connect directly to the switch but stays in the box for the light fixture.
Spot The Ground Wire
The ground wire is a safety wire. It is either green or bare copper. This wire prevents electric shocks and must be connected to the switch’s ground terminal.
Use A Voltage Tester
A voltage tester helps check which wires carry electricity. This tool avoids guesswork and increases safety. Always test wires before touching them.
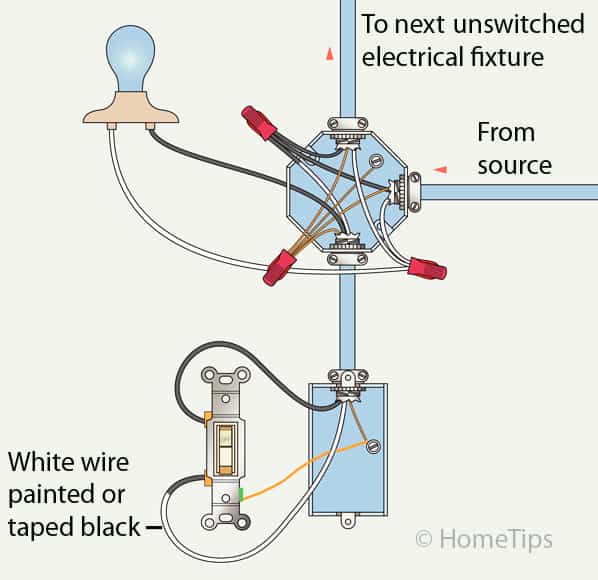
Connect The Switch Light
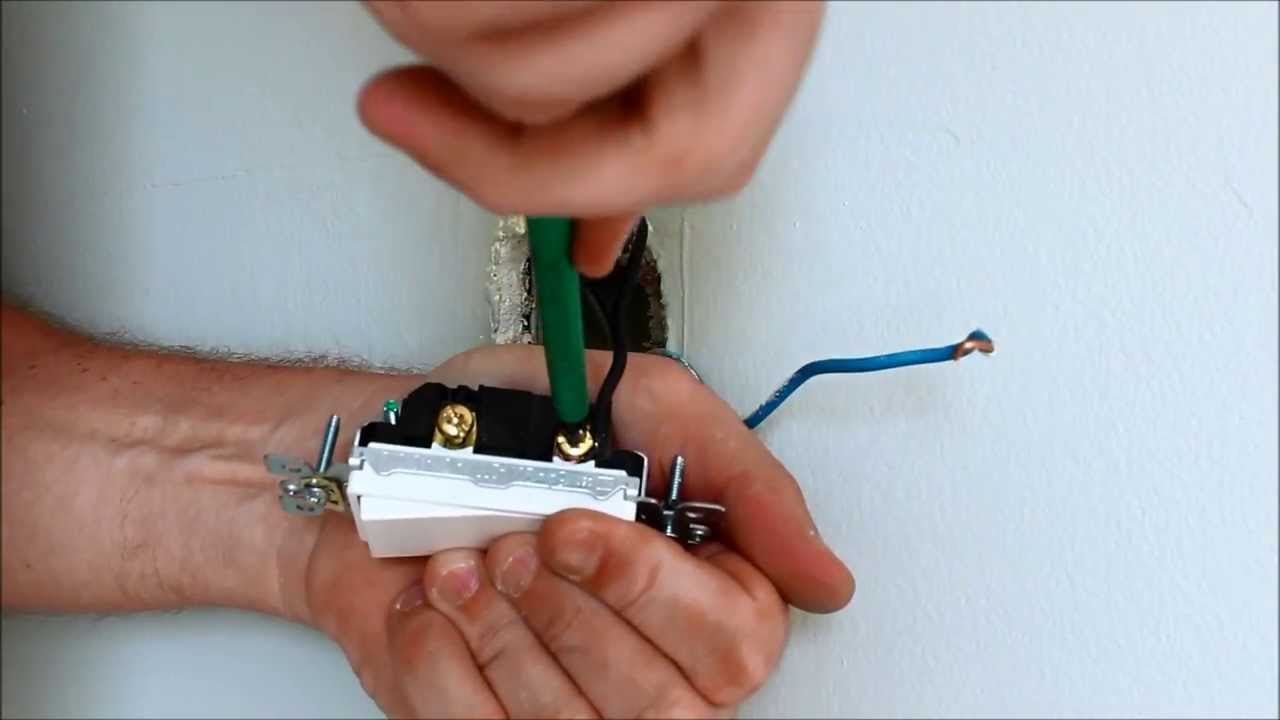
Connecting the switch light is an important step in the installation process. It involves attaching three main wires: live, neutral, and ground. Each wire must be connected properly for the switch to work safely and correctly.
Connect Live Wire
The live wire carries electricity from the power source to the switch. Usually, it is colored red or brown. First, strip about half an inch of insulation from the wire end. Then, attach it to the live terminal on the switch. Tighten the screw firmly to secure the wire. Make sure there are no loose strands that could cause a short circuit.
Connect Neutral Wire
The neutral wire completes the electrical circuit. It is usually blue or black. Strip the wire end like the live wire. Connect it to the neutral terminal on the switch or the light fixture, depending on your setup. Tighten the terminal screw well. A good connection helps the light work smoothly and reduces electrical hazards.
Attach Ground Wire
The ground wire protects against electrical shocks. It is green or bare copper. Locate the ground screw on the switch box or switch itself. Strip the wire and loop it around the screw. Tighten the screw to hold the wire firmly. Proper grounding keeps your switch safe and meets electrical codes.
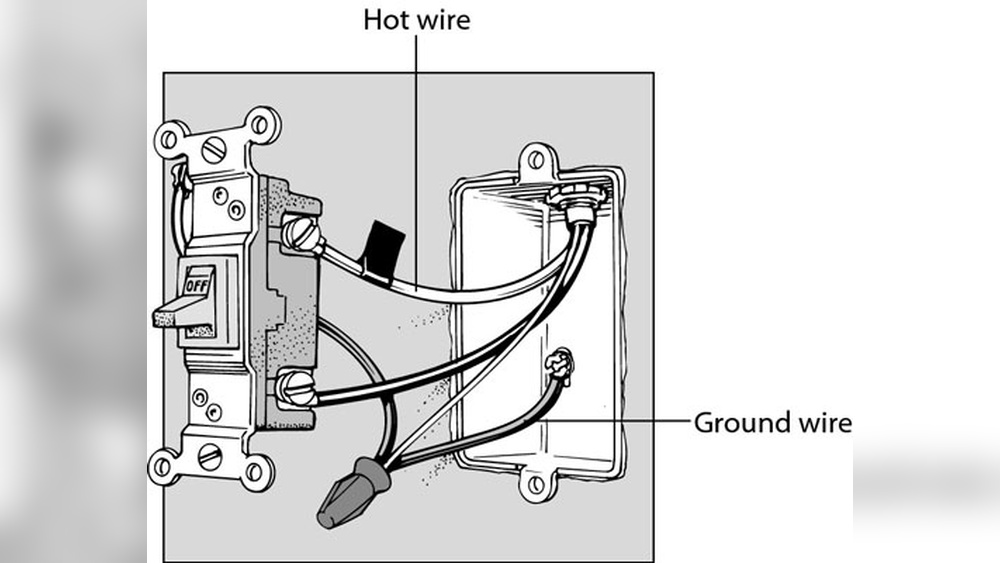
Secure The Switch In Place
Securing the switch in place is a key step in the installation process. It ensures the switch stays fixed and functions correctly. A loose switch can cause problems like flickering lights or safety hazards.
Follow these steps carefully to fix the switch firmly. Proper securing provides stability and a neat finish to your work.
Prepare The Switch Box
Start by cleaning the switch box. Remove any dust or debris inside it. Check the box for damage or loose screws. Tighten or replace screws if needed. A clean, sturdy box holds the switch better.
Align The Switch Correctly
Place the switch in the box carefully. Make sure the switch is straight and the toggle or button is centered. Misalignment can cause trouble when using the switch. Hold it steady before securing.
Use The Mounting Screws
Insert the mounting screws into the switch holes. Use a screwdriver to tighten them slowly. Do not overtighten as it can crack the switch or box. Tighten just enough to hold the switch firmly in place.
Check The Switch Stability
Gently wiggle the switch to test its hold. It should not move or feel loose. If it moves, tighten the screws a bit more. A stable switch ensures safe and smooth operation.
:max_bytes(150000):strip_icc()/how-to-wire-and-install-single-pole-switches-1152330-05-2de77af170364a6fb3846f30634a5cd3.jpg)
Credit: www.thespruce.com
Restore Power And Test
Restoring power and testing your newly installed switch light is a key step. It confirms everything works safely and correctly. This step helps avoid electrical issues and ensures your switch controls the light as expected.
Restore Power Safely
Find the circuit breaker that controls your light. Flip the breaker back to the ON position. Make sure no tools or wires are touching anything inside the box. Safety first. Stand clear before restoring power.
Test The Switch Light
Press the switch to turn the light on. Watch for the light to glow steadily. Flip the switch again to turn it off. Check the switch feels firm and clicks properly. This shows the switch works well.
Check For Any Issues
Look for flickering or dim light. Listen for buzzing or crackling sounds. These signs mean a loose connection or wrong wiring. Turn off power immediately if you see or hear this. Fix problems before use.
Troubleshooting Tips
Troubleshooting is a key step when installing a switch light. Problems can happen during or after installation. Knowing simple tips can save time and avoid frustration. Here are some easy ways to fix common issues.
Check The Power Supply
Make sure the power is off before starting work. Use a voltage tester to confirm no electricity flows. If the light does not turn on, check the circuit breaker. Reset it if needed. A power cut can cause the light to stay off.
Verify Wiring Connections
Loose or wrong wires cause many switch problems. Double-check all wire connections. Each wire should be tight and secure. Match the wires according to the instructions. Incorrect wiring can stop the light from working.
Test The Switch Itself
Sometimes the switch may be faulty. Use a multimeter to test the switch’s function. Replace the switch if it does not work properly. A broken switch will not control the light.
Inspect The Light Bulb
Check if the bulb is working. Replace burnt-out bulbs with new ones. Use the right bulb type and wattage. A bad bulb can make it seem like the switch is the problem.
Look For Loose Fixtures
Loose light fixtures can cause flickering or no light. Tighten any loose screws or parts. Ensure the fixture is properly attached to the ceiling or wall. Secure fixtures improve safety and function.
Reset The Circuit Breaker
Sometimes the breaker trips during installation. Flip the breaker off and then on again. This resets the electrical system. A reset can restore power to the switch and light.
Credit: www.youtube.com
Frequently Asked Questions
How Do I Install A Switch Light Safely?
Turn off the power at the breaker before starting. Use a voltage tester to confirm no electricity flows. Follow wiring instructions carefully and secure connections tightly. If unsure, consult a licensed electrician for safety.
What Tools Are Needed To Install A Light Switch?
You need a screwdriver, wire stripper, voltage tester, and electrical tape. A drill may help if mounting new fixtures. These tools ensure you work safely and efficiently when installing a switch light.
Can I Replace A Switch Light Myself?
Yes, if you follow safety guidelines and have basic electrical knowledge. Always turn off power before starting. Read the instructions carefully. If uncomfortable, hire a professional electrician to avoid hazards.
How Do I Know Which Wires To Connect?
Identify the live, neutral, and ground wires using a voltage tester. Usually, black or red wires are live. White is neutral, and green or bare copper is ground. Match wires according to the switch’s instructions.
Conclusion
Installing a switch light can be simple and quick. Follow the steps carefully and stay safe. Use the right tools and check the wires well. Test the switch before closing the wall box. A well-installed switch can make your home brighter and safer.
Take your time and do the job right. You can enjoy better lighting with just a little effort. Keep this guide handy for future light switch projects.