Have you ever wished you could control an outlet with a simple flip of a light switch? Imagine turning on a lamp or charging your devices without fumbling for plugs or buttons.
Making a light switch control an outlet is easier than you think, and it can add convenience and safety to your home. In this guide, you’ll learn clear, step-by-step instructions to transform your ordinary outlet into a smart, switch-controlled power source.
Ready to make your space more functional and efficient? Keep reading, and you’ll be surprised how quickly you can get started.
Tools And Materials Needed
Changing a light switch to control an outlet needs specific tools and materials. Having the right items makes the job safe and easier. Prepare everything before starting to save time and avoid problems.
Essential Tools
Gather a screwdriver set with flathead and Phillips heads. A wire stripper is needed to remove insulation from wires. Use a voltage tester to check power is off before working. Needle-nose pliers help bend and hold wires. A drill with bits might be useful for new holes.
Materials Required
Buy a new light switch rated for your home’s voltage. Get an electrical outlet that matches your current one. Use electrical wire that matches your home’s wiring gauge. Wire nuts are needed to connect wires safely. Electrical tape helps secure and insulate wire connections. A switch cover plate finishes the look and protects wires.
Safety Gear
Wear insulated gloves to avoid electric shocks. Safety glasses protect your eyes from debris. Use a flashlight or headlamp if lighting is poor. Have a fire extinguisher nearby for emergencies.
Credit: www.oneprojectcloser.com
Safety Precautions
Safety is the top priority when working with electrical wiring. Mistakes can cause shocks or fires. Taking the right safety steps prevents accidents and protects you and your home.
Before starting, turn off the power at the circuit breaker. Never rely only on the light switch to cut power. Use a voltage tester to make sure no electricity flows to the wires.
Wear insulated gloves and use tools with insulated handles. Keep the work area dry and free of clutter. Avoid touching metal parts that may carry current.
Know your limits. If you feel unsure about any step, call a licensed electrician. Working safely saves time and prevents costly damage.
Turn Off Power At The Circuit Breaker
Locate the correct breaker and switch it off. Double-check power is off using a voltage tester. This step is critical for your safety.
Use A Voltage Tester
Test all wires before touching them. A voltage tester shows if current is present. It confirms that power is truly off.
Wear Protective Gear
Use insulated gloves and tools. They reduce the risk of electric shock. Safety gear is essential for handling wires.
Work In A Dry Area
Water and electricity do not mix. Keep your hands and workspace dry. Avoid working in damp or wet conditions.
Call A Professional If Unsure
Electrical wiring can be complex. If unsure, seek help from a licensed electrician. Better safe than sorry.
Identify The Wiring Setup
Before you start wiring a light switch to control an outlet, identifying the wiring setup is crucial. Understanding the current wiring helps avoid mistakes and keeps you safe. This step guides you through checking the wires and figuring out how they connect.
Every home can have a different wiring setup. Knowing what wires you have and where they go will make the process smoother. This section explains how to identify the wiring in your switch box and outlet.
Turn Off The Power
Safety first. Switch off the circuit breaker for the area you will work on. Use a voltage tester to confirm power is off. Never touch wires while the power is on.
Remove The Switch And Outlet Covers
Use a screwdriver to take off the covers. This gives you access to the wires behind the switch and outlet. Keep screws safe for later use.
Examine The Wires In The Switch Box
Look inside the switch box. Identify black (hot), white (neutral), and green or bare (ground) wires. Note how many wires connect to the switch.
Check The Outlet Wiring
Open the outlet box and inspect wires. Outlets usually have similar wire colors. See if the wires link directly to the switch or run separately.
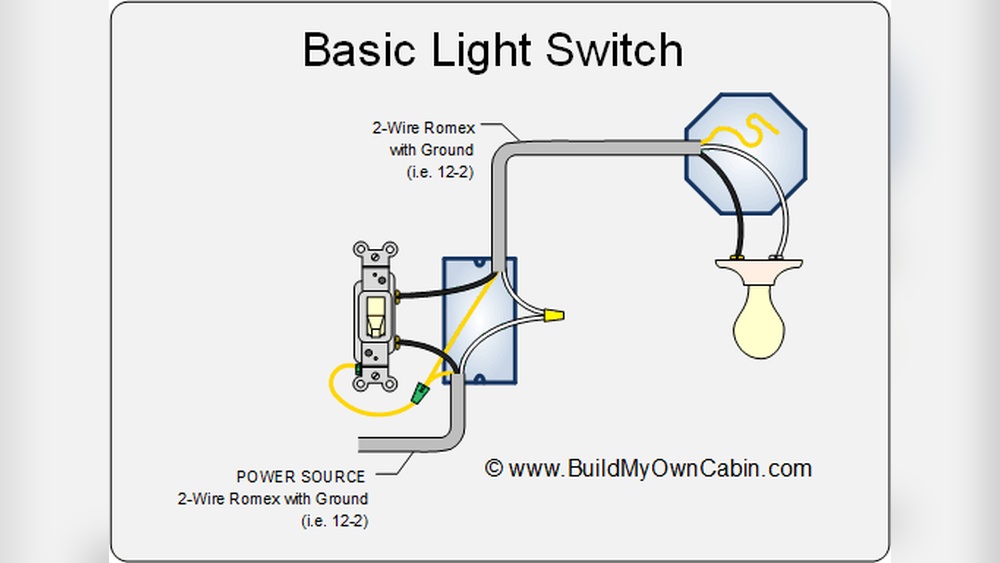
Identify The Switch Loop Or Line
Find out if the switch controls the outlet through a switch loop. A switch loop uses only black and white wires without a neutral. This detail affects how you wire the outlet.
Take Photos And Label Wires
Use your phone to take pictures of the wiring setup. Label wires with tape or markers to remember their position. This helps during reassembly and wiring changes.

Credit: www.do-it-yourself-help.com
Turn Off Power Safely
Turning off power safely is the first step to work on any electrical project. It stops electric shocks and accidents. You must always cut power before touching wires or outlets.
Safety helps protect you and your home. Take time to do it right. This step is simple but very important.
Locate The Circuit Breaker
Find your home’s circuit breaker box. It is usually in the basement or garage. The box controls electricity to all parts of your house.
Look for labels on the breakers. Find the one that controls the outlet you want to work on.
Turn Off The Correct Breaker
Switch the correct breaker to the OFF position. This stops electricity flow to the outlet and switch.
Double-check by testing the outlet before starting work. Use a voltage tester or plug in a small device.
Use A Voltage Tester
A voltage tester checks if power is off safely. Touch the tester to the outlet’s terminals.
If the tester shows no electricity, it is safe to work. If it shows power, turn off the breaker again.
Remove Existing Switch And Outlet Covers
Removing existing switch and outlet covers is the first step. It lets you see the wiring behind them.
Safety is important. Always turn off the power at the breaker before touching anything.
Gather Necessary Tools
Use a screwdriver to remove cover plates. A flathead or Phillips screwdriver works well.
Have a voltage tester handy. It helps ensure the power is off.
Remove Switch Cover Plate
Locate screws on the switch cover. Unscrew them carefully and set aside.
Gently pull the cover plate away from the wall. Avoid forcing it.
Remove Outlet Cover Plate
Find screws on the outlet cover. Unscrew and keep them safe.
Slowly pull the cover plate off. Check for any stuck paint or debris.
Inspect The Switch And Outlet
Look at the wiring behind the covers. Note wire colors and connections.
Take a photo for reference. It helps during reinstallation and rewiring.
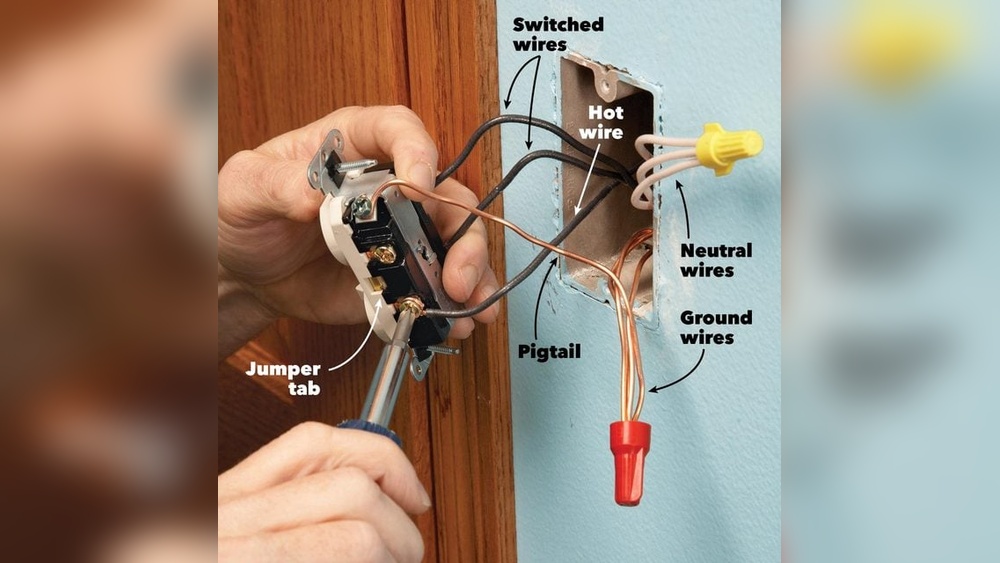
Connect Switch To Outlet Wiring
Connecting the switch to the outlet wiring is an important step. This makes the outlet controllable by the switch. You work with the electrical wires inside the outlet box and the switch box. Safety is key. Always turn off power before starting.
Locate Hot Wire
Find the hot wire in the outlet box first. The hot wire usually has black insulation. It carries the electrical current from the power source. Use a voltage tester to confirm which wire is hot. Mark this wire to avoid confusion later.
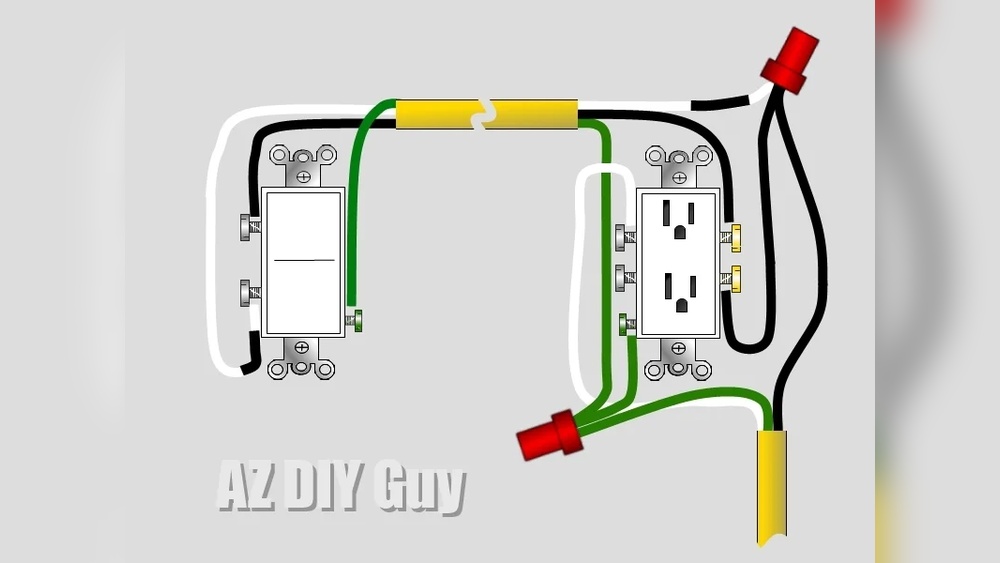
Wire Switch To Outlet
Connect one wire from the switch to the hot wire in the outlet box. Use a wire nut to join them securely. Then, connect the other switch wire to the outlet’s hot terminal. This creates a path for electricity controlled by the switch.
Secure Ground Connections
Find the bare copper or green ground wires in both boxes. Twist them together with a wire nut. Attach a ground wire to the metal switch box if it is metal. Grounding protects you from electric shocks and keeps the system safe.
Test The Wiring Connection
Testing the wiring connection is a key step in making a light switch control an outlet. It ensures safety and proper function. You must check every wire and terminal carefully. A good test helps avoid shorts and electrical issues.
Use a voltage tester or multimeter for accurate results. Double-check connections before turning the power back on. This step saves time and prevents damage to your electrical system.
Turn Off Power At The Circuit Breaker
Start by switching off the power to the circuit. This stops any chance of electric shock. Confirm the power is off using a non-contact voltage tester.
Inspect The Wire Connections
Look at all wires connected to the switch and outlet. Check for loose or damaged wires. Make sure each wire is firmly attached to the correct terminal.
Use A Voltage Tester To Check Wires
Test the wires with a voltage tester. This shows if power flows correctly through the switch to the outlet. No power means a wiring issue or a break in the circuit.
Test The Outlet For Power
Plug in a simple device or use a socket tester. Flip the switch on and off to see if the outlet responds. Proper wiring will power the device only when the switch is on.

Credit: www.youtube.com
Reinstall Covers And Restore Power
After wiring the switch to control the outlet, the final step is to reinstall the covers and restore power. This step ensures safety and completes the installation. Properly securing the covers protects the wires and prevents accidents.
Restoring power allows you to test the switch and outlet connection. It confirms that everything works as intended.
Secure The Switch And Outlet Covers
Place the cover plates back over the switch and outlet. Align the screw holes carefully. Use a screwdriver to tighten the screws. Do not overtighten to avoid cracking the covers.
Turn On The Circuit Breaker
Locate the main electrical panel. Find the breaker controlling the switch and outlet circuit. Flip the breaker to the ON position. This restores electricity to the wiring you modified.
Test The Switch And Outlet Function
Flip the switch on and off. Plug a device into the outlet to check power. The device should turn on and off with the switch. This confirms the wiring is correct and safe.
Troubleshooting Common Issues
Troubleshooting common issues helps fix problems fast. It saves time and avoids frustration. This section covers simple fixes for usual mistakes when making a light switch control an outlet.
Check wires, test switches, and confirm power flow. Understanding basic steps improves safety and success. Follow each step carefully. Do not skip safety precautions.
Checking For Loose Connections
Loose wires cause outlets not to work. Turn off power before touching wires. Tighten all screws on switch and outlet terminals. Make sure wires are properly wrapped around screws. Check wire nuts for secure connections. Wiggling wires gently can find loose ends.
Testing The Light Switch
Sometimes switches fail internally. Use a voltage tester to see if power reaches the switch. Flip the switch on and off while testing. A bad switch will not let electricity pass. Replace the switch if it shows no power flow. Always cut power before replacing parts.
Verifying Outlet Functionality
The outlet itself may be faulty. Plug a lamp or device directly into the outlet. If it does not work, the outlet might be damaged. Test the outlet with a voltage tester. Replace the outlet if it shows no power or irregular voltage. Make sure it matches your circuit type.
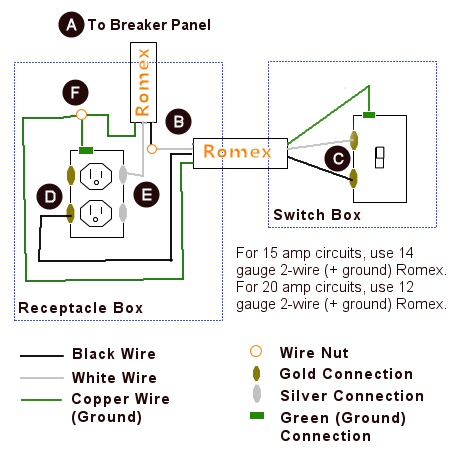
Confirming Proper Wiring
Wiring mistakes prevent the switch from controlling the outlet. Identify the line (power in) and load (power out) wires. The switch must connect between the line and outlet load. Check color codes: black is hot, white is neutral. Ground wires must be connected safely. Use a wiring diagram to compare your setup.
Tips For Safe And Efficient Diy Wiring
Working with electrical wiring can feel tricky. Safety is the top priority. Following some simple tips helps keep your project safe and smooth. Proper wiring also makes your setup last longer and work better.
These tips cover key points to keep you protected. They also help you avoid common mistakes. Clear steps make your DIY wiring easier to follow.
Use The Right Tools And Materials
Choose tools made for electrical work. Insulated screwdrivers and wire strippers reduce shock risk. Use wires and outlets rated for your home’s voltage. Cheap or wrong materials can cause failures or fires.
Turn Off Power Before Starting
Always switch off power at the breaker box. Double-check by testing the outlet or switch with a voltage tester. This step prevents shocks and accidents. Never assume the power is off without testing.
Follow Local Electrical Codes
Each area has rules for wiring projects. These codes keep installations safe and reliable. Check your local codes before starting work. Following them avoids fines and unsafe setups.
Label Wires Clearly
Mark wires with tape or tags as you disconnect them. Clear labels help you connect wires correctly later. Mixing wires can cause malfunctions or damage. Good labeling saves time and reduces errors.
Secure Connections Firmly
Loose connections create sparks and failures. Tighten all wire nuts and terminal screws properly. Use electrical tape if needed for extra security. Firm connections ensure your outlet works well and lasts.
Test Your Work Before Closing
Turn power back on and test the switch and outlet. Use a lamp or device to check if the outlet turns on. Testing early helps spot mistakes quickly. Fix any issues before sealing everything up.
Know When To Call A Professional
Some wiring tasks need expert skills. If unsure, ask an electrician for help. Better safe than sorry with electricity. Professionals ensure your wiring meets safety standards.
Frequently Asked Questions
How Can I Wire A Light Switch To Control An Outlet?
To wire a light switch to control an outlet, turn off power first. Connect the switch’s hot wire to the outlet’s hot terminal. Ensure the neutral wires are joined separately. Always follow local electrical codes for safety.
What Tools Do I Need To Connect A Switch To An Outlet?
You need a voltage tester, wire strippers, screwdriver, electrical tape, and wire nuts. These tools help safely cut, strip, and connect wires when wiring a switch to an outlet.
Is It Safe To Make An Outlet Controlled By A Switch?
Yes, it is safe if done correctly. Turn off power before working. Use proper wiring methods and follow local electrical codes to prevent hazards.
Can I Control Multiple Outlets With One Light Switch?
Yes, you can control multiple outlets with one switch. Wire the outlets in parallel from the switch-controlled hot wire. Ensure the total load does not exceed the circuit rating.
Conclusion
Making a light switch control an outlet is a simple project. It saves energy and adds convenience to your space. Always turn off power before starting any electrical work. Follow safety rules to avoid accidents. Use the right tools and materials for best results.
Double-check your wiring before turning power back on. This small change can make your home more functional. Try it yourself or ask a professional if unsure. Enjoy the ease of controlling your outlet with a switch.