Are your light switches and outlets looking old or not working properly? Changing them yourself can save you money and give your home a fresh, updated look.
You might think it’s complicated or risky, but with the right steps, you can do it safely and easily. In this guide, you’ll discover simple instructions that anyone can follow. Keep reading, and by the end, you’ll feel confident handling your own electrical upgrades—no electrician needed.
Ready to take control and brighten up your space? Let’s get started!

Credit: www.youtube.com
Tools And Materials Needed
Changing light switches and outlets requires the right tools and materials. Having these ready makes the job easier and safer. This section covers what you need before starting the work.
Essential Tools
Start with a screwdriver set, including flathead and Phillips heads. A voltage tester helps check if wires are live. Wire strippers remove insulation without damaging wires. Needle-nose pliers help bend and twist wires. A utility knife can cut electrical tape or insulation. Keep a flashlight handy for dark spaces.
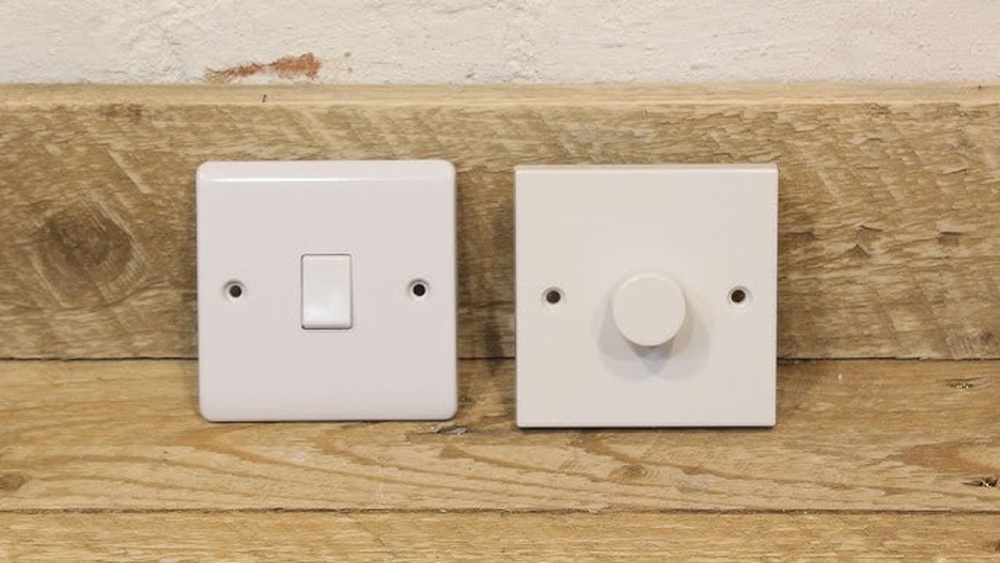
Types Of Switches And Outlets
Know the type of switch or outlet you need to replace. Single-pole switches control one light or device. Three-way switches control lights from two locations. Standard outlets have two slots and a ground hole. GFCI outlets include buttons to test and reset. Choose parts that match your home’s wiring and style.
Safety Gear
Safety gear protects you while working with electricity. Wear insulated gloves to avoid shocks. Safety glasses protect your eyes from dust and sparks. Use shoes with rubber soles to stay grounded. Keep a first aid kit nearby for minor injuries. Always turn off power at the circuit breaker before starting.
Credit: www.oneprojectcloser.com
Preparing For The Job
Preparing for the job is the first step to safely change light switches and outlets. Proper preparation helps avoid accidents and makes the work easier. Take time to gather tools and follow safety rules carefully.
Turning Off Power
Start by turning off the power at the circuit breaker. This stops electricity from flowing to the switch or outlet. Find the right breaker that controls the area you will work on. Switch it off and keep it off during the job.
Testing For Live Wires
Use a voltage tester to check wires for electricity. Touch the tester to each wire in the box. If the tester lights up or beeps, the wire is live. Double-check the breaker is off if wires still have power. Never skip this step.
Removing Old Switches And Outlets
Unscrew the faceplate covering the switch or outlet. Remove screws that hold the device in place. Gently pull the switch or outlet out of the wall box. Take note of how wires connect to the device before disconnecting them.
Wiring Basics
Understanding wiring basics is key for changing light switches and outlets safely. Knowing the types of wires and their roles helps you avoid mistakes. It also makes the process faster and less stressful.
Before starting, recognize the wires inside your switch or outlet box. Each wire has a job and color code. Learning these basics ensures a correct and secure connection.
Identifying Wires
Most homes use three types of wires: hot, neutral, and ground. The hot wire carries electricity to the switch or outlet. It is usually black or red. The neutral wire returns electricity to the panel and is white. The ground wire protects against shocks and is green or bare copper. Use a voltage tester to confirm the hot wire before touching anything.
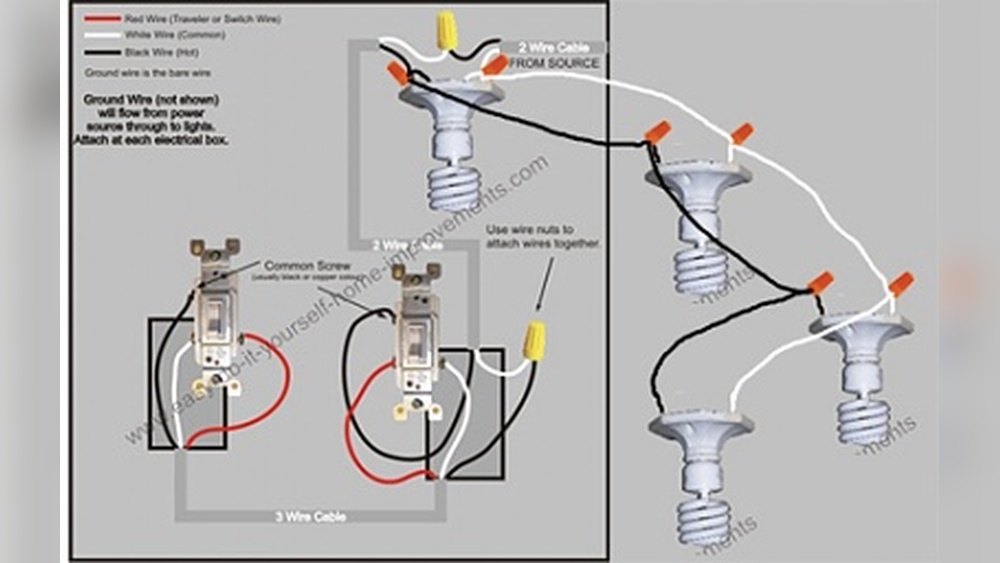
Common Wiring Configurations
Single-pole wiring is the simplest setup. It controls one light or outlet from one switch. You will see one hot wire and one neutral wire connected. Three-way wiring controls a light from two switches. It has more wires, including travelers that carry current between switches. Knowing your wiring type helps in choosing the right replacement switch or outlet.
Wire Stripping Tips
Strip wires carefully to avoid damage. Use a wire stripper tool to remove about half an inch of insulation. Do not nick or cut the wire strands. Twisting the wire strands before connecting improves the contact. Always strip wires evenly for a neat and safe connection.
Installing New Switches
Installing new switches is a simple task anyone can do with care. It improves your home’s look and function. Follow clear steps to do it right and stay safe.
Connecting Wires To Switch
First, turn off the power at the breaker. Use a voltage tester to check no electricity flows. Identify the wires: usually black (hot), white (neutral), and green or bare (ground). Attach the black wire to the brass screw on the switch. Connect the white wire to the silver screw if your switch needs it. Attach the ground wire to the green screw. Tighten all screws firmly. Make sure no wires touch each other or metal parts.
Securing The Switch
Push the wires gently into the electrical box. Position the switch so the screws face up. Use the mounting screws to fix the switch in place. Do not over-tighten to avoid breaking the switch. Check the switch sits straight and flush with the wall. Install the switch cover plate securely over the switch.
Testing The Installation
Turn the breaker back on. Flip the switch to check if the light or device works. Use a voltage tester if the switch does not work. Turn off the power before making any fixes. Make sure the switch moves smoothly without sparks or noises. Your new switch is ready to use safely.
Installing New Outlets
Installing new outlets is a common task when updating your home’s electrical system. It helps add convenience and improve safety. This guide breaks down the process into easy steps. Follow each one carefully to ensure a proper installation.
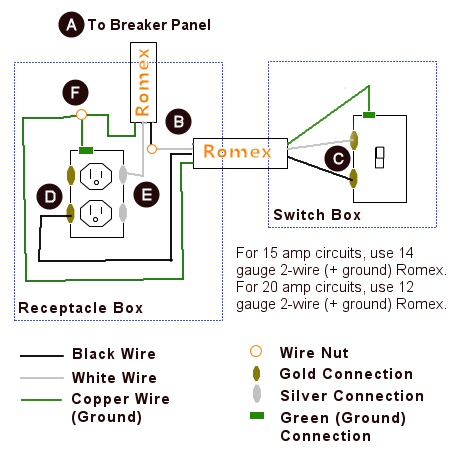
Wiring The Outlet
Start by turning off power at the circuit breaker. Test the wires with a voltage tester to confirm no electricity flows. Connect the black (hot) wire to the brass screw. Attach the white (neutral) wire to the silver screw. Connect the green or bare copper (ground) wire to the green screw. Tighten all screws firmly to secure the wires in place.
Mounting And Securing
Gently push the wired outlet back into the electrical box. Align it so the screw holes match the box. Use screws to fasten the outlet securely. Make sure it sits flush with the wall. Avoid over-tightening, which can damage the outlet or box.
Safety Checks
Restore power at the breaker. Use a tester to check if the outlet works correctly. Confirm the ground connection is solid. Test with a small appliance or device. If everything functions well, attach the outlet cover plate. This step protects wires and prevents accidental contact.
Troubleshooting Tips
Troubleshooting light switches and outlets can save time and effort. Knowing common problems helps fix issues quickly. Some fixes are simple and do not need special tools. Others may need a professional’s skills.
Common Issues
Switch does not work. Check if power is off before touching wires.
Outlet feels warm. This may mean a loose wire or too much load.
Switch makes a buzzing sound. This can show a bad connection or wrong switch type.
Outlet has no power. Test with a different device or use a voltage tester.
Switch or outlet is loose. Tighten screws to secure it firmly.
When To Call A Professional
Wires look damaged or burnt. Do not try to fix these yourself.
Circuit breaker trips often after replacing. This signals a wiring or load issue.
Uncertainty about wiring connections. Mistakes can cause shocks or fires.
Outlets or switches are part of older wiring systems. Modern codes may require updates.
No power after checking all steps. A professional can diagnose hidden problems safely.
Maintenance And Upgrades
Maintaining and upgrading your light switches and outlets keeps your home safe and efficient. Regular care prevents electrical issues and improves functionality. Upgrades can bring convenience and modern features to your space.
Regular Inspections
Check switches and outlets often for signs of damage. Look for cracks, sparks, or unusual sounds. Loose switches or outlets can cause electrical hazards. Tighten any loose screws and replace worn parts quickly. Regular inspections help avoid costly repairs later.
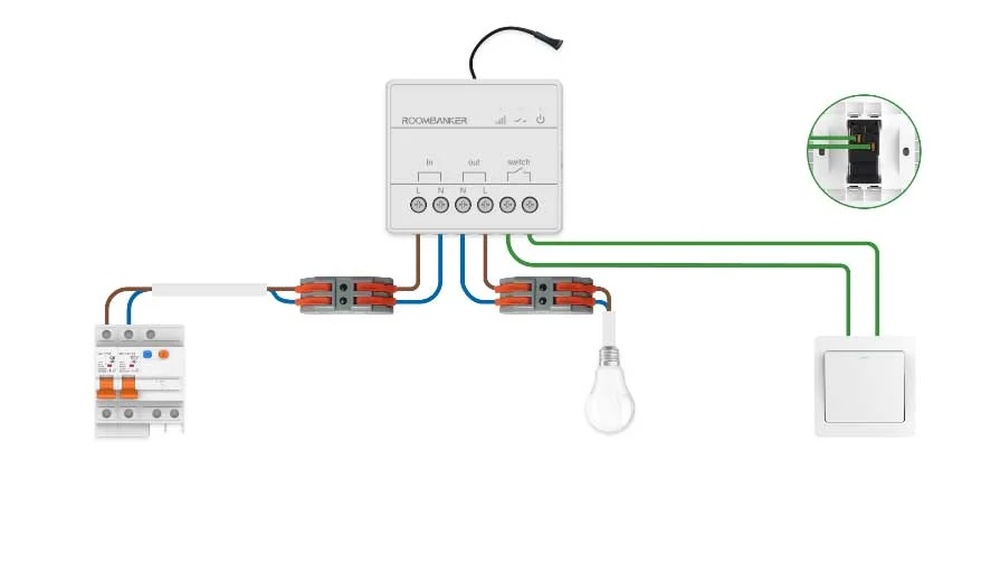
Smart Switches And Outlets
Smart switches and outlets add control and energy savings. Use your phone or voice to turn lights on and off. Set schedules to save electricity automatically. Many smart devices also improve home security. Upgrading to smart technology is easy and useful.

Credit: bratcherelectric.com
Frequently Asked Questions
How Do I Safely Turn Off Power Before Changing Switches?
Turn off power at the circuit breaker to avoid shocks. Use a voltage tester to confirm no electricity flows. Always double-check before handling wires to ensure safety.
What Tools Do I Need To Change Outlets And Switches?
You need a screwdriver, voltage tester, wire stripper, and needle-nose pliers. These tools help you remove old devices and connect new ones safely and efficiently.
Can I Replace Switches Without An Electrician?
Yes, if you follow safety steps and instructions carefully. Turn off power, use proper tools, and double-check connections. If unsure, consult a professional to avoid hazards.
How Do I Identify The Correct Wiring For Switches?
Look for black (hot), white (neutral), and green or bare (ground) wires. Use a voltage tester to verify. Correct wiring ensures safe and functional switch operation.
Conclusion
Changing light switches and outlets is a simple task anyone can do. Always turn off the power before starting work. Use the right tools and follow safety steps closely. Take your time to connect wires correctly. Testing the new switch or outlet ensures it works well.
This small project can improve your home’s look and function. Stay safe, and enjoy your upgraded electrical fixtures.