Are you ready to take control of your lighting setup? Connecting a light bar to a switch might seem tricky at first, but with the right steps, you can do it yourself quickly and safely.
Imagine turning your light bar on and off with ease, whenever you want, without reaching for plugs or complicated controls. In this guide, you’ll discover simple, clear instructions that anyone can follow—no technical background needed. Keep reading, and you’ll have your light bar working perfectly in no time.
Choosing The Right Light Bar
Choosing the right light bar is key to a successful connection to your switch. It affects the brightness, power use, and how it fits your space. Knowing the basics helps you pick the best option for your needs. Here is what to consider.
Types Of Light Bars
Light bars come in different styles. Some use LED bulbs, which save energy and last long. Others may use halogen bulbs that give a warm light but use more power. Choose a type that fits your lighting needs and budget.
Power Requirements
Each light bar needs a certain amount of power to work. Check the voltage and current ratings before buying. Make sure your switch and power source can handle these needs. This prevents damage and ensures safe use.
Size And Mounting Options
Light bars vary in length and width. Pick a size that fits your space without blocking views or controls. Also, check the mounting style. Some light bars have brackets for easy installation. Others may need extra tools or parts.
Credit: www.blackoakled.com
Selecting A Compatible Switch
Selecting a compatible switch is important for connecting a light bar safely and effectively. The right switch controls power flow and ensures your light bar works well. Choosing the wrong switch can cause damage or poor performance. Focus on key factors to pick the best switch for your setup.
Switch Types
Switches come in different types. Toggle switches are common and easy to use. Push-button switches offer quick on/off control. Rocker switches provide a firm feel and clear position. Choose a type that fits your needs and installation space.
Voltage And Current Ratings
Check the voltage rating of the switch. It must match your light bar’s power supply. The current rating shows how much electricity the switch can handle safely. Select a switch with ratings higher than your light bar’s requirements. This prevents overheating and failure.
Durability And Weatherproofing
Many light bars are used outdoors. The switch must resist water, dust, and heat. Look for switches with weatherproof seals or covers. Durable materials like metal or tough plastic last longer. A strong switch keeps your light bar working in any weather.
Gathering Tools And Materials
Gathering the right tools and materials is the first step to connect a light bar to a switch. This step ensures you have everything for a smooth and safe installation. Preparing well saves time and prevents mistakes during the process.
Focus on the essential items. They help make the connection strong and reliable. Knowing what to gather keeps you organized and ready.
Wiring And Connectors
Good wiring is key for a solid connection. Use wires that match your light bar’s power needs. Connectors link wires securely. Choose connectors that fit your wire size and type. Proper connectors avoid loose ends and shorts.
Tools Needed
Basic tools make the job easier. You will need wire cutters and strippers to handle wires. A screwdriver helps mount the switch and light bar. A multimeter tests the electrical flow. These tools ensure correct and safe wiring.
Safety Gear
Safety is important during electrical work. Wear gloves to protect your hands from sharp edges. Use safety glasses to guard your eyes. Work in a dry area to avoid electric shock. Safety gear keeps you safe while working.

Credit: www.silveradosierra.com
Wiring The Light Bar To The Switch
Wiring the light bar to the switch is a key step in your installation process. It ensures you can control the light bar easily. This section breaks down the wiring process. Follow each step carefully for safety and function.
Identifying Wires
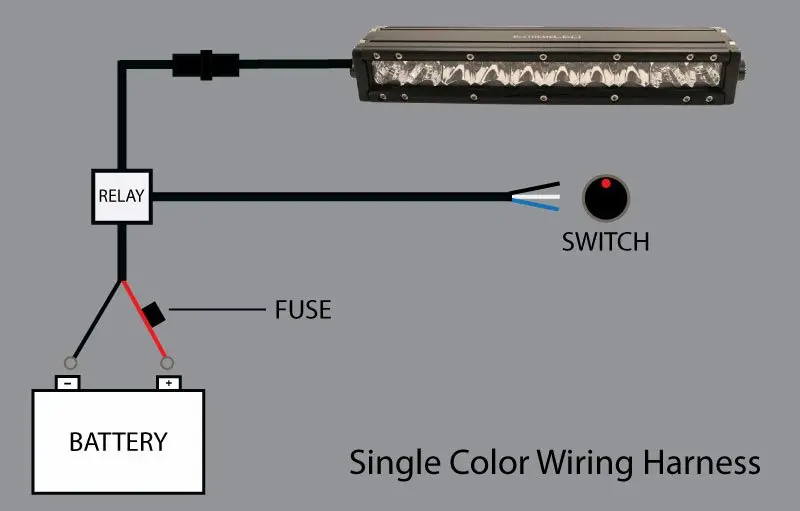
First, find the wires on your light bar and switch. The light bar usually has three wires: power, ground, and sometimes a signal wire. The power wire is often red. The ground wire is typically black. The switch will have two or three terminals to connect wires. Check the manual for wire colors and functions before starting.
Connecting Power And Ground
Connect the red power wire from the light bar to the positive terminal on the switch. Use a fuse between the battery and switch to protect the circuit. Attach the black ground wire to a solid metal part of your vehicle or the battery’s negative terminal. Secure all connections tightly to avoid loose wires. Proper grounding prevents electrical problems and keeps your system safe.
Installing The Switch
Choose a spot on your dashboard or control panel for the switch. Drill a hole if needed, matching the switch size. Insert the switch and connect the power wire and ground wire to the switch terminals. Use wire connectors or solder wires for a strong connection. Test the switch to ensure the light bar turns on and off smoothly.
Testing The Connection
Testing the connection ensures your light bar works correctly with the switch. This step checks power flow and confirms the wiring is right. A smooth test means your setup is complete and safe.
Powering On
First, turn on the power source. Watch the light bar carefully. It should light up immediately. If it stays off, check the switch position. Make sure the switch is set to “on.” A quick light signal shows the connection works.
Troubleshooting Common Issues
If the light bar does not turn on, start by checking all connections. Loose wires often cause problems. Tighten any loose screws or plugs. Confirm the switch is working by testing it with a multimeter. Replace faulty switches or wires. Also, check the fuse or circuit breaker. These might stop power flow. Test again after each fix to find the problem fast.
Credit: mictuning.com
Frequently Asked Questions
How Do I Wire A Light Bar To A Switch Safely?
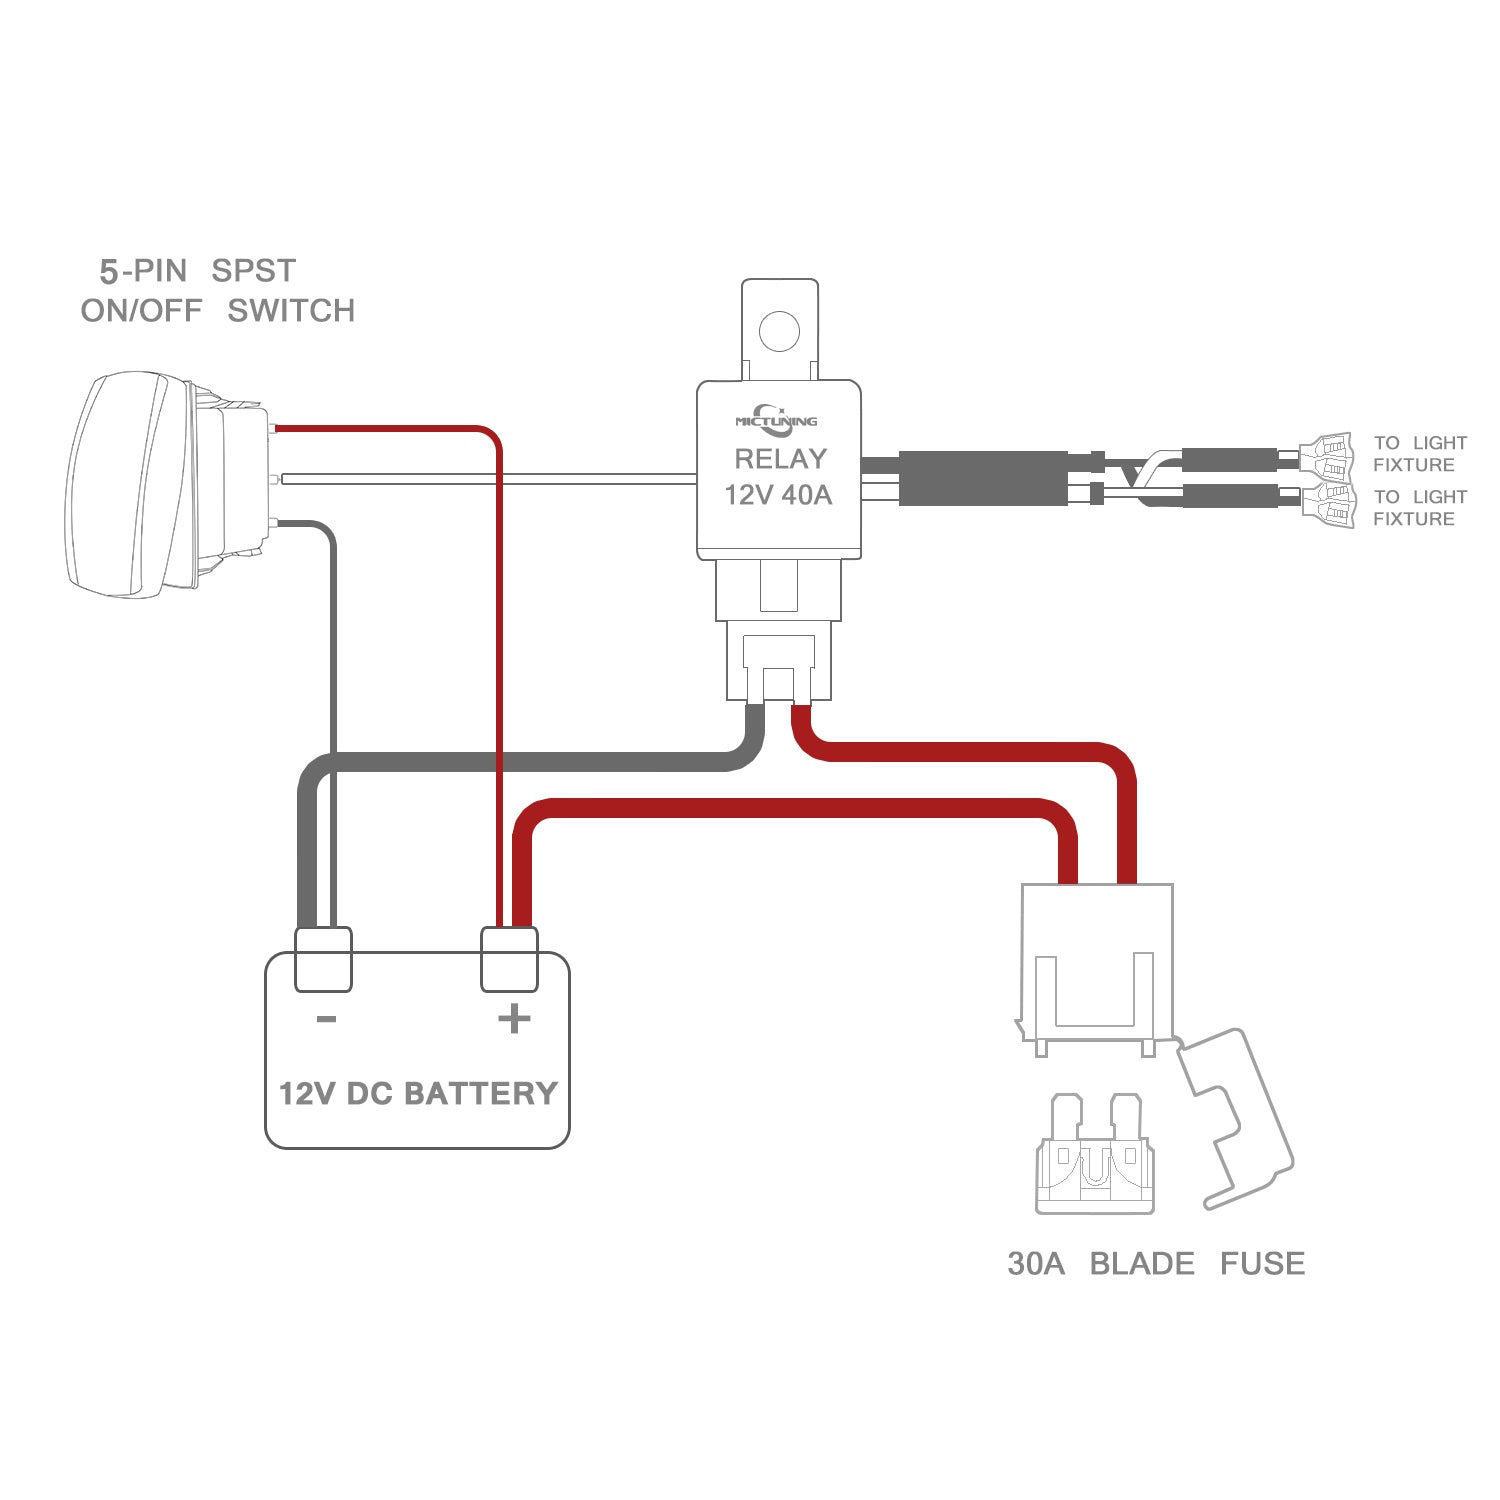
Use a relay and fuse for safety. Connect the light bar’s positive wire to the relay’s output. Attach the relay’s input to the battery with a fuse. Connect the switch to control the relay coil. This setup prevents electrical overloads and ensures safe operation.
What Tools Are Needed To Connect A Light Bar To A Switch?
You need wire cutters, crimpers, a screwdriver, electrical tape, and a multimeter. Also, get connectors, a relay, and a fuse. These tools help you make secure and reliable electrical connections for your light bar installation.
Can I Connect A Light Bar Directly To A Switch?
It’s not recommended to connect directly. Direct wiring risks overloading the switch and wiring. Always use a relay to handle the current safely. This protects your switch and prevents potential electrical failures or hazards.
Where Should I Place The Switch For A Light Bar?
Place the switch within easy reach of the driver. Common locations include the dashboard or center console. Ensure it is mounted securely and does not interfere with vehicle controls for safe and convenient use.
Conclusion
Connecting a light bar to a switch is simple with the right steps. Always start by turning off the power to stay safe. Use the proper wires and tools to ensure a strong connection. Double-check each link to avoid problems later.
A working switch gives you control over your light bar easily. Follow these tips to complete your project with confidence and ease. Enjoy the convenience of your new setup every day.