Have you ever wanted to control a single light from two different places? Imagine turning your hallway or staircase light on or off without walking back and forth.
Connecting a light with two switches might sound tricky, but it’s easier than you think. You’ll discover simple, clear steps that anyone can follow to set up this handy lighting system. Keep reading, and you’ll be able to make your home more convenient and smarter in no time.

Credit: www.realpars.com
Tools And Materials Needed
Connecting a light with two switches requires specific tools and materials. Having the right items helps make the job safe and smooth. This section lists all essentials needed for this wiring task.
Basic Electrical Tools
You need tools like a screwdriver, wire stripper, and pliers. A voltage tester is important to check power before work. A drill may be needed to make holes for wires.
Electrical Materials
Get electrical cables, usually 14/3 wire for two-switch setups. Use wire nuts to join wires safely. Electrical tape secures connections and insulates wires.
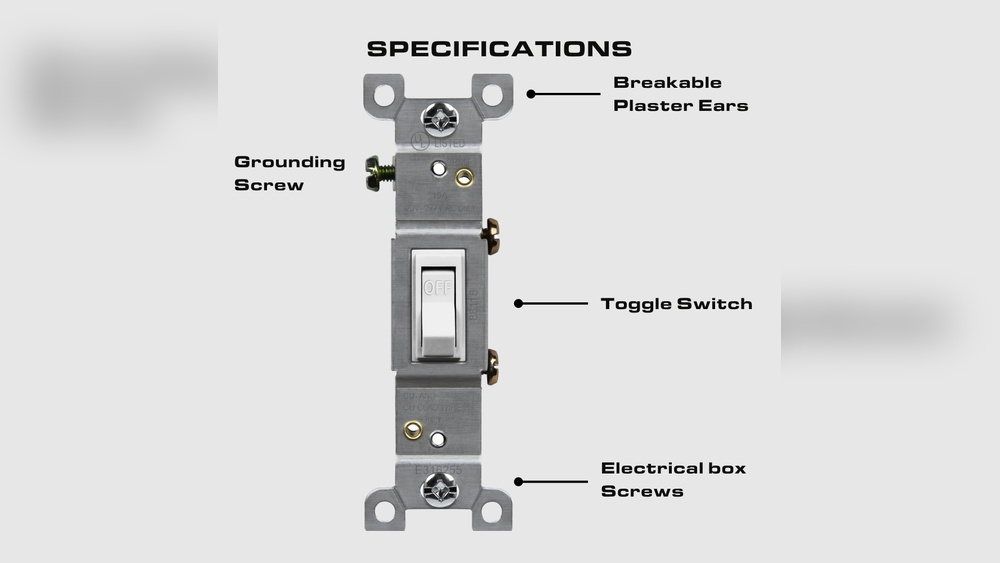
Switches And Light Fixtures
Two single-pole switches are necessary for controlling the light. Choose a light fixture that fits your room and needs. Switch boxes hold the switches and keep wires organized.
Safety Equipment
Wear insulated gloves to protect against electric shock. Safety goggles shield your eyes from dust and debris. Use a sturdy ladder if the switches or light are high.
Safety Precautions
Working with electrical wiring can be risky. Safety must be your top priority when connecting a light with two switches. Taking the right precautions protects you from electric shock and other hazards. Follow these simple safety steps to keep the job safe and smooth.
Turn Off The Power
Always switch off the circuit breaker before starting any electrical work. This cuts the electricity supply and prevents accidents. Use a tester to make sure no current flows through the wires.
Use Proper Tools And Equipment
Choose insulated tools designed for electrical work. Avoid using damaged or worn-out tools. Wear rubber-soled shoes to reduce the risk of electric shock.
Check Wiring And Connections
Inspect wires for damage or wear before connecting them. Make sure all connections are tight and secure. Loose wires can cause short circuits or fires.
Follow Local Electrical Codes
Abide by local electrical rules and standards. Proper wiring methods keep your home safe and meet legal requirements. Consult a professional if you are unsure about the codes.
Wear Safety Gear
Use safety glasses to protect your eyes from sparks or debris. Gloves provide extra protection from sharp edges and electric shock. Dress in non-flammable clothing for extra safety.
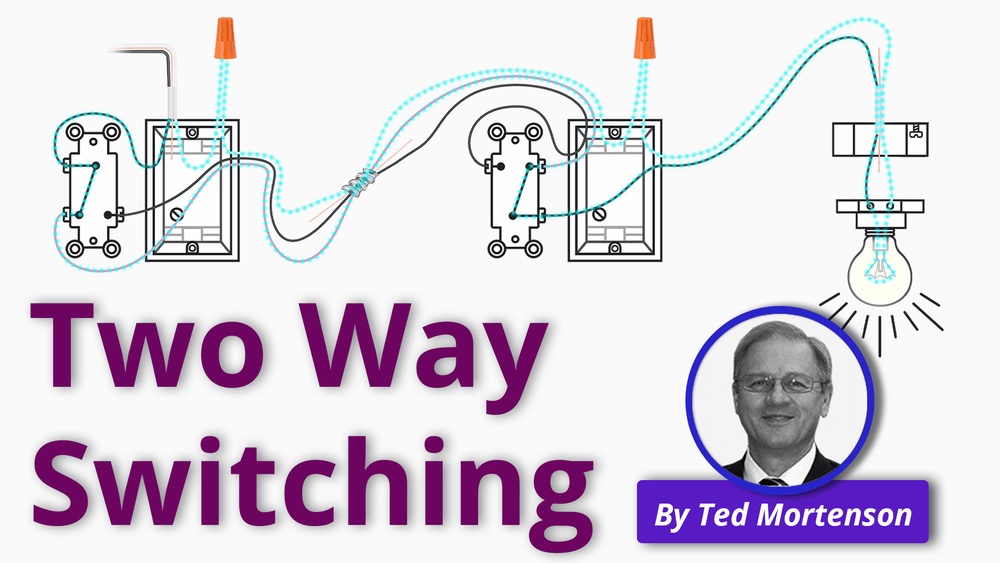
How Two-switch Lighting Works
Two-switch lighting lets you control one light from two different places. This setup is common in long hallways, staircases, or large rooms. It adds convenience and safety by allowing you to turn the light on or off from either switch.
The system uses special wiring to connect the switches and the light. Each switch can change the state of the light without affecting the other switch’s position. This way, the light turns on or off regardless of which switch you use last.
Basic Components Of Two-switch Lighting
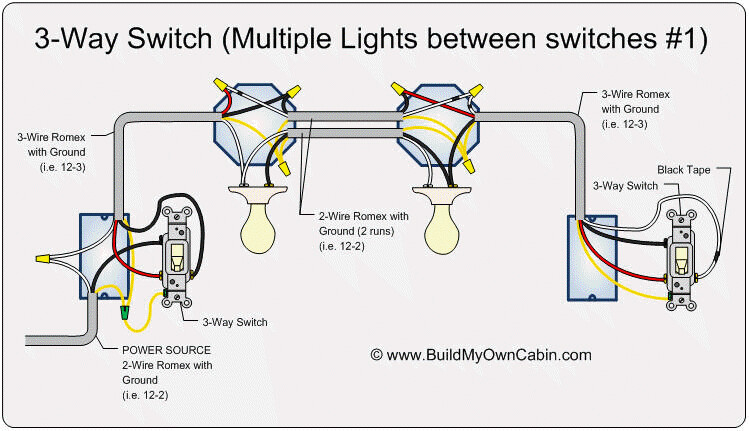
Two switches control one light fixture. These switches are called “three-way switches.” Unlike regular switches, three-way switches have three terminals. Two terminals connect the switches to each other. The third terminal connects to the light or power source.
How The Wiring Works
Wires run between the two switches and the light. Two traveler wires link the switches. They carry current back and forth. A common wire connects the power source or the light. This wire completes the circuit. Switching either switch changes the current path.
How The Switches Control The Light
Each switch changes the path of electricity. When the path is complete, the light turns on. When the path breaks, the light turns off. Flipping either switch reverses the connection. This changes the light’s state from on to off or vice versa.
Identifying Your Wiring Setup
Identifying your wiring setup is the first step to connect a light with two switches. Understanding the wiring helps ensure safety and proper function. It also makes the installation process smoother and faster.
Look at your existing switches and wires carefully. Different setups use different wire colors and placements. Knowing this helps you avoid mistakes and saves time during wiring.
Check The Type Of Switches
Start by checking what type of switches you have. Most two-switch light setups use “three-way” switches. These switches have three terminals plus a ground screw. Confirm this before proceeding.
Identify The Wires
Turn off the power before touching any wires. Look for black, white, and red wires. Black wires usually carry power. Red wires often act as travelers between switches. White wires are typically neutral but can vary.
Locate The Power Source
Find where the power comes in. It may enter at one switch or at the light fixture. This affects how you connect the wires. Tracing the power source is key to a correct setup.
Use A Voltage Tester
A voltage tester shows which wires are live. Test each wire carefully. This tool prevents accidents and helps identify wiring roles. Never guess without testing.
Step 1: Turn Off Power
Turning off the power is the first and most important step. It keeps you safe from electric shock. Before starting to connect a light with two switches, make sure no electricity flows.
Even a small electric shock can cause serious injury. Never skip this safety step. Safety always comes first in any electrical work.
Locate The Circuit Breaker
Find the main electrical panel in your home. It usually holds the circuit breakers. These switches control the power to different parts of your house.
Turn Off The Correct Breaker
Identify the breaker that controls the light and switches you want to work on. Flip the switch to the off position. This stops the flow of electricity.
Verify Power Is Off
Use a voltage tester or a simple light bulb to check. Test the wires or switches to confirm no current flows. This step ensures your safety before touching wires.
Use Protective Gear
Wear insulated gloves and safety glasses. This gear adds a layer of protection. Treat every wire as if it is live until confirmed safe.
Credit: www.reddit.com
Step 2: Prepare The Switch Boxes
Preparing the switch boxes is a key step in connecting a light with two switches. This step ensures safety and proper wiring. It makes the installation process smoother and helps avoid mistakes.
Start by turning off the power at the circuit breaker. This prevents electric shock during work. Next, remove the existing switches and clear out the boxes. Check that the boxes are deep enough to hold the new wiring and switches.
Turn Off The Power
Locate the correct breaker in your electrical panel. Switch it off to cut power to the switches. Use a voltage tester to confirm no electricity flows. Safety first. Never skip this step.
Remove Existing Switches
Unscrew the switch cover plates carefully. Pull out the switches from the boxes. Note how the wires connect to each switch. Take a picture or label wires to avoid confusion later.
Clear And Inspect The Switch Boxes
Remove any debris or old wiring inside the boxes. Check for damage or corrosion. Make sure there is enough space for new wiring. Replace the box if it looks weak or cracked.
Prepare Wiring For New Connections
Strip about half an inch of insulation from each wire end. Straighten the wires for easy connection. Group wires by function: power, traveler, and ground. Organize wires neatly inside the box.
Step 3: Connect The First Switch
Connecting the first switch is an important part of wiring a light with two switches. This step sets the foundation for controlling the light from two locations. Careful attention to wiring will ensure the switches work correctly.
Before starting, turn off the power at the circuit breaker. Safety is key. Use a voltage tester to confirm no electricity flows to the wires.
Identify The Wires
Locate the wires in the switch box. You will see a hot wire, two traveler wires, and a ground wire. The hot wire carries electricity from the power source. Traveler wires connect the two switches. The ground wire provides safety.
Connect The Ground Wire
Attach the ground wire to the green screw on the switch. This ensures safety and prevents shocks. Tighten the screw firmly to secure the wire.
Attach The Hot Wire
Connect the hot wire to the common terminal on the switch. This terminal is usually marked differently or colored black. This connection powers the switch.
Connect The Traveler Wires
Attach the two traveler wires to the remaining terminals on the switch. These wires allow the switches to communicate. Make sure the connections are tight to avoid loose wiring.
Secure The Switch
Push the wires back gently into the box. Screw the switch into place. Ensure it sits flush with the wall. This keeps the installation neat and safe.
Step 4: Connect The Second Switch
Step 4 is important for controlling the light from two places. This step connects the second switch, allowing you to turn the light on or off from either switch. Follow the instructions carefully for safety and proper function.
Identify The Wires On The Second Switch
Look at the wires attached to the second switch. Usually, there are three wires: two traveler wires and one common wire. The traveler wires connect the first switch to the second. The common wire connects to the light or power source.
Connect The Traveler Wires
Take the two traveler wires from the first switch and connect them to the traveler terminals on the second switch. These terminals are often marked or colored. Make sure the connections are tight and secure.
Attach The Common Wire
Connect the common wire to the common terminal on the second switch. This wire is key for controlling the light. Check that this wire is firmly attached to avoid loose connections.
Secure The Switch And Test
After all wires are connected, carefully place the switch back into the box. Screw it in place. Turn the power back on and test the switches. Both switches should control the light independently.
Step 5: Connect The Light Fixture
Step 5 is where the light fixture connects to the wiring. This step makes your setup complete and ready to work. Proper connection ensures the light responds to both switches.
Take your time and follow each part carefully. Safety is important. Turn off the power before touching wires.
Identify The Wires From The Switches
Look for the traveler wires coming from the two switches. These wires carry the current to the light fixture. Usually, they are red and black, but colors can vary.
Make sure you know which wire is which before connecting. Label them if needed for easy identification.
Connect The Traveler Wires To The Light Fixture
Attach the traveler wires to the corresponding terminals on the light fixture. Use wire nuts to secure the connection. Check that the wires are tight and will not come loose.
Loose connections can cause flickering or failure to turn on. Twist the wires well before placing the wire nuts.
Connect The Neutral Wire
Find the neutral wire, usually white. Connect it to the light fixture’s neutral terminal. This completes the circuit for the electrical flow.
Ensure this connection is solid to avoid electrical issues. The neutral wire returns current safely back to the panel.
Secure The Ground Wire
Connect the ground wire to the fixture’s grounding screw. The ground wire is typically green or bare copper. It protects you from electrical shocks.
Make sure the ground wire is firmly attached. This step is important for safety and code compliance.
Attach The Light Fixture To The Ceiling
Once all wires are connected, mount the light fixture to the ceiling box. Use screws to hold it tightly. Do not pinch any wires.
Check the fixture is stable and secure. Turn on the power and test the switches to confirm the light works properly.
Step 6: Secure And Test The Setup
Step 6 is the final part of wiring a light with two switches. It is important to secure all connections safely. Testing the setup ensures the light works correctly from both switches.
Safety and function go hand in hand here. Make sure wires are tight and no bare copper shows. Loose wires can cause sparks or failure.
Secure All Wire Connections
Use wire nuts to cover all wire ends. Twist them firmly to hold wires together. Wrap electrical tape around wire nuts for extra safety. Check that no wires are loose inside the boxes.
Attach Switches And Cover Plates
Carefully push the wires back into the switch boxes. Screw the switches into place. Attach the cover plates to protect the switches and wires. This prevents accidental contact and keeps the setup neat.
Test The Light From Each Switch
Turn on power at the breaker. Flip each switch one at a time. The light should turn on and off smoothly from both switches. If the light does not work, recheck your wiring connections.
Troubleshooting Common Issues
Troubleshooting common issues is key when connecting a light with two switches. Problems can arise even with simple setups. Knowing how to fix them saves time and stress.
Electrical wiring can confuse many. Small mistakes cause switches not to work properly. The following tips cover frequent problems and easy solutions.
Checking For Loose Wires
Loose wires often cause lights to flicker or not turn on. Turn off the power before checking. Tighten all wire connections at both switches and the light fixture. Secure wires with wire nuts for safety.
Verifying Switch Types
Using the wrong switch type can break the circuit. Ensure both switches are three-way switches. Single-pole switches will not work in this setup. Check the switch labels before installation.
Testing The Light Bulb
A burnt-out bulb can seem like a wiring problem. Replace the bulb with a new one to test. Use the correct wattage for the fixture. This step rules out simple bulb issues.
Confirming Proper Wire Connections
Crossed wires cause the switches to fail. Follow the wiring diagram carefully. The traveler wires must connect between the two switches. The common terminal connects to the power source or light.
Using A Voltage Tester
A voltage tester helps identify live wires. Test all wires at switches and fixture. No power means a break in the circuit. This tool ensures safe and accurate troubleshooting.
Tips For Maintenance And Upgrades
Maintaining a light connected to two switches keeps your home safe and efficient. Regular checks help spot problems early. Upgrades improve performance and save energy.
Simple care routines extend the life of your switches and wiring. Small changes can make your lighting system more reliable and easier to use.
Checking Switches For Wear And Tear
Look for loose switches or flickering lights. Tighten any loose screws on switch plates. Replace switches that feel hot or make noise. These signs show it is time for repair.
Cleaning Switches And Fixtures
Dust and dirt can affect switch function. Use a dry cloth to clean switch covers gently. Avoid water or cleaners that may cause damage. Clean light fixtures to keep brightness steady.
Upgrading To Smart Switches
Smart switches add convenience and control. They let you turn lights on or off with your phone. Some models work with voice assistants. Upgrading is simple and uses existing wiring.
Replacing Old Wiring
Old wires can cause flickering or power loss. Check wiring for cracks or fraying. Hire a professional for safe replacement. New wiring supports modern switches and lights better.
Credit: community.inovelli.com
Frequently Asked Questions
What Is A Two-switch Light Circuit?
A two-switch light circuit allows control of one light from two locations. It uses two three-way switches wired together to toggle the light on or off independently.
How Do You Wire A Light With Two Switches?
Connect the power source to the common terminal of the first switch. Link traveler wires between switches. Attach the light to the second switch’s common terminal and neutral line.
Can I Install Two Switches For One Light Myself?
Yes, if you understand electrical wiring and safety precautions. Always turn off power before starting. Follow wiring diagrams and local codes. Otherwise, consult a licensed electrician.
Why Use Two Switches For One Light?
Two switches provide convenience by allowing control from different locations. They improve accessibility in large rooms, hallways, or staircases. This setup enhances user comfort and energy efficiency.
Conclusion
Connecting a light with two switches is easier than it seems. Follow the steps carefully to ensure safety and success. Double-check your wiring before turning on the power. This setup allows you to control one light from two places. It saves time and adds convenience to your home.
Practice patience and stay safe throughout the process. With some effort, you can do this yourself. Remember, clear instructions make the job simpler and more manageable. Keep learning and improving your skills with small projects like this.