Are you tired of struggling to install cabinet hardware perfectly every time? Imagine getting precise, professional-looking results without the frustration and guesswork.
Using a jig for your cabinet hardware can be a total game-changer. It helps you save time, avoid mistakes, and make your cabinets look amazing. You’ll discover simple steps to use a jig like a pro and transform your DIY projects with ease.
Keep reading, and you’ll never worry about misaligned knobs or handles again!
Credit: www.homedepot.com
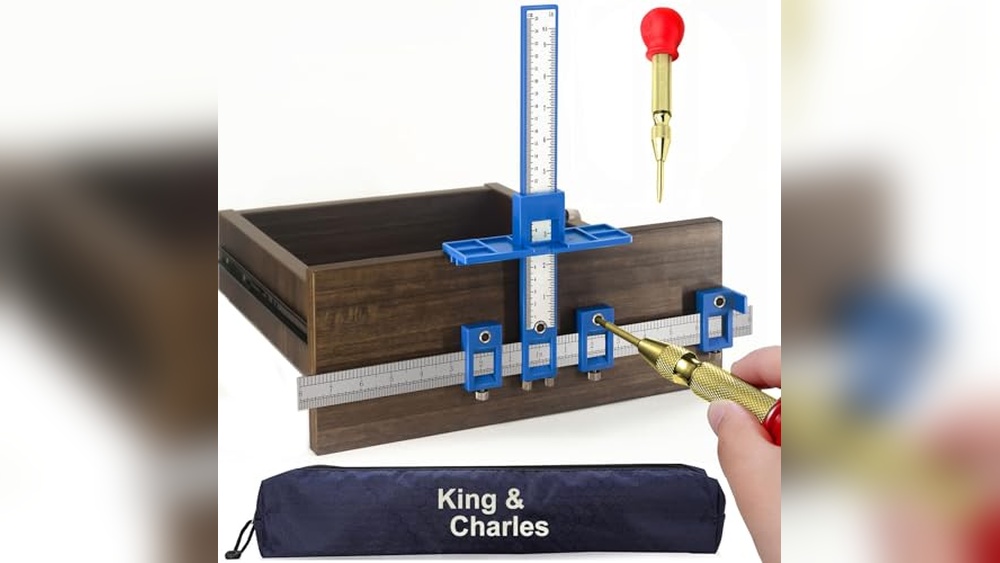
Choosing The Right Jig
Choosing the right jig is important for cabinet hardware installation. The correct jig helps place handles and knobs evenly. It saves time and prevents mistakes. Understanding different jigs and their features makes your work easier. Focus on the jig type, material, and hardware compatibility for best results.
Types Of Cabinet Hardware Jigs
There are several types of jigs for cabinet hardware. Some jigs have fixed hole spacing for knobs or handles. Others are adjustable to fit different sizes and shapes. Template jigs guide drilling holes quickly and accurately. Multi-hole jigs allow drilling multiple holes at once. Choose a jig type based on your project needs.
Material And Durability Factors
Jigs come in plastic, metal, or wood. Plastic jigs are lightweight and affordable but less durable. Metal jigs are strong and last longer, ideal for frequent use. Wooden jigs offer a classic feel but may wear down over time. Pick a jig that holds up to your work style and frequency.
Compatibility With Hardware Styles
Cabinet hardware varies in size and hole patterns. Some jigs fit only standard handles or knobs. Others adjust to different hardware styles and sizes. Check if the jig matches your hardware before buying. A compatible jig ensures accurate placement and smooth installation.
Preparing Your Workspace
Preparing your workspace is the first step to using a jig for cabinet hardware. A clean and organized area helps you work faster and with fewer mistakes. It also keeps your tools and materials easy to reach. Setting up well makes the whole process smoother and more enjoyable.
Gathering Essential Tools
Collect all tools before starting. You will need a jig, drill, measuring tape, pencil, and screws. Having everything ready saves time. It stops you from searching for items mid-task. Double-check your tools for damage or wear. Good tools make your work easier and safer.
Setting Up A Stable Work Surface
Use a flat and steady table or workbench. A stable surface prevents your workpiece from moving. Movement can cause errors in drilling holes. Place clamps to hold the cabinet door or drawer firmly. Avoid working on uneven or slippery surfaces. This keeps your hardware aligned perfectly.
Marking Measurement Points
Measure carefully before drilling. Use a tape measure to find exact spots for hardware. Mark these points lightly with a pencil. Check measurements twice to avoid mistakes. Align the jig with these marks for accuracy. Clear marks help drill holes in the right place every time.
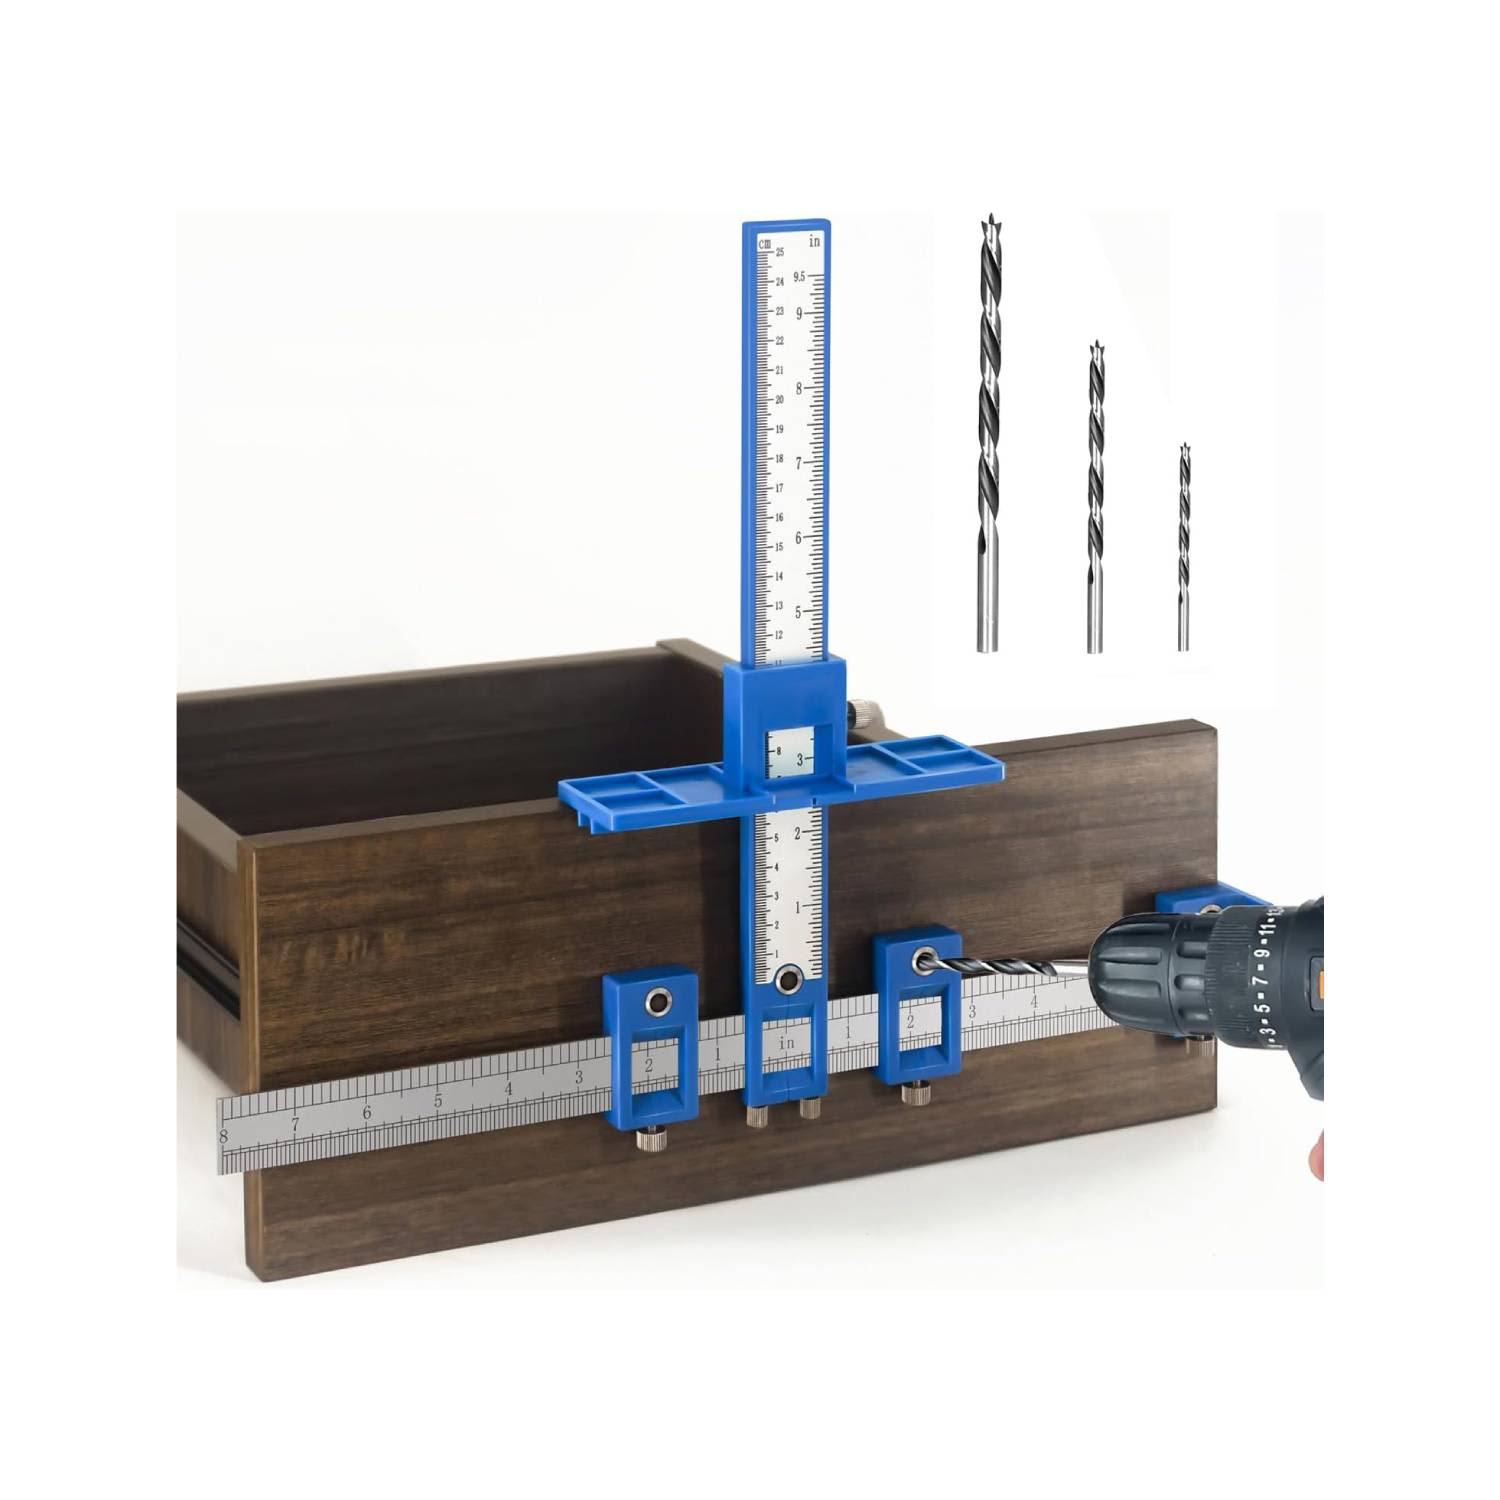
Setting Up The Jig
Setting up the jig properly is the first step to perfect cabinet hardware installation. The jig helps you place handles and knobs in the right spots. Taking time to set it up correctly saves effort later. Follow these steps to prepare your jig for use.
Adjusting For Handle And Knob Placement
Start by selecting the right jig template for your hardware type. Handles and knobs need different hole spacing. Adjust the jig to match your hardware size. Use the measurements on the jig as a guide. Make sure the jig’s holes line up with your hardware’s screw holes. Double-check the spacing before drilling.
Securing The Jig To The Cabinet
Place the jig firmly on the cabinet door or drawer front. Use clamps or the jig’s built-in clips to hold it steady. Make sure it does not move during drilling. A moving jig causes misaligned holes. Check that the jig sits flat against the surface for best results.
Checking Alignment And Level
Use a level to ensure the jig is straight. Check both vertical and horizontal alignment. Mark the cabinet surface lightly if needed. Align the jig with these marks for accuracy. Confirm the jig’s position before starting to drill. Precision here leads to a professional look.
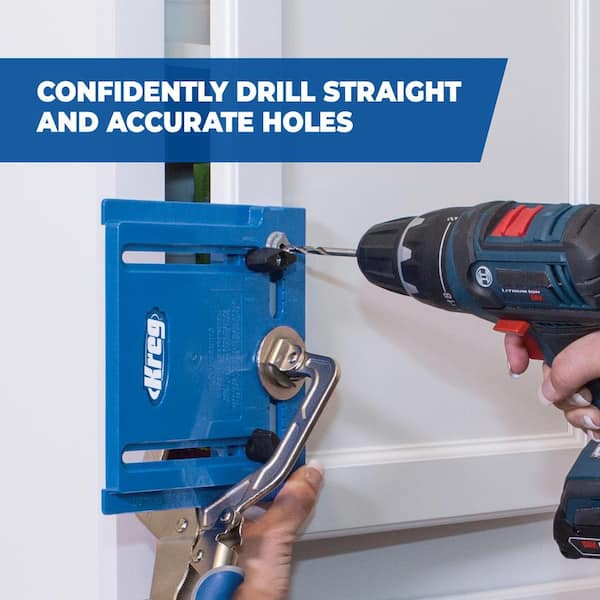
Drilling With Precision
Drilling with precision is key when installing cabinet hardware. It ensures holes are in the right spot and at the correct depth. This prevents damage to cabinets and makes the hardware fit perfectly. Using a jig helps guide your drill for accurate results every time.
Selecting The Right Drill Bits
Choose drill bits that match your hardware screws. Use brad point bits for wood to reduce splintering. Smaller bits work well for pilot holes, which prevent wood from cracking. Make sure bits are sharp to cut clean holes quickly.
Drilling Techniques To Avoid Damage
Start drilling slowly to keep control. Hold the drill steady and apply even pressure. Use the jig to keep the drill aligned. Avoid pushing too hard; this can split the wood. Clear dust from holes often to prevent overheating.
Ensuring Consistent Hole Depth
Set a depth stop on your drill bit or use tape to mark the drill. This stops the bit from going too deep. Consistent hole depth keeps screws tight and hardware flush. Always check depth before drilling multiple holes.
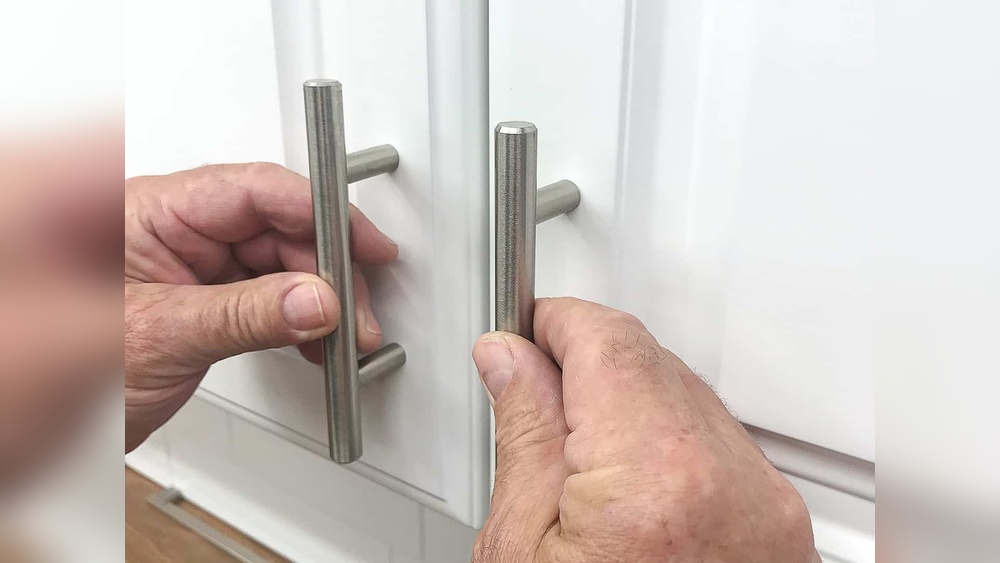
Installing Cabinet Hardware
Installing cabinet hardware is a simple task that improves your kitchen’s look. Using a jig helps place handles and knobs in the right spots. It saves time and keeps everything even. Follow these steps for a neat and secure fit.
Attaching Handles And Knobs
Start by placing the jig on the cabinet door or drawer front. Align it with the edges to mark the hole spots. Drill holes using the jig’s guide for perfect placement. Insert screws through the back of the door. Attach handles or knobs to the screws on the front. Make sure they fit snugly without forcing them.
Tightening Screws Properly
Use a screwdriver to tighten screws slowly. Tighten until the handle or knob feels firm. Avoid over-tightening as it can damage the cabinet or hardware. Check that the handle or knob does not wiggle or move. Keep the screws straight to prevent stripping the hole.
Final Alignment Checks
Look at all hardware from different angles. Make sure handles and knobs line up evenly. Use the jig again if any piece looks off-center. Adjust screws slightly to correct minor misalignments. Step back and confirm all hardware feels secure and looks balanced.

Credit: aerocavlogistics.com
Tips For Common Challenges
Using a jig for cabinet hardware can make your work faster and more precise. Still, some challenges may arise. These tips will help you handle common problems easily. Follow them to improve your results and save time.
Fixing Misaligned Holes
Misaligned holes happen if the jig slips or is not set right. First, check the jig’s position before drilling. Mark the spot clearly with a pencil. Use a clamp to hold the jig tight. If holes are slightly off, fill them with wood filler. Sand the area smooth before drilling again. Use a smaller drill bit to start the hole. This helps keep the hole straight and accurate.
Working With Different Cabinet Materials
Cabinet materials vary from soft wood to hard metal. Soft wood can split if the drill is too fast. Slow down the drill speed. Hard materials need stronger drill bits. Use bits made for metal or tough wood. Always test the jig and drill on a scrap piece first. This avoids damage to your cabinets. Adjust pressure based on the material hardness.
Maintaining Jig Accuracy Over Time
Jigs can wear out or lose accuracy with use. Clean the jig after each project to remove dust. Check for loose parts and tighten screws. Store the jig in a dry place to avoid rust. Measure the jig’s guides regularly with a ruler. Replace worn-out parts as needed. This keeps your jig working well for every job.
Maintenance And Storage Of Jigs
Proper maintenance and storage of your jig ensure it lasts longer and works accurately. A clean, well-stored jig prevents damage and keeps your cabinet hardware projects precise. Simple care steps help you avoid costly replacements and save time on repairs.
Cleaning After Use
Remove dust and wood chips from the jig after each use. Use a soft brush or cloth to clean all surfaces gently. Avoid using water or harsh chemicals that can damage the jig material. Check moving parts for any debris and clean them carefully. Dry the jig completely before storing it.
Proper Storage Techniques
Store your jig in a dry, cool place away from direct sunlight. Keep it in a protective case or box to avoid dust buildup. Avoid placing heavy items on top of the jig to prevent warping. Store the jig flat or as recommended by the manufacturer. Organize your workspace to keep the jig easy to find and safe.
When To Replace Your Jig
Replace the jig if it shows signs of wear or damage. Check for cracks, broken parts, or loose fittings regularly. If the jig no longer holds hardware accurately, it is time to get a new one. Using a damaged jig can harm your cabinet hardware and cause mistakes. Keep your tools in good shape for the best results.
Credit: www.apartmenttherapy.com
Frequently Asked Questions
What Is A Jig For Cabinet Hardware?
A jig is a tool that helps align and drill holes accurately. It ensures consistent placement of cabinet handles and knobs. Using a jig saves time and improves the quality of hardware installation.
How Do You Use A Jig For Cabinet Hardware?
Place the jig on the cabinet door where hardware is needed. Align it properly, then drill holes through the jig’s guides. This method guarantees uniform hole spacing and straight hardware alignment.
Why Should I Use A Jig For Cabinet Hardware Installation?
Using a jig prevents errors and misaligned hardware. It ensures every handle or knob is installed at the same height and spacing. This results in a professional and polished cabinet appearance.
Can A Jig Fit Different Cabinet Hardware Sizes?
Yes, many jigs are adjustable for various hole spacing and hardware sizes. This flexibility allows you to install different styles of knobs and handles with one jig.
Conclusion
Using a jig for cabinet hardware makes the job easier and more precise. It helps you place handles and knobs in the right spot every time. This tool saves time and reduces mistakes. You can work faster and get better results.
Practice a little, and you will feel more confident. Remember, steady hands and patience are key. Enjoy upgrading your cabinets with neat, even hardware. Simple steps lead to great-looking cabinets. Try it on your next project and see the difference.