Are you ready to upgrade your cabinets but worried about those old holes left behind? Filling holes for new cabinet hardware might seem tricky, but it doesn’t have to be.
With the right steps, you can make your cabinets look brand new and flawless. Imagine how satisfying it will feel to see your kitchen or bathroom transformed without any visible marks from the past. Keep reading, and you’ll discover simple, effective ways to fill those holes quickly and confidently—no special skills required.
Your cabinets are about to get a fresh, clean look that you’ll love showing off!
Tools And Materials Needed
Preparing to fill holes for new cabinet hardware needs the right tools and materials. These ensure the job is done cleanly and lasts long. Using proper items saves time and effort. It also helps achieve a smooth, professional look.
Essential Tools
Gather a screwdriver to remove old hardware. A putty knife helps apply filler evenly. Sandpaper smooths the surface after filling. A drill may be needed for new holes. Measuring tape ensures precise placement. Clean cloths remove dust and debris.
Recommended Fillers
Wood filler is best for small to medium holes. It dries fast and sands easily. Epoxy putty works well for larger or deeper holes. It bonds strongly with wood surfaces. Choose filler that matches your cabinet color. This keeps repairs less visible and neat.
Safety Equipment
Wear safety goggles to protect your eyes from dust. Use gloves to keep hands clean and safe. A dust mask prevents breathing in fine particles. Good ventilation helps keep air fresh. Safety first makes work easier and prevents accidents.
Preparing The Surface
Preparing the surface is a key step before filling holes for new cabinet hardware. A clean and smooth area helps the filler stick better. This ensures a strong and lasting repair. Take time to prepare well. It makes the next steps easier and the results neater.
Cleaning The Area
Start by cleaning the surface around the hole. Use a soft cloth and mild soap with water. Remove all grease, dirt, and dust. A clean area allows the filler to bond tightly. Wipe dry with a clean cloth before moving on.
Removing Loose Debris
Check the hole for any loose wood or paint flakes. Use a small brush or vacuum to remove these bits. Loose debris can weaken the filler. Make sure the hole is free of any particles. This helps the filler stay firm and smooth.
Sanding Around The Hole
Lightly sand the area around the hole using fine-grit sandpaper. Sanding roughens the surface slightly. This helps the filler grip better. Be gentle to avoid enlarging the hole. After sanding, wipe away the dust with a dry cloth.
Choosing The Right Filler
Choosing the right filler is important when fixing holes for new cabinet hardware. The filler must blend well with the cabinet surface. It should be strong and easy to shape. The wrong filler can crack or fall out, ruining the cabinet’s look. This guide helps you pick the best option for your project.
Wood Putty Vs. Epoxy
Wood putty is easy to use and dries fast. It works best for small holes and minor damage. Wood putty blends well with wooden cabinets. It can be sanded and painted after drying. Epoxy is stronger and good for bigger holes. It hardens like plastic and lasts longer. Epoxy can also fill deep holes in cabinets. Both have their uses depending on the hole size and surface type.
Using Toothpicks And Glue
Toothpicks and glue work well for tiny holes. Fill the hole with glue first. Then insert toothpicks to fill the space. Break off the extra toothpick pieces. This method is cheap and quick. It strengthens the hole for new screws. It is best for small holes where putty might not hold well.
Other Diy Options
Other fillers include sawdust mixed with glue. This mixture matches wood texture closely. Candle wax can also fill tiny holes temporarily. Some people use crayon pieces melted into holes. Each option depends on the hole size and cabinet type. Test on a hidden area first to see the result. Choose a filler that is easy to shape and paint.
Credit: www.reddit.com
Step-by-step Filling Process
Filling holes for new cabinet hardware requires a clear process. This step-by-step guide makes it simple. Follow each step carefully for the best results.
Applying The Filler
Start by choosing the right wood filler for your cabinet. Use a putty knife to scoop a small amount. Press the filler firmly into the hole. Overfill slightly to allow for sanding later. Remove any extra filler around the hole. This ensures a clean finish after drying.
Smoothing The Surface
Wait until the filler is dry before smoothing. Use fine-grit sandpaper to gently sand the filled area. Sand in small circles to blend with the cabinet surface. Be careful not to remove too much filler. The goal is a flat, even surface ready for painting or staining.
Drying Times
Drying time depends on the filler type and hole size. Check the product label for exact times. Usually, it takes between 30 minutes to several hours. Avoid touching the filler before it fully hardens. Patience here prevents cracking or uneven surfaces later.
Finishing Touches
After filling holes for new cabinet hardware, the final steps make all the difference. These finishing touches help your cabinets look neat and new. Taking time to smooth and protect the surface ensures your work lasts longer. Follow these simple steps for a polished result.
Sanding For A Smooth Finish
Start by sanding the filled holes gently. Use fine-grit sandpaper to avoid scratching the wood. Sand until the surface feels even and blends with the surrounding area. This step removes bumps and helps paint or stain stick better.
Matching Paint Or Stain
Choose paint or stain that matches your cabinet color. Test a small spot first to check the color match. Apply thin, even coats over the filled areas. Let each coat dry completely before adding another. This keeps the finish smooth and natural.
Sealing The Repair
Seal the painted or stained area to protect it. Use a clear varnish or sealant made for wood surfaces. Apply it carefully with a brush or cloth. This step prevents moisture damage and keeps the finish looking fresh. Let the sealant dry well before using the cabinet.
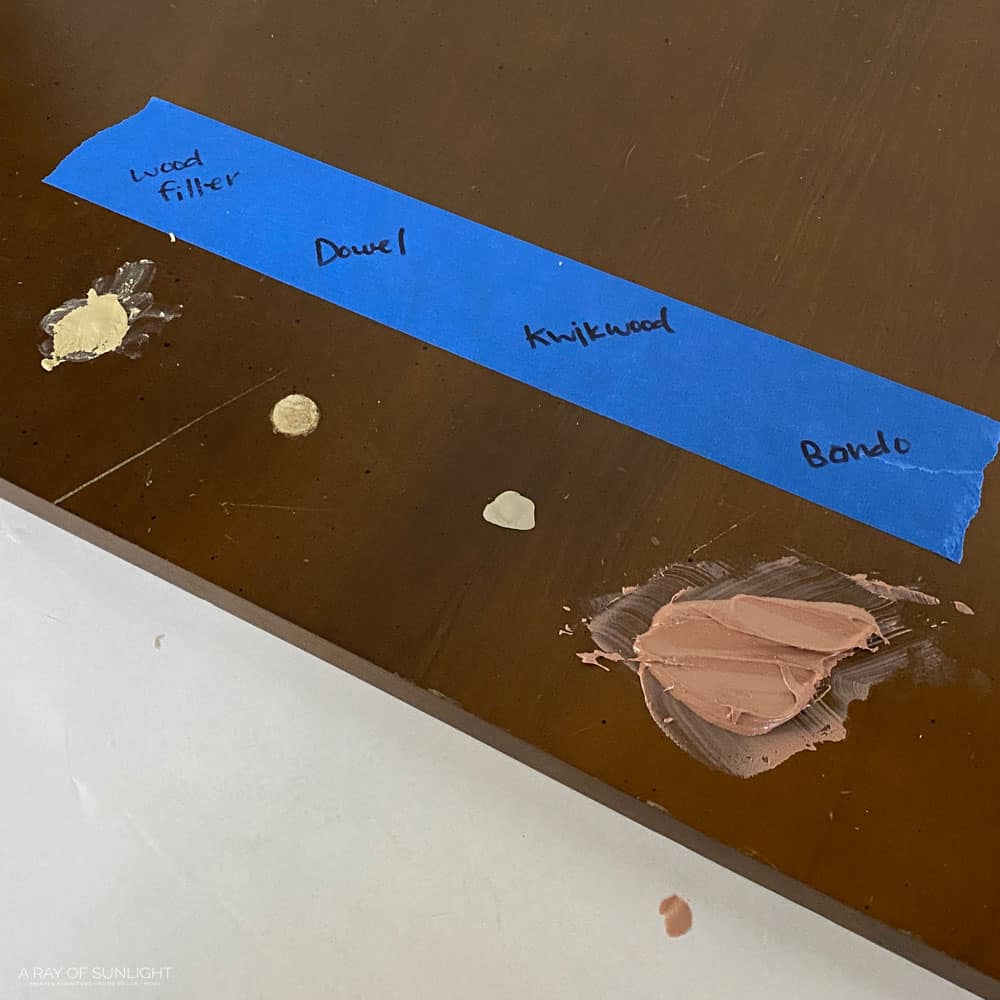
Credit: arayofsunlight.com
Tips For Installing New Hardware
Installing new cabinet hardware can refresh your kitchen or bathroom. Doing it right ensures a clean, professional look. This section shares simple tips to help you install hardware with ease and accuracy.
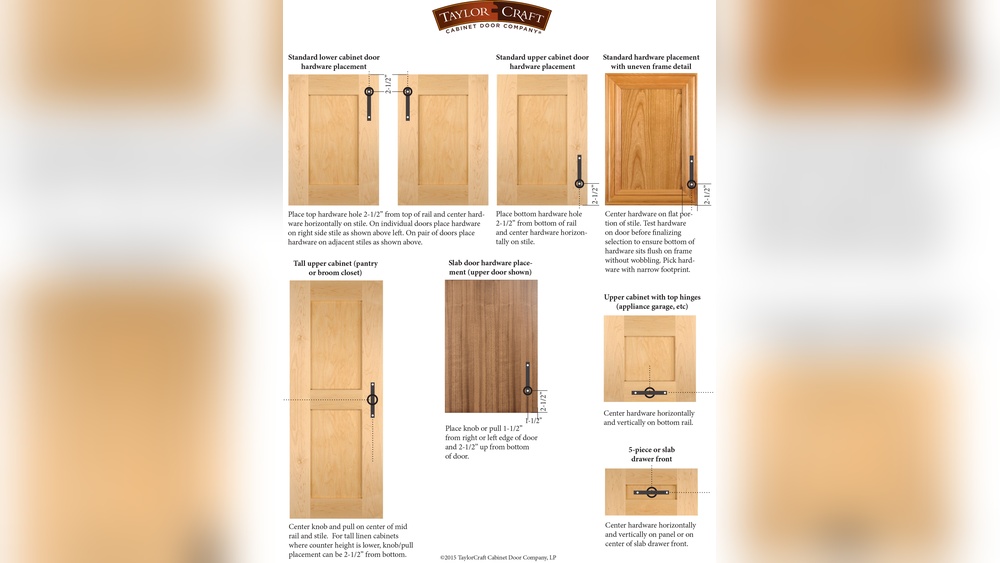
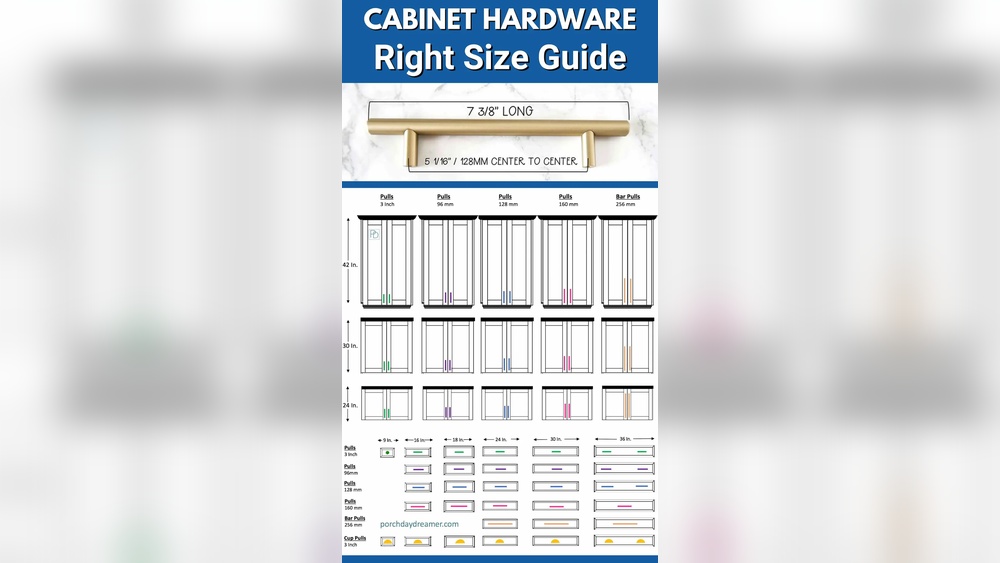
Measuring And Marking
Measure carefully before drilling any holes. Use a ruler or tape measure to find the center of the cabinet door or drawer.
Mark the spot with a pencil. Check the marks twice to avoid mistakes. Use a level to keep marks straight and even across all doors or drawers.
Drilling New Holes
Select a drill bit that matches the size of the screws. Drill slowly and steadily to avoid splitting the wood.
Place a piece of painter’s tape on the drill bit to mark the depth. This prevents drilling too deep and damaging the cabinet.
Hold the door firmly or ask someone to help. Keep the drill perpendicular to the surface for straight holes.
Avoiding Common Mistakes
Do not rush measuring or drilling. Small errors can ruin the appearance and function.
Do not force screws into holes that are too small. This can crack the wood or strip the screw.
Use the right hardware for your cabinet type. Check the instructions and screw length before starting.
When To Call A Professional
Filling holes for new cabinet hardware can be simple. Small holes often need just basic tools and materials. Sometimes, problems are bigger and require expert help. Knowing when to call a professional saves time and prevents damage.
Complex Repairs
Some holes are too tricky to fix alone. When holes are large or oddly shaped, a professional can help. They have tools to fill and smooth complex areas. Experts ensure the repair looks clean and strong.
Structural Damage
Damage to cabinet wood or frame is serious. Cracks or weak spots may cause cabinets to fall. A professional checks if the structure is safe. They fix damage to keep cabinets sturdy and secure.
Time And Skill Considerations
Repairing holes takes time and skill. If you lack experience, the job might take much longer. Professionals work faster and with better results. Calling an expert saves effort and avoids mistakes.
Credit: salvagedinspirations.com
Frequently Asked Questions
How Do I Fill Old Holes Before Installing New Cabinet Hardware?
Use wood filler or wood putty to fill old holes. Apply with a putty knife, let it dry, then sand smooth. This creates a solid surface for new hardware installation.
What Materials Work Best For Filling Cabinet Holes?
Wood filler and epoxy wood putty are ideal. They dry hard, sand smoothly, and paint well. Choose one based on hole size and cabinet material.
Can I Paint Over Filled Holes On Cabinets?
Yes, once the filler is dry and sanded, paint over it. Use matching cabinet paint for a seamless finish. This hides the repair and preps for new hardware.
How Long Does Wood Filler Take To Dry?
Drying time varies by product but usually takes 15 minutes to an hour. Follow the manufacturer’s instructions for best results before sanding or painting.
Conclusion
Filling holes for new cabinet hardware is simple with the right steps. Use wood filler or putty to close old holes quickly. Sand the surface smooth for a clean look. Let the filler dry fully before installing new hardware. This process keeps cabinets neat and sturdy.
Small repairs can make a big difference in your kitchen’s appearance. Take your time and follow these tips for best results. Your cabinets will look fresh and ready for new handles or knobs. Easy fixes like this improve your space without much effort.