Have you ever struggled to remove a push nut fastener and felt stuck not knowing where to start? You’re not alone.
These small but tough clips can be tricky to take off without damaging your parts or tools. But don’t worry—this guide will show you simple, effective ways to remove a push nut fastener quickly and safely. By the end, you’ll have the confidence and know-how to handle these fasteners like a pro, saving you time and frustration on your next project.
Keep reading to discover the best tips and tricks that work every time.
What Is A Push Nut Fastener
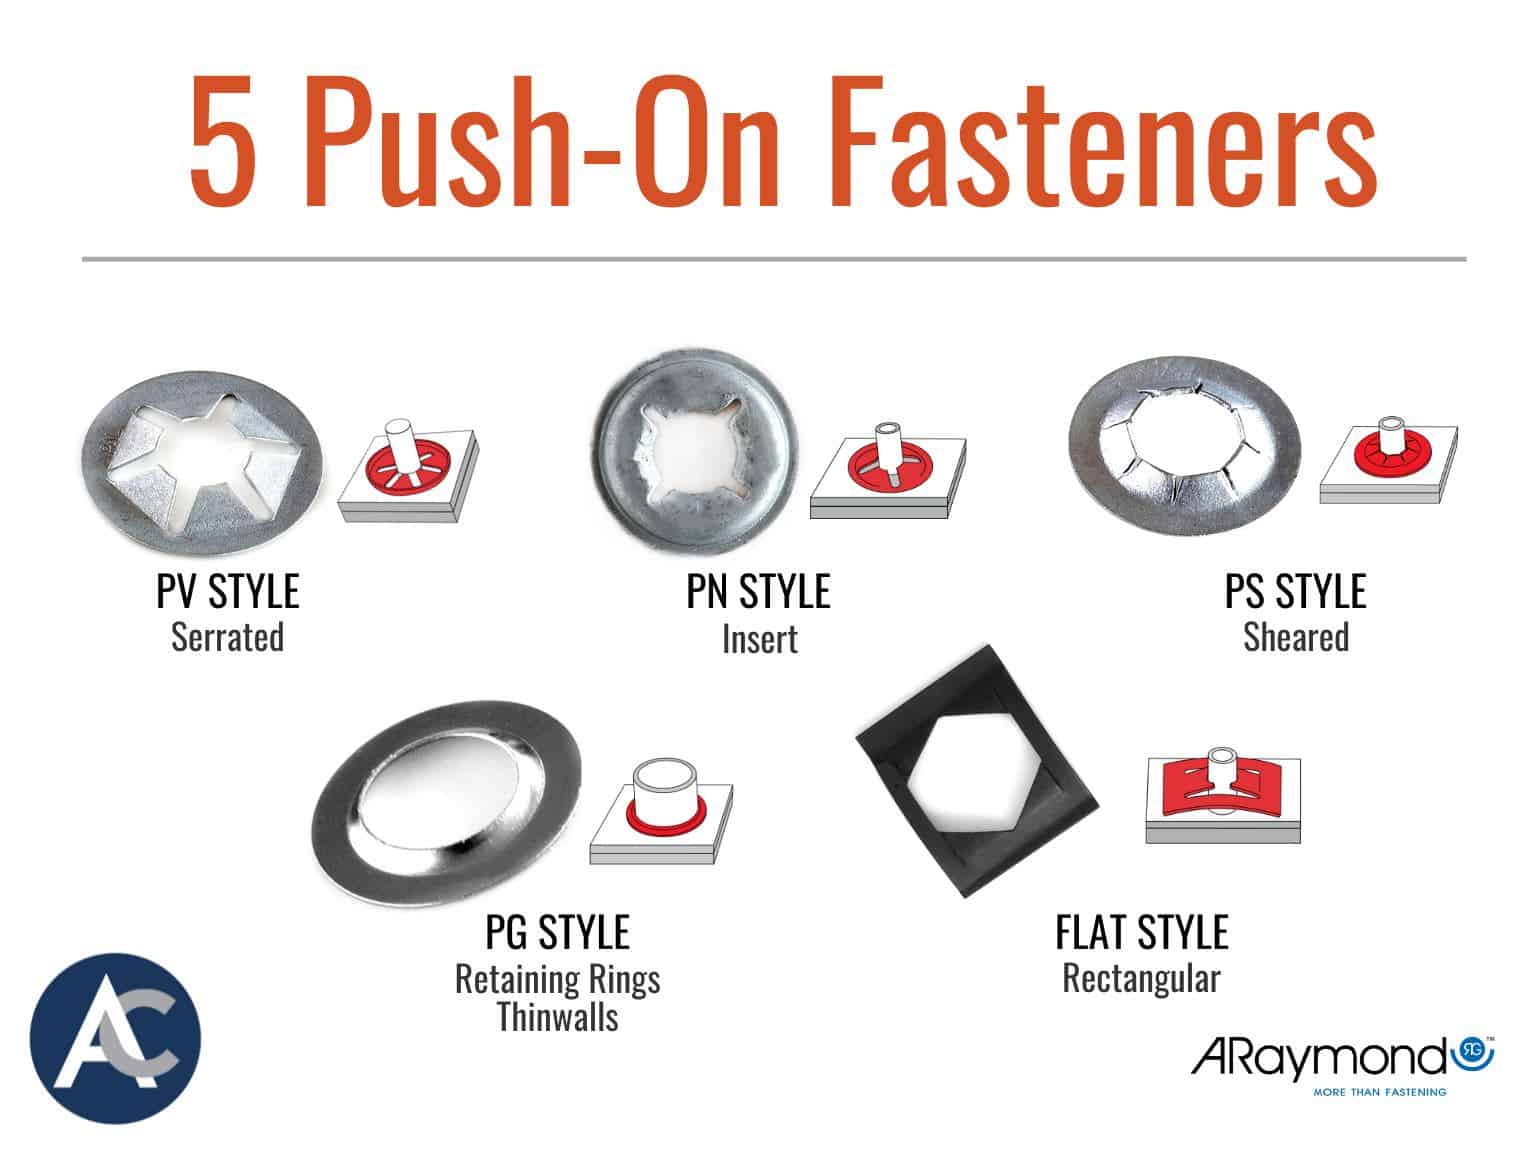
A push nut fastener is a small, simple part used to hold items together. It looks like a tiny metal ring with sharp edges inside. This fastener fits tightly onto a shaft or rod. It holds parts securely without screws or bolts.
Push nuts are common in machines, toys, and household items. They prevent pieces from sliding off. The fastener stays in place by gripping the shaft firmly. Removing it needs care to avoid damage.
What Does A Push Nut Fastener Look Like?
It has a round, flat shape like a washer. Inside, small metal teeth point inward. These teeth dig into the shaft’s surface. This grip stops the fastener from moving. Push nuts come in different sizes and styles.
Where Are Push Nut Fasteners Used?
They attach wheels to axles in toys. They hold knobs on appliance shafts. Push nuts also secure parts in machinery. Their simple design makes assembly quick and easy.
Why Choose A Push Nut Fastener?
Push nuts need no tools to install. They save time during assembly. The fastener offers strong holding power. It is low-cost and lightweight. These benefits make push nuts popular.
Credit: www.advancecomponents.com
Tools Needed For Removal
Removing a push nut fastener requires the right tools. These tools make the job easier and prevent damage to parts. Using the correct tools helps you work safely and quickly.
Flathead Screwdriver
A flathead screwdriver is useful for prying under the push nut. Choose one with a thin blade to fit between the fastener and the surface. This tool helps lift the push nut gently without scratching.
Pliers
Pliers provide a strong grip to pull off the push nut. Needle-nose pliers work best for small fasteners in tight spaces. Use them to hold and pull the push nut straight out.
Push Nut Removal Tool
Specialized push nut removal tools exist for quick removal. They have a forked end to slide under the fastener easily. These tools reduce effort and protect surrounding parts.
Protective Gloves
Wearing gloves protects your hands during removal. Gloves also improve grip on tools and fasteners. Choose gloves that fit well and allow good finger movement.
Preparing For Removal
Preparing to remove a push nut fastener is key to a smooth process. Careful preparation helps avoid damage to parts and tools.
Gathering the right tools and understanding the fastener type makes removal easier. Clear workspace and good lighting improve visibility and safety.
Identify The Type Of Push Nut Fastener
Push nuts come in various shapes and sizes. Check the size and type before starting. Different fasteners need different tools for removal.
Gather The Necessary Tools
Use flathead screwdrivers, pliers, or special removal tools. Have a small hammer ready if gentle tapping is needed. Keep tools clean and in good condition.
Clear And Organize Your Work Area
Remove any clutter around the fastener. Clear space helps avoid losing small parts. Good lighting shows details clearly and reduces mistakes.
Wear Safety Gear
Wear safety glasses to protect your eyes. Gloves protect your hands from sharp edges. Safety gear prevents injuries during removal.

Credit: www.youtube.com
Step-by-step Removal Process
Removing a push nut fastener can seem tricky. Follow simple steps for a smooth removal. This guide breaks down the process clearly.
Locate The Push Nut
First, find the push nut on your project. It looks like a small, round piece holding parts together. Check for any dirt or rust around it. Clean the area to see the edges clearly. Proper lighting helps a lot.
Use A Flathead Screwdriver
Take a flathead screwdriver that fits under the push nut’s edge. Gently slide the screwdriver tip between the nut and the surface. Apply light pressure to lift the edge. Move slowly to avoid bending the parts.
Leverage With Pliers
Hold the base firmly with one hand. Use pliers to grip the raised edge of the push nut. Pull the nut away from the surface carefully. Small, steady pulls work best. Avoid sudden force to prevent damage.
Twist And Pull Technique
If the push nut is tight, twist it slightly while pulling. This loosens the grip on the shaft or bolt. Keep twisting gently as you pull outward. The nut should slide off smoothly with this method.
Common Challenges And Fixes
Removing a push nut fastener can be tricky. Many face problems like stuck fasteners or accidental damage around the part. Knowing common challenges helps prepare for these issues. It also guides how to fix them quickly and safely.
Dealing With Stuck Fasteners
Push nut fasteners often get stuck tightly. Rust or dirt can make them harder to remove. Use a small flat screwdriver or a pair of pliers to pry gently. Work slowly around the edges. Avoid forcing the fastener too much. Applying a little oil or lubricant helps loosen rusted parts.
Avoiding Damage To Surroundings
Removing a push nut fastener can harm nearby surfaces. Scratches or dents happen easily if tools slip. Place a thin cloth or tape around the area to protect it. Use tools with smooth edges or rubber grips. Take your time and apply steady pressure. This reduces risk of damage while removing the fastener.
Tips For Replacing Push Nut Fasteners
Replacing push nut fasteners needs care and the right tools. These fasteners hold parts tightly, so install new ones properly. Doing it well keeps your project strong and safe.
Small mistakes can cause loose parts or damage. Follow simple tips to make the process easier and more effective.
Use The Correct Size Push Nut
Choosing the right size is key. Too small or too big will not hold parts well. Check the part’s diameter before buying a new push nut. Measure twice, install once.
Clean The Shaft Before Installing
Dirt or rust can stop the fastener from fitting tightly. Wipe the shaft clean with a cloth. Use sandpaper if needed to remove rust. A clean surface helps the push nut grip better.
Apply Even Pressure When Installing
Press the push nut straight onto the shaft. Avoid tilting it. Use pliers or a hammer with a soft block for even force. This stops the fastener from bending or breaking.
Test The Fastener After Installation
After fitting, check if the push nut holds firmly. Try to move the parts gently. If it slips, remove and try again. A secure fit prevents future problems.
Replace Damaged Fasteners Immediately
Old or bent push nuts may fail. Remove and replace them at once. Do not reuse damaged fasteners. Using new ones ensures safety and strength.

Credit: www.reddit.com
Frequently Asked Questions
What Tools Are Needed To Remove A Push Nut Fastener?
To remove a push nut fastener, use pliers or a flathead screwdriver. These tools help pry the fastener gently without damage. Needle-nose pliers work best for precision. Avoid excessive force to prevent damaging the fastener or surrounding parts.
How Do You Safely Remove A Push Nut Fastener?
Safely remove a push nut by gently prying it from the shaft. Use a flathead screwdriver or pliers to lift the edges slowly. Apply even pressure to avoid bending or breaking the fastener. Work carefully to protect the attached components.
Can Push Nut Fasteners Be Reused After Removal?
Push nut fasteners are generally not reusable after removal. Their gripping teeth often deform during removal. For secure fastening, replace with a new push nut. Reusing may cause poor fit and reduced holding strength.
Why Is A Push Nut Fastener Difficult To Remove?
Push nut fasteners grip tightly with inward-facing teeth. This design resists loosening and provides strong holding power. The tight fit and angled teeth make removal challenging without proper tools and technique.
Conclusion
Removing a push nut fastener is simple with the right tools. Use a flat tool or pliers to lift it carefully. Avoid damaging the parts around the fastener. Take your time and work gently to prevent scratches. Practice makes the task easier and faster.
Now, you can handle push nut fasteners with confidence. Keep these tips in mind for future projects. Small steps lead to good results every time.