Are you looking to control a light using your existing outlet but don’t know where to start? Connecting a light switch from an outlet might sound tricky, but with the right steps, you can do it yourself safely and easily.
Imagine turning your lamps or fixtures on and off with just a flick of a switch—no more crawling under tables or unplugging cords. In this guide, you’ll discover simple, clear instructions to make this connection work perfectly in your home.
Ready to take control of your lighting and add convenience to your space? Let’s dive in and get started!
Tools And Materials Needed
Before connecting a light switch from an outlet, gather all tools and materials. Having everything ready makes the job easier and safer. This section covers what you need for a smooth installation.
Essential Tools
- Screwdriver (flathead and Phillips) for screws
- Wire stripper to remove insulation
- Voltage tester to check power
- Needle-nose pliers for bending wires
- Electrical tape for insulation
- Wire nuts to connect wires
- Drill with bits for mounting
Required Materials
- Light switch suitable for your circuit
- Electrical box if new installation
- Romex cable or suitable wiring
- Outlet cover and switch plate
- Wire connectors and grounding screws
- Cable clamps for securing wires
Safety Gear
- Insulated gloves to prevent shocks
- Safety glasses to protect eyes
- Rubber-soled shoes for insulation
- Flashlight or headlamp for visibility
- Fire extinguisher nearby for emergencies

Credit: www.do-it-yourself-help.com
Understanding Electrical Basics
Connecting a light switch from an outlet requires basic knowledge of electricity. Understanding electrical basics helps you work safely and correctly. Knowing how wires, circuit breakers, voltage, and current work is important. This knowledge prevents accidents and ensures your setup functions well.
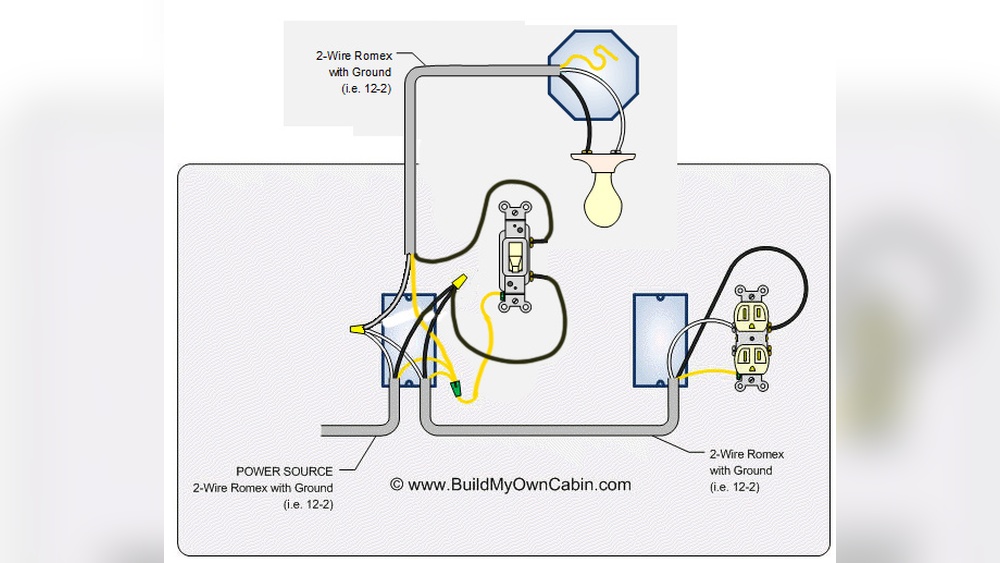
Wiring Types
Different wires carry electricity in homes. The most common are live, neutral, and ground wires. Live wires carry electricity to devices. Neutral wires return electricity to the panel. Ground wires protect from electric shocks by redirecting current. Identifying these wires is key before connecting a switch.
Circuit Breakers
Circuit breakers stop the flow of electricity if there is a problem. They protect your home from electrical fires. Each circuit in your home has a breaker. Turning off the breaker before working on wiring keeps you safe. Always check the breaker status before starting any electrical work.
Voltage And Current
Voltage is the force that pushes electricity through wires. Current is the flow of electricity. Most homes use 120 volts for lights and outlets. Too much current can cause wires to overheat. Using the right voltage and current levels is essential for safety and device performance.
Preparing The Workspace
Preparing the workspace is the first step to connect a light switch from an outlet safely. This stage sets the foundation for a smooth and secure wiring process. Taking time to organize and secure the area helps prevent accidents and ensures you work efficiently.
Turning Off Power
Always turn off the power at the circuit breaker before starting. This stops electricity from flowing to the outlet and switch. Double-check the correct breaker is off to avoid any shocks. Safety comes first in every electrical task.
Testing For Live Wires
Use a voltage tester to check if wires are live. Touch the tester to each wire carefully. No light or sound means the wire is safe to handle. Never skip this step, even after switching off the power.
Clearing The Area
Remove any objects around the outlet and switch. Clear space makes it easier to work and avoids damage. Keep tools and parts organized nearby. A clean workspace helps you focus and finish faster.
Removing The Existing Outlet
Removing the existing outlet is the first step to connect a light switch from an outlet. This process requires care and attention. Safety is important. Always turn off the power at the breaker before starting. This prevents electrical shocks and accidents.
Follow these steps to remove the outlet safely and correctly. Each step helps prepare for installing the new switch.
Unscrewing The Outlet Cover
Start by unscrewing the outlet cover plate. Use a flathead or Phillips screwdriver, depending on the screws. Remove all screws and gently pull the cover away from the wall. Set the cover aside carefully. This exposes the outlet and wiring behind it.
Disconnecting Wires
Next, unscrew the outlet mounting screws to loosen it. Pull the outlet out slowly to access the wires. Note how the wires connect to the outlet. Loosen the terminal screws holding the wires. Carefully disconnect each wire from the outlet terminals. Keep the wires separated to avoid mistakes later.
Inspecting The Wiring
Check the condition of the exposed wires. Look for any damage, like frayed or broken insulation. Damaged wires can cause problems and must be fixed. Confirm the wires are the correct type for your switch. Identify the hot, neutral, and ground wires. This helps connect the new switch properly.
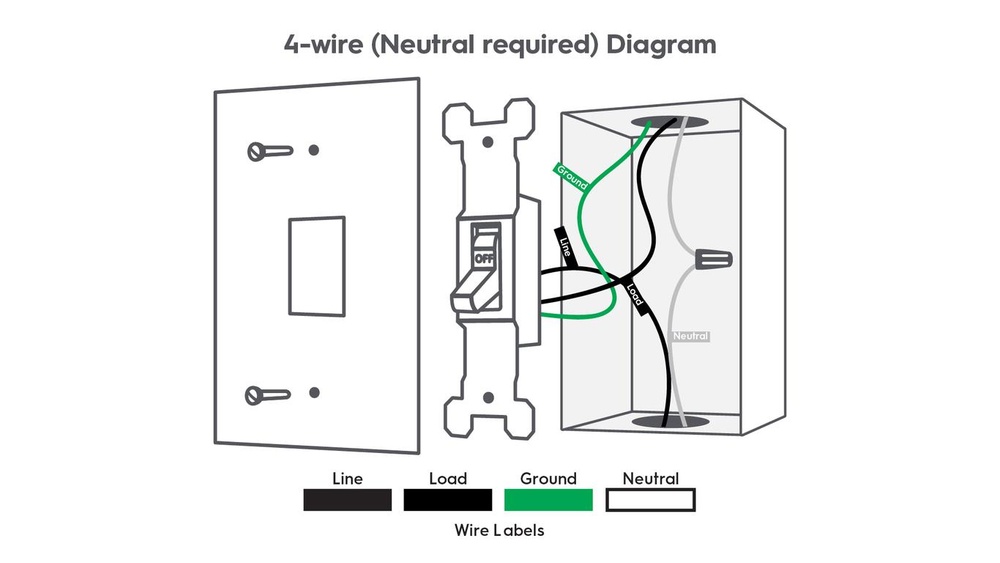
Wiring The Light Switch
Wiring the light switch is a key step to control your lighting from an outlet. It involves working with electrical wires safely and correctly. Proper wiring ensures the switch operates smoothly and prevents electrical hazards. Follow simple steps to identify wires, connect the switch, and secure all connections.
Identifying Wires
First, turn off the power at the circuit breaker. Use a voltage tester to confirm no electricity flows. Typically, you will find three types of wires: live (black or red), neutral (white), and ground (green or bare copper). The live wire carries power, the neutral completes the circuit, and the ground protects from shocks. Identify each wire by its color and position carefully.
Connecting The Switch
Attach the live wire from the outlet to the switch’s input terminal. Connect the wire from the switch’s output terminal to the light fixture. The neutral wire usually bypasses the switch and goes directly to the light. Ensure wires are stripped properly to expose enough metal for a firm connection. Double-check that no wires touch each other or the switch body.
Securing Wire Connections
Use wire nuts to twist wires together tightly. Wrap electrical tape around the wire nuts for extra security. Push all wires neatly into the electrical box to avoid damage. Screw the switch firmly into place. Finally, restore power and test the switch for correct operation. Secure connections prevent shorts and keep your home safe.
Credit: www.youtube.com
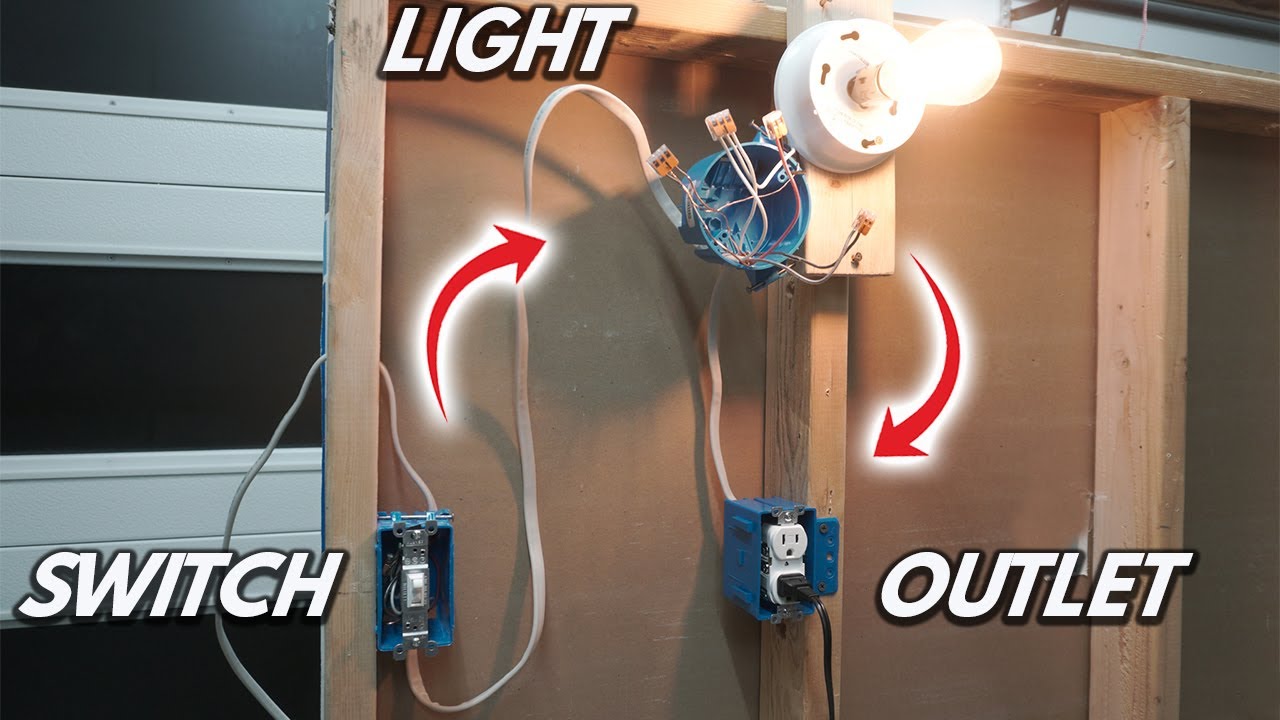
Installing The Switch In The Wall
Installing the switch in the wall is a key step in connecting a light switch from an outlet. This process makes sure the switch fits securely and works safely. Each part must be done carefully to avoid problems later. Follow these steps to install the switch properly.
Mounting The Switch Box
Choose a spot on the wall near the outlet. Cut a hole that matches the size of the switch box. Push the box into the hole until it fits tight. Use screws or nails to hold the box firmly in place. Make sure the box is level and does not move.
Securing The Switch
Connect the wires to the switch terminals. Match wire colors to the correct screws. Push the switch gently into the box. Avoid bending or pinching the wires. Use screws to fasten the switch to the box. The switch should sit flush with the wall.
Attaching The Cover Plate
Place the cover plate over the switch. Align the holes in the plate with the switch screws. Screw the cover plate tightly but do not over-tighten. The plate should sit flat against the wall. This step protects the switch and gives a clean look.
Testing The Switch
Testing the switch is a key step after connecting a light switch from an outlet. It ensures the wiring is correct and the switch works safely. This process helps avoid electrical problems and keeps your home safe.
Follow clear steps to test the switch properly. This includes restoring power, checking if the switch operates well, and solving common issues if the switch does not work.
Restoring Power
Turn the main power back on at the circuit breaker. This supplies electricity to the switch and outlet. Use a voltage tester to check if power flows to the switch. Safety first: never touch wires with power on until testing is done.
Checking Switch Operation
Flip the switch to the ON position. Look if the connected light turns on. Flip it OFF to see if the light goes off. Test the switch several times to confirm it works smoothly. A good switch will feel firm and click clearly.
Troubleshooting Common Issues
If the light does not turn on, check the wiring connections again. Loose or wrong wires can stop the switch from working. Use a voltage tester to find if power reaches the switch. Replace the switch if it feels loose or damaged. Repeat testing after fixing any problems.

Credit: www.youtube.com
Safety Tips For Diy Electrical Work
Working with electrical wiring can be risky without proper care. Safety must be the top priority for any DIY electrical task. Understanding basic safety rules helps prevent accidents and damage. Follow these essential tips to protect yourself and your home while connecting a light switch from an outlet.
When To Call A Professional
Some electrical jobs require expert skills beyond DIY. Complex wiring, old circuits, or unclear wiring paths need professional attention. If unsure about any step, stop and call a licensed electrician. Professionals ensure the work meets safety codes and prevents hazards.
Avoiding Electrical Hazards
Turn off power at the circuit breaker before starting work. Use a voltage tester to confirm no electricity flows. Wear insulated gloves and use tools with rubber handles. Keep the work area dry and avoid working in wet conditions. Never bypass safety devices like fuses or circuit breakers.
Maintaining Your Wiring
Check wires for damage or wear before installation. Use proper wire connectors and avoid loose connections. Secure wires neatly to avoid strain or pinching. Replace old or damaged outlets and switches promptly. Regular maintenance extends wiring life and keeps your home safe.
Frequently Asked Questions
How Do I Connect A Light Switch To An Outlet Safely?
Turn off power before starting. Use a voltage tester to confirm. Connect the switch to the outlet’s hot wire. Follow wiring codes and secure all connections properly. Always use insulated tools and consult a professional if unsure.
Can I Control An Outlet With A Light Switch?
Yes, you can control an outlet using a light switch. Wire the switch to interrupt the hot wire feeding the outlet. This allows the switch to turn the outlet on and off safely.
What Tools Are Needed To Connect A Switch From An Outlet?
You need a voltage tester, wire strippers, screwdriver, electrical tape, and wire nuts. These tools help you safely strip wires, connect terminals, and secure the wiring properly for the switch and outlet.
Is It Legal To Connect A Light Switch To An Outlet?
Yes, it is legal if done according to local electrical codes. Always check your area’s regulations and use proper wiring techniques. When in doubt, hire a licensed electrician to ensure safety and compliance.
Conclusion
Connecting a light switch from an outlet is simpler than it seems. Follow safety rules and double-check your wiring. Use the right tools and take your time. This task saves energy and adds convenience to your home. Always turn off power before starting any work.
Small steps lead to great results. Now, you can control your lights easily and safely. Give it a try and see the difference.