Are you ready to take control of your lighting and create the perfect mood in any room? Learning how to connect a dimmer light switch is easier than you might think, and it can instantly transform your space.
Whether you want softer lights for relaxing evenings or brighter settings for work, a dimmer switch puts that power right at your fingertips. In this guide, you’ll discover simple steps to install your dimmer switch safely and quickly. Keep reading, and by the end, you’ll have the confidence to upgrade your lighting like a pro.
Choosing The Right Dimmer Switch
Choosing the right dimmer switch is key to a smooth lighting experience. A suitable dimmer helps control light levels easily. It also protects bulbs from damage. Picking the wrong type may cause flickering or shorten bulb life. Focus on the dimmer’s type, bulb compatibility, and safety features. These factors ensure the switch works well with your setup.
Types Of Dimmer Switches
There are several dimmer switch types. Leading-edge dimmers suit incandescent bulbs well. Trailing-edge dimmers fit LED and CFL bulbs best. Rotary dimmers adjust light by turning a knob. Slide dimmers change light using a slider. Touch dimmers work with a simple tap. Choose a type that matches your bulb and style.
Compatibility With Bulbs
Not all dimmers work with every bulb type. Incandescent bulbs need a basic dimmer. LED bulbs require dimmers made for LED technology. CFL bulbs often need specific dimmers to avoid flicker. Check dimmer packaging for bulb compatibility. Using the right dimmer extends bulb life and avoids buzzing sounds.
Safety Ratings And Certifications
Safety is important when choosing a dimmer switch. Look for certifications like UL or CE marks. These show the product meets safety standards. Certified dimmers reduce fire and electric shock risks. Also, check the dimmer’s voltage and wattage limits. Proper ratings keep your home safe and your lights working well.
Tools And Materials Needed
Before starting to connect a dimmer light switch, gather the right tools and materials. This preparation saves time and prevents mistakes. Using proper equipment ensures a smooth and safe installation. Below is a list of what you need.
Essential Tools
- Screwdriver (flathead and Phillips)
- Wire stripper or cutter
- Voltage tester
- Needle-nose pliers
- Electrical tape
- Drill (optional, for mounting)
Required Materials
- Dimmer light switch compatible with your fixture
- Wire connectors (wire nuts)
- Electrical box (if replacement needed)
- Wall plate for dimmer switch
Safety Gear
- Insulated gloves
- Safety goggles
- Non-conductive footwear
Preparing For Installation
Preparing for installation is the first step in connecting a dimmer light switch. It ensures safety and a smooth process. Proper preparation prevents accidents and damage to the electrical system.
Follow these steps carefully before starting the installation. Take your time and be cautious.
Turning Off Power
Switch off the power to the light switch at the circuit breaker. This stops electricity flow and protects you from electric shocks. Use a voltage tester to confirm the power is off before touching any wires.
Removing The Old Switch
Remove the switch cover plate with a screwdriver. Unscrew the old switch from the electrical box. Gently pull the switch out to expose the wiring. Keep track of how the wires are connected for the new switch.
Inspecting Wiring
Check the wires for any damage or wear. Look for loose or frayed wires that may need fixing. Ensure the wires are clean and free of corrosion. Proper wiring is essential for the dimmer switch to work correctly.
Wiring The Dimmer Switch
Wiring the dimmer switch is an important step in your installation process. Correct wiring ensures your dimmer works safely and efficiently. This section explains how to identify wires, connect them properly, and secure all connections for a lasting setup.
Identifying Wires
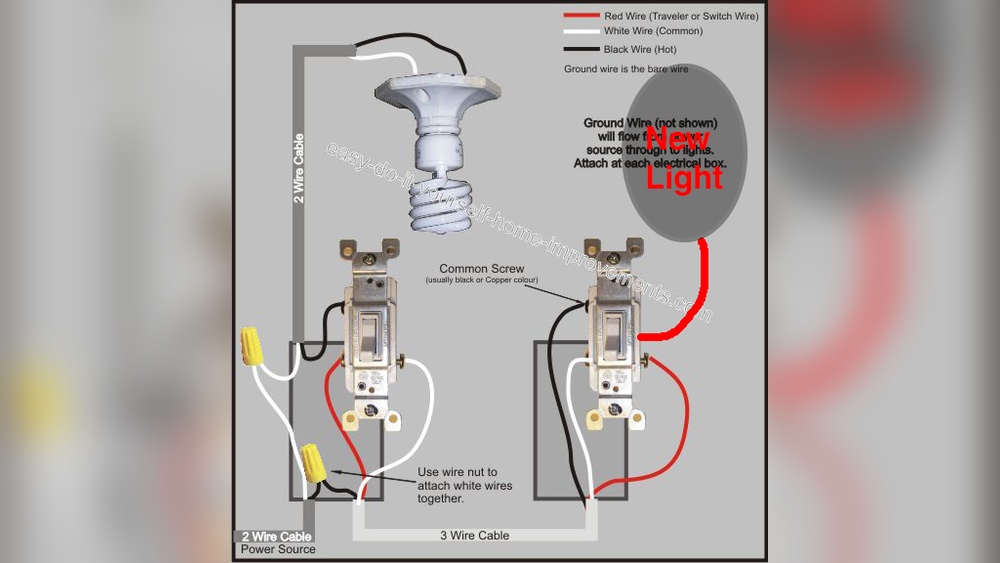
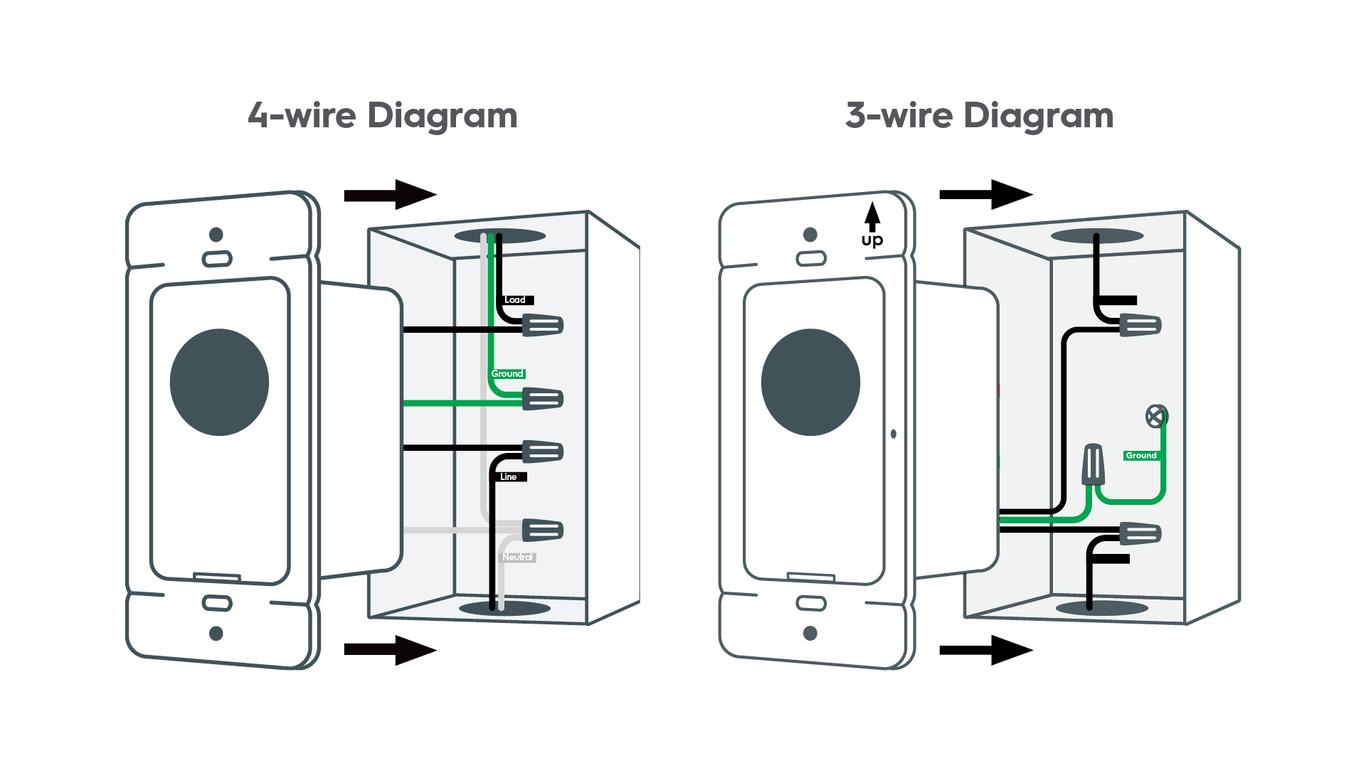
First, turn off the power at the circuit breaker. Use a voltage tester to confirm no current flows. Look inside the switch box. You will find three main wires: the live (hot), the load, and the ground wire. The live wire usually has black or red insulation. The load wire also is black or red but leads to the light fixture. The ground wire is bare copper or green.
Connecting Wires Correctly
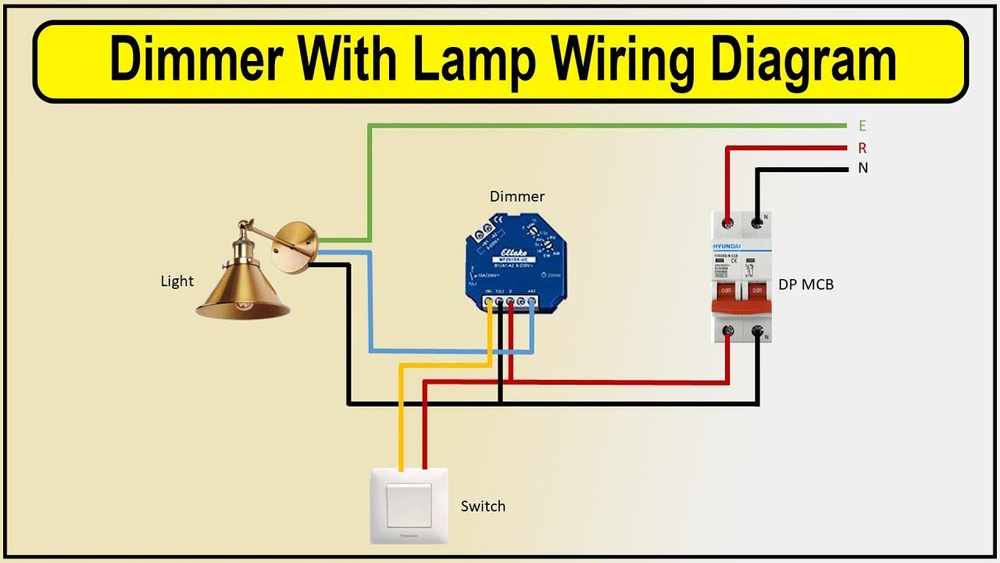
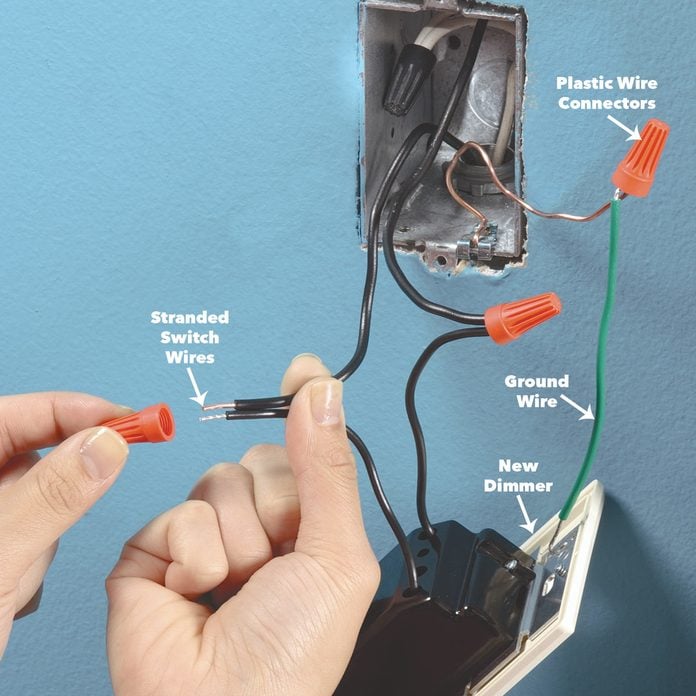
Match the wires from the dimmer switch to the house wires. Connect the dimmer’s live wire to the live wire in the box. Attach the load wire from the dimmer to the load wire going to the light. Connect the ground wire from the dimmer to the bare copper or green wire. Use wire nuts to twist wires together securely. Do not mix up the wires to avoid damage.
Securing Connections
After connecting, wrap each wire nut with electrical tape. This adds extra security and prevents loosening. Gently push wires back into the box. Mount the dimmer switch firmly onto the electrical box. Tighten screws evenly to avoid damaging the switch. Restore power and test the dimmer to check if it works properly.
Mounting And Testing
Mounting and testing your dimmer light switch is the final step in the installation process. It ensures the switch fits securely and works correctly. Careful mounting prevents damage and keeps the switch safe. Testing confirms the dimmer adjusts light levels smoothly.
Installing The Switch Into The Wall
First, push the wires back into the electrical box. Align the dimmer switch with the mounting holes. Use screws to secure the switch tightly. Avoid over-tightening to prevent cracking the switch. Make sure the switch sits flush against the wall.
Attaching The Faceplate
Place the faceplate over the mounted switch. Align the screw holes on the faceplate and switch. Use the small screws to fix the faceplate in place. Tighten the screws gently to avoid damage. The faceplate should cover the edges neatly.
Turning Power Back On
Go to your circuit breaker panel. Switch the power back on to the room. Check that the switch has power by flipping the dimmer on. Never touch wires before restoring power. Safety first.
Testing The Dimmer Function
Turn the dimmer knob slowly from low to high. Watch the light brightness change smoothly. Check for flickering or buzzing sounds. If the light dims evenly, the switch works well. If not, turn off power and review the wiring.

Credit: support.brilliant.tech
Troubleshooting Common Issues
Troubleshooting common issues with dimmer light switches can save time and frustration. Many problems are simple to fix. Knowing what to check helps you get the lights working perfectly again.
Dimmer Not Working
Check the power source first. Make sure the circuit breaker is on. Test the switch wiring for loose connections. Sometimes, the dimmer switch itself may be faulty. Replace it if needed.
Verify the type of bulbs you use. Not all bulbs work with dimmers. Use dimmable LED or incandescent bulbs for best results.
Flickering Lights
Flickering often means poor connections. Tighten all wire nuts and screws. Inspect the bulb socket for damage or dirt. Use bulbs that match the dimmer’s wattage rating.
Try a different bulb to see if flickering stops. Dimmer switches sometimes need compatible bulbs to work smoothly.
Noise Or Buzzing
Buzzing usually comes from the dimmer or bulb. Use dimmers designed for LED or fluorescent bulbs. Older dimmers may not fit newer bulbs well.
Reduce noise by changing the bulb type or switch brand. Check if the dimmer is overloaded by too many bulbs. Replace it with one that handles higher wattage.
Tips For Optimal Lighting
Proper lighting improves any room’s look and feel. Dimmer switches help control light levels easily. Using them right gives you comfort and saves energy. Follow these tips for the best lighting results.
Adjusting Brightness Levels
Set the dimmer to match your mood or task. Bright light works well for reading or cooking. Soft light creates a cozy atmosphere for relaxing. Avoid setting the brightness too low or too high. Smooth adjustment keeps the room comfortable and easy on the eyes.
Using Compatible Bulbs
Choose bulbs that work well with dimmers. Look for dimmable LED or incandescent bulbs. Non-dimmable bulbs may flicker or get damaged. Check the bulb package to confirm compatibility. Proper bulbs ensure safe operation and better lighting quality.
Maintaining Your Dimmer Switch
Keep the dimmer switch clean and dust-free. Use a dry cloth to wipe the surface gently. Avoid using water or harsh cleaners. Test the switch regularly to catch any issues early. Proper care extends the switch’s life and performance.
Credit: www.familyhandyman.com
Credit: www.gelighting.com
Frequently Asked Questions
How Do I Safely Connect A Dimmer Light Switch?
Turn off the power at the circuit breaker first. Use a voltage tester to ensure no current flows. Connect the dimmer switch wires to the corresponding wires in the wall box. Secure connections with wire nuts and mount the switch properly.
Can I Use A Dimmer Switch With Led Lights?
Yes, but ensure the dimmer is compatible with LED bulbs. Using incompatible dimmers can cause flickering or damage. Always check the product specifications for LED compatibility before installation.
What Tools Are Needed To Install A Dimmer Switch?
You will need a screwdriver, wire stripper, voltage tester, and wire nuts. These tools help safely remove the old switch and connect the dimmer switch wires securely.
Why Won’t My Dimmer Switch Work Properly?
Improper wiring, incompatible bulbs, or a faulty dimmer can cause issues. Double-check connections and bulb type. Replace the dimmer switch if problems persist after troubleshooting.
Conclusion
Connecting a dimmer light switch is simple and useful. It lets you control light brightness easily. Always turn off power before starting work. Follow the steps carefully for a safe setup. Double-check your wiring before turning the switch on. Enjoy the cozy light you create in your room.
This small change can improve your space a lot. Try it yourself and see the difference.