Are you dealing with damaged anchor stud walls and don’t know where to start? You’re not alone, and the good news is that fixing them is easier than you might think.
Imagine restoring your walls to their original strength and appearance without spending a fortune or calling in expensive professionals. In this guide, you’ll discover simple, step-by-step solutions that anyone can follow. By the end, you’ll feel confident tackling the repairs yourself and protecting your home for years to come.
Keep reading to learn how to fix your damaged anchor stud walls quickly and effectively.
Identify Anchor Stud Damage
Identifying damage to anchor stud walls is the first step in fixing them. Understanding the signs helps prevent bigger problems. Early detection saves time and money.
Anchor studs hold walls firmly. Damage weakens the structure and causes safety risks. Spotting damage early keeps your walls strong and safe.
Signs Of Damage
Look for cracks near the studs on the wall surface. Walls may feel loose or wobbly when pushed. Nails or screws might come out easily. Paint can bubble or peel around the damage. Gaps or holes may appear near the anchor points. Doors and windows might not close properly. These signs show the anchor studs could be damaged.
Common Causes
Water leaks can cause wood to rot and weaken. Poor installation leads to loose or missing anchors. Heavy loads or impacts put stress on studs. Termites and pests eat away at wooden anchors. Natural settling of the building causes shifting and cracks. Using wrong materials can also cause damage. Identifying the cause helps in choosing the right repair method.
Gather Essential Tools
Before starting to fix damaged anchor stud walls, gather all essential tools. Having the right tools makes the repair process smoother. It saves time and ensures safety. Prepare everything in one place for easy access.
Safety Gear
Protect yourself first. Wear safety goggles to shield your eyes from dust and debris. Use gloves to protect your hands from sharp edges and splinters. A dust mask helps you breathe safely in dusty areas. Wear long sleeves and pants to avoid skin scratches. Safety boots protect your feet from heavy falling objects. Safety gear keeps injuries away and helps you work confidently.
Repair Materials
Collect materials needed for the repair. Get replacement anchor studs that match the damaged ones. Use wood glue to secure loose parts firmly. Have wood filler ready to fill small holes and cracks. Sandpaper smooths rough surfaces before painting or finishing. Use screws and nails suitable for wall studs. Having all materials ready avoids interruptions during repair.
Prepare The Wall Surface
Preparing the wall surface is the first step to fix damaged anchor stud walls. This step ensures the repair material sticks well and lasts longer. A clean, smooth surface helps create a strong bond between the wall and the patch. Take your time to prepare the area correctly for the best results.
Remove Loose Debris
Start by removing all loose debris from the damaged area. Use a brush or a scraper to clear away dust, old paint, and crumbling plaster. Loose material can weaken the repair and cause it to fail. Make sure to clean the edges around the damage to create a solid base for patching.
Clean The Area
After removing debris, clean the wall surface thoroughly. Use a damp cloth or sponge to wipe away dust and dirt. Avoid soaking the wall, just enough moisture to remove particles. A clean surface improves adhesion and prevents bubbles or cracks in the repair. Let the wall dry completely before applying any filler or patching compound.
Fix Small Cracks And Holes
Small cracks and holes in anchor stud walls often appear over time. These minor damages can worsen if left untreated. Fixing them early keeps walls strong and looking good. The process is simple and requires just a few materials. Follow clear steps to repair these small issues and restore your wall’s smooth surface.
Apply Filler
Start by cleaning the crack or hole. Remove dust and loose pieces for better grip. Use a putty knife to apply filler into the damaged area. Press the filler firmly to fill the space completely. Overfill slightly to allow for sanding later. Let the filler dry according to the product instructions. This step is key for a solid repair.
Smooth And Sand
Once the filler is dry, check the surface. Use sandpaper to smooth out the filled area. Sand gently until the surface is even with the wall. Wipe away dust with a clean cloth. This prepares the wall for painting or finishing. Smooth repairs blend in and look natural. Take your time to get a perfect finish.
Repair Larger Damages
Repairing larger damages on anchor stud walls requires more effort and care. Small fixes won’t hold well if the damage is big. Proper repair helps keep the wall strong and safe.
Two main steps help fix larger damage: reinforcing the studs and replacing damaged sections. These steps restore the wall’s structure and prepare it for finishing.
Reinforce Studs
Start by checking the strength of the existing studs. Use extra wood pieces to support weak or cracked studs. Attach the new wood firmly with nails or screws.
Reinforcing helps stop further damage and adds support. Make sure the added pieces fit tightly to avoid movement. This step is key for a long-lasting repair.
Replace Damaged Sections
Remove any parts of the studs that are too damaged to fix. Cut out the broken wood carefully without harming the rest of the wall. Measure and cut new wood pieces to match the removed sections.
Install the new sections by nailing or screwing them in place. Check that the new wood aligns perfectly with the existing studs. This replacement keeps the wall solid and ready for finishing touches.

Credit: www.youtube.com
Seal And Protect The Wall
After repairing damaged anchor stud walls, sealing and protecting the surface is crucial. This step prevents moisture, dirt, and damage from returning. A well-sealed wall lasts longer and stays stronger. Follow simple steps to apply primer and finish the wall properly.
Apply Primer
Start by applying a good-quality primer. Primer helps the paint stick better to the wall. It also blocks stains and seals any small cracks. Use a brush or roller to spread the primer evenly. Let it dry completely before the next step. This creates a smooth base for painting.
Paint Or Finish
Choose paint or finish that suits the room’s use. For damp areas, use moisture-resistant paint. Apply at least two coats for full coverage. Allow each coat to dry well. This protects the wall from water and dirt. A fresh finish also improves the wall’s look and feel.
Prevent Future Damage
Preventing future damage to anchor stud walls is key to keeping your home safe and sound. Small issues can grow into big problems fast. Taking steps now saves time and money later. Focus on regular checks and good care. These habits help keep walls strong and stable for years.
Regular Inspection
Check your walls often for cracks or loose studs. Look closely at areas near doors and windows. Use a flashlight to see hidden spots. Early signs include small cracks, bulges, or noise when touched. Catching problems early stops damage from spreading. Mark any issues and fix them quickly. Make inspections part of your home routine.
Proper Wall Maintenance
Keep walls dry by fixing leaks right away. Moisture weakens wood and metal parts inside walls. Avoid hanging heavy items on weak spots. Use anchors made for your wall type. Clean walls gently to avoid damage. Paint walls to protect them from water and pests. Good care helps walls stay strong and last longer.
Credit: www.youtube.com
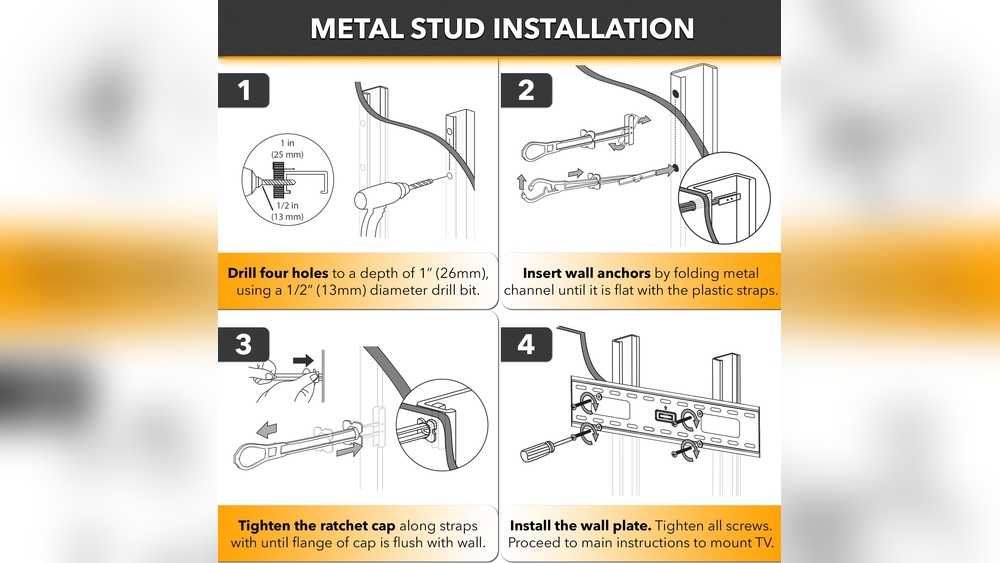
Credit: condomounts.com
Frequently Asked Questions
How Do I Identify Damaged Anchor Stud Walls?
Look for cracks, bulges, or loose studs in the wall. Check for unusual sounds or movement when pressed. Moisture damage or mold can also indicate issues. Early identification prevents further structural damage and costly repairs.
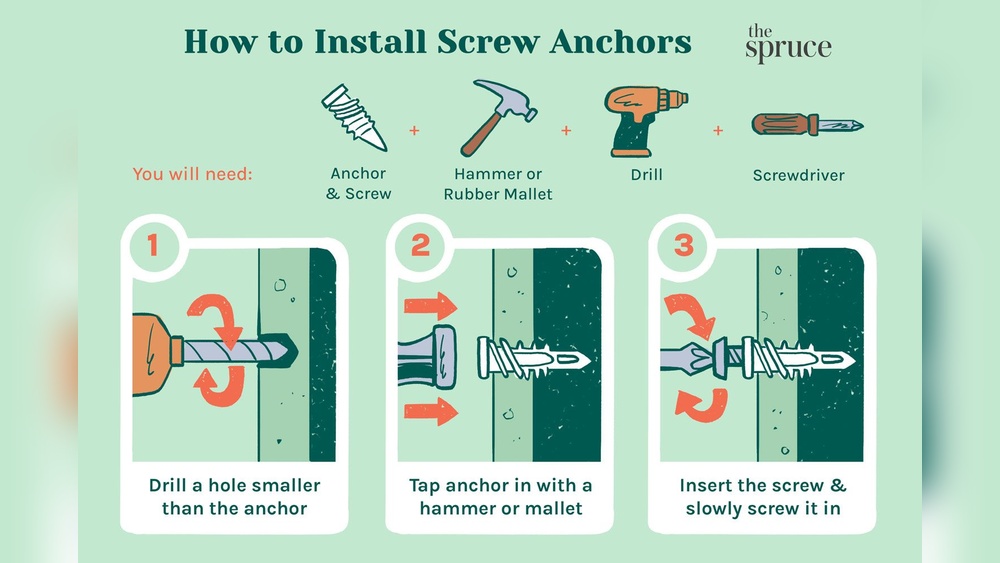
What Tools Are Needed To Fix Anchor Stud Walls?
You need a hammer, nails, screws, drill, stud finder, and a pry bar. Safety gear like gloves and goggles is essential. Measuring tape and a level help ensure precision during repair.
Can I Repair Damaged Anchor Studs Myself?
Yes, minor damage can be fixed with proper tools and knowledge. Replace or reinforce weak studs and fill cracks with suitable materials. For severe damage, consult a professional to ensure safety and compliance.
How Long Does It Take To Repair Anchor Stud Walls?
Minor repairs may take a few hours, while major fixes can take days. Time depends on damage extent and repair method. Planning and preparation can speed up the process.
Conclusion
Fixing damaged anchor stud walls takes patience and care. Start by assessing the damage carefully. Use the right tools to remove loose material. Replace or reinforce the studs as needed. Apply new drywall or patches smoothly. Sand and paint to match the wall’s finish.
Regular checks can prevent future damage. Small repairs save time and money. Keep your walls strong and safe. Simple steps make a big difference. Ready to restore your wall’s strength?