Are you struggling to hang something sturdy on your walls without worrying about damage or slipping? Installing wall anchors with rounded corners could be the simple solution you need.
These anchors provide extra grip and protect your walls from cracks, making your projects stronger and cleaner. In this guide, you’ll learn exactly how to install them step-by-step, even if you’ve never done it before. Keep reading, and you’ll soon have the confidence to secure your shelves, pictures, or hooks like a pro.
Choosing The Right Wall Anchors
Choosing the right wall anchors is important for a strong hold. The anchor must fit the wall type and the weight of the object. Picking the wrong anchor can cause damage or make the object fall. This guide helps you select the best anchor for your needs.
Types Of Wall Anchors
There are several types of wall anchors. Plastic expansion anchors work well with light objects and drywall. Metal anchors offer more strength and are good for heavier items. Toggle bolts spread the load behind the wall for extra support. Choose the type based on weight and wall material.
Materials And Sizes
Wall anchors come in various materials like plastic, metal, and nylon. Plastic anchors suit light loads and softer walls. Metal anchors handle heavier loads and hard walls. Sizes vary to match screw diameter and wall thickness. Use anchors that fit your screw and wall size perfectly.
Rounded Corner Features
Anchors with rounded corners provide better grip in drywall. The shape helps prevent tearing around the hole. Rounded corners also make installation easier by reducing wall damage. This type of anchor is ideal for delicate walls and light to medium loads.
:strip_icc()/how-to-install-corner-beads-for-smooth-drywall-edges-5fd0957d9346402796487b155fda6f44.jpg)
Credit: www.bhg.com
Tools And Materials Needed
Installing wall anchors with rounded corners requires specific tools and materials. Using the right items makes the job easier and safer. Preparing everything before starting saves time and effort.
Essential Tools
- Power drill or hand drill for making holes
- Drill bits matching the anchor size
- Screwdriver to tighten screws
- Measuring tape to mark anchor spots
- Level to keep anchors straight
- Hammer for tapping anchors into place
Safety Gear
- Safety glasses to protect your eyes
- Dust mask to avoid inhaling debris
- Work gloves to protect your hands
- Ear protection if using loud power tools
Additional Supplies
- Wall anchors with rounded corners
- Screws that fit the anchors
- Pencil for marking drill points
- Wall patch kit for fixing mistakes
Preparing The Wall
Preparing the wall is the first step to install wall anchors with rounded corners correctly. A well-prepared wall ensures the anchors hold firmly and safely. This step involves finding the right spots, cleaning the area, and making small holes for the anchors.
Locating Studs And Marking Spots
Find studs behind the wall for stronger support. Use a stud finder tool to locate them easily. Mark the spots with a pencil where you want to place the anchors. Avoid areas with wires or pipes. Marking helps guide drilling and keeps the anchors secure.
Cleaning The Surface
Clean the wall surface before drilling. Remove dust, dirt, and grease with a damp cloth. A clean surface helps the anchors stick better. Wait for the wall to dry fully before moving to the next step.
Drilling Pilot Holes
Use a drill bit slightly smaller than the anchor size. Drill pilot holes at the marked spots gently. Keep the drill straight to avoid angled holes. Pilot holes make it easier to insert the anchors and reduce wall damage.
Installing Wall Anchors
Installing wall anchors is a simple way to hang items securely on your walls. Wall anchors hold screws tightly, especially in drywall or plaster. They prevent damage and keep your items stable. This guide explains how to install wall anchors with rounded corners for a clean, strong hold.
Inserting The Anchor
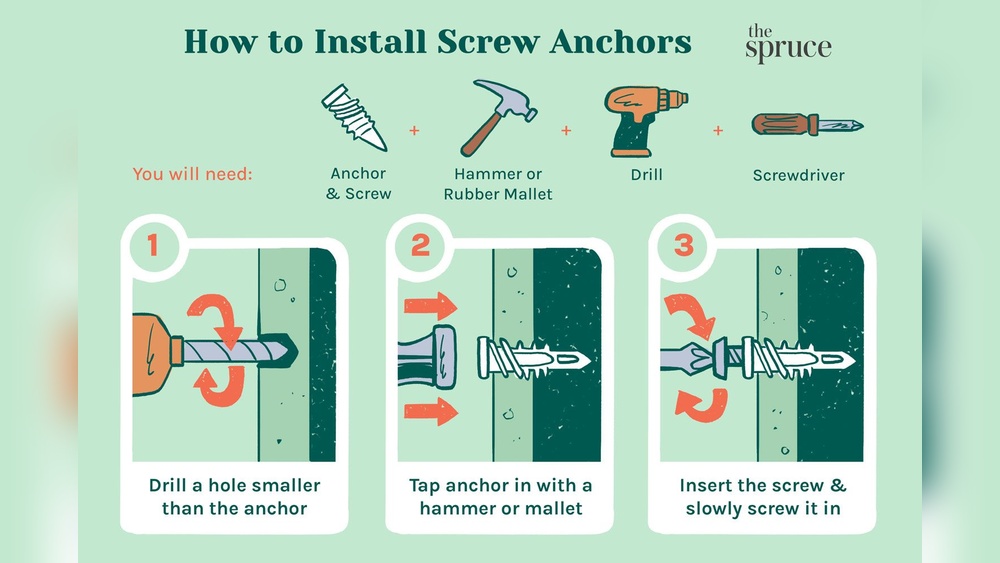
First, choose the right size anchor for your screw. Mark the spot on the wall carefully. Use a drill bit that fits the anchor size. Drill a hole straight into the wall. Push the anchor gently into the hole. It should fit snugly without force. Tap it lightly with a hammer if needed.
Securing The Anchor Properly
Next, insert the screw into the anchor. Turn the screw slowly with a screwdriver. Do not overtighten; the anchor can break. Stop when the screw feels firm. The anchor expands inside the wall. This expansion holds the anchor in place. Check if the anchor feels stable by pulling lightly on the screw.
Handling Rounded Corners
Rounded corners need extra care. Avoid placing anchors too close to edges. Measure a small distance from the curve. This prevents cracks or breakage. Use anchors designed for curved surfaces if possible. Press the anchor evenly to follow the corner shape. This helps maintain a strong grip on the wall.
Attaching Fixtures
Attaching fixtures to wall anchors with rounded corners is the final step in a secure installation. This step ensures your items stay firmly on the wall without damage. Properly attaching fixtures helps keep everything steady and safe.
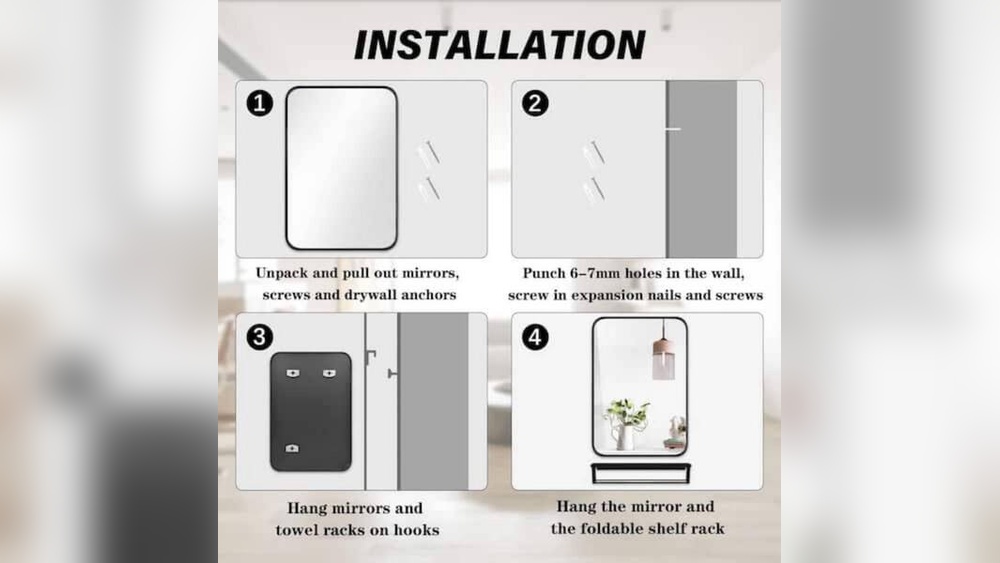
Aligning Fixtures
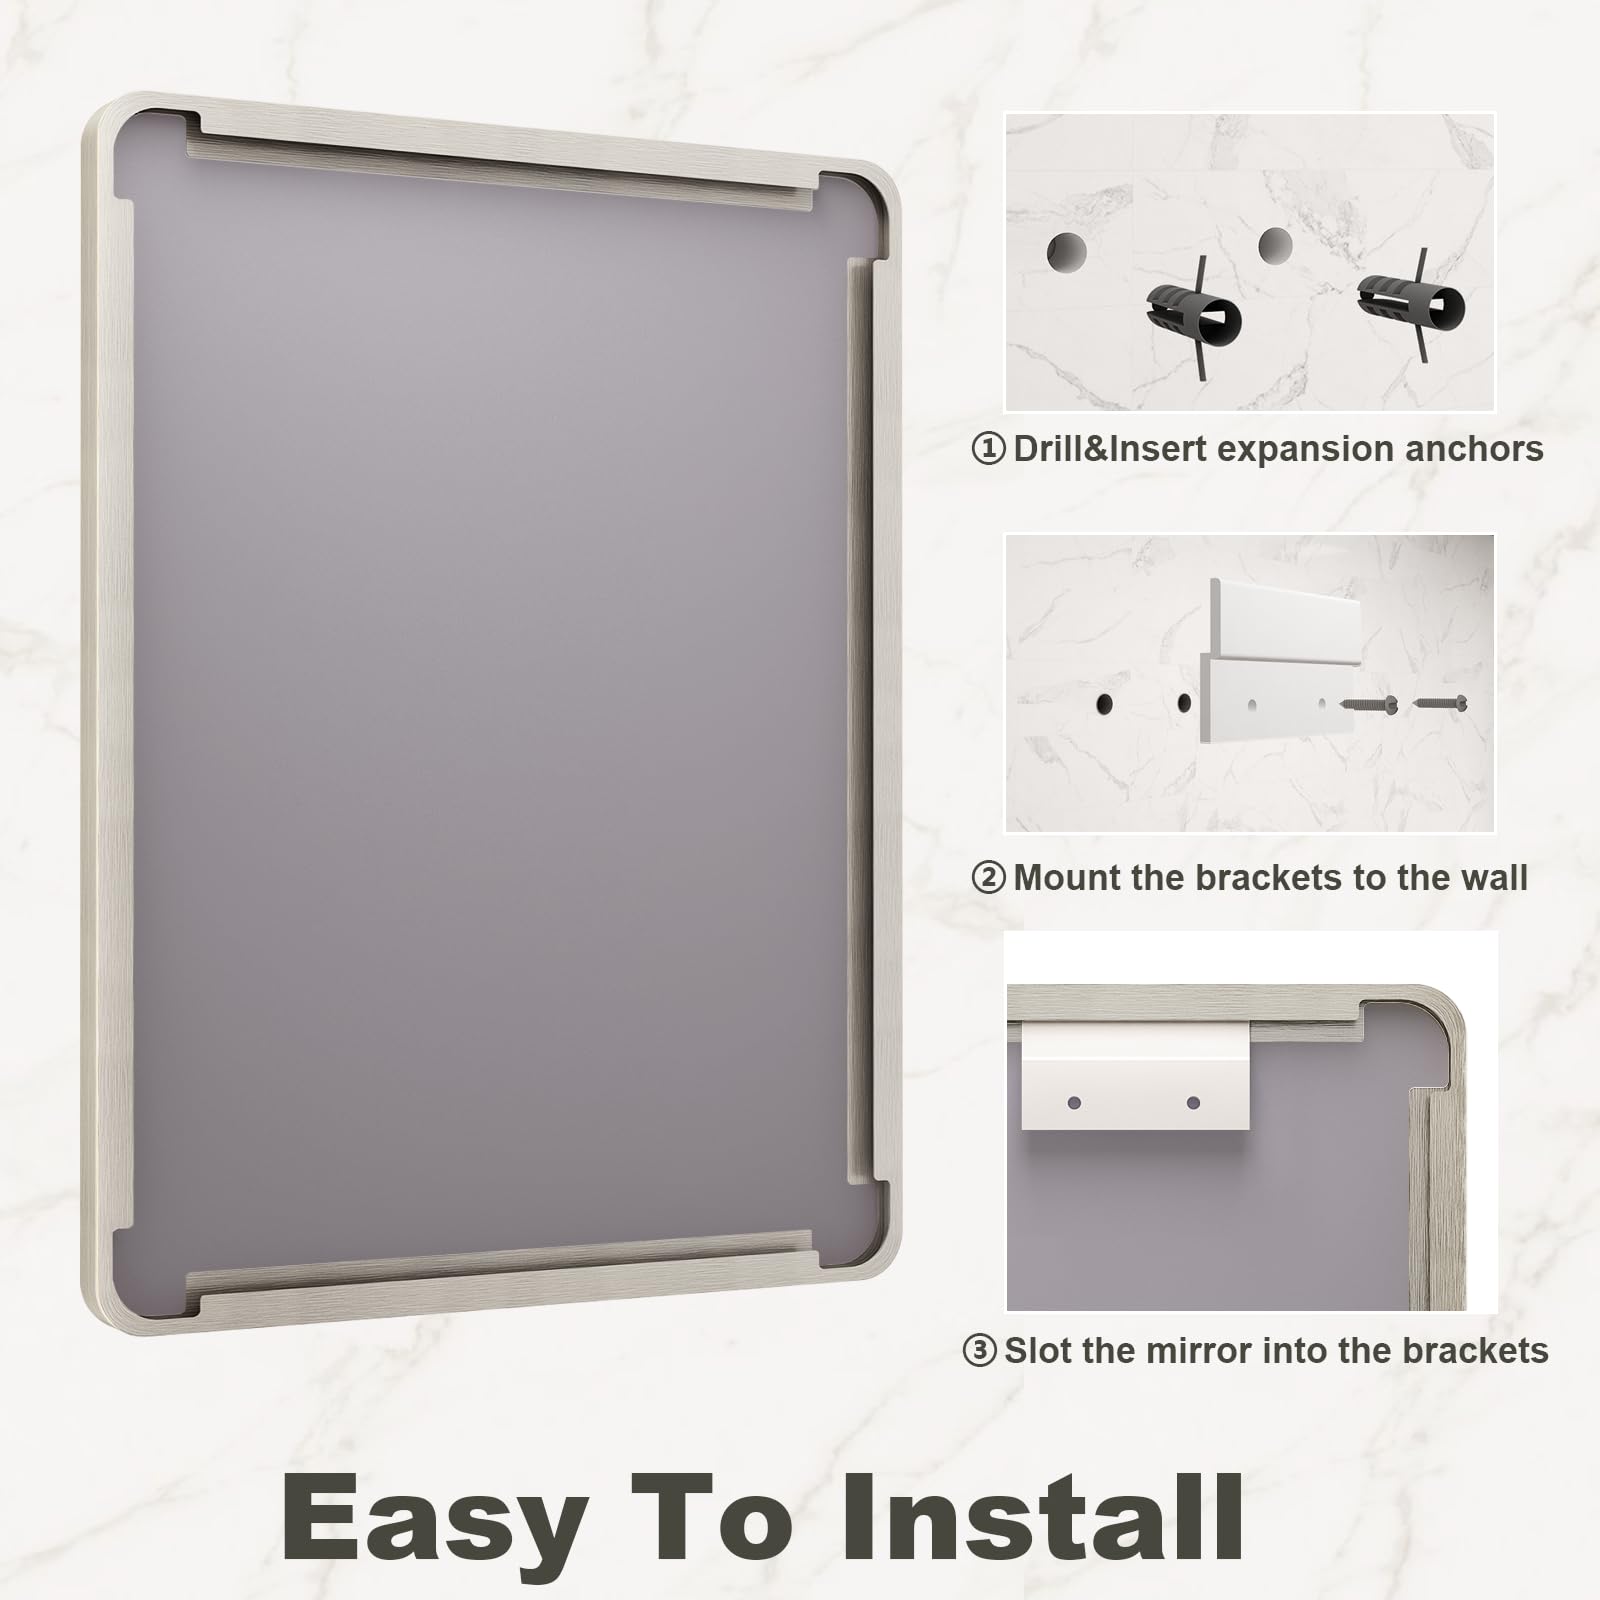
Start by placing the fixture over the wall anchors. Match the holes on your fixture with the anchors. Take time to check the alignment before drilling screws. Proper alignment prevents the fixture from tilting or coming loose later.
Screwing Into Anchors
Insert screws through the fixture holes into the anchors. Use a screwdriver or drill with a suitable bit. Turn screws slowly and steadily to avoid stripping. Stop when the screw feels tight but do not overtighten.
Ensuring Stability
Once screws are in place, gently shake the fixture. It should not move or wobble. If it shifts, tighten the screws a little more. Check that the fixture sits flush against the wall. Stability means your fixture will hold strong over time.
Troubleshooting Common Issues
Installing wall anchors with rounded corners can sometimes lead to common problems. These issues can affect the strength and stability of your fixtures. Understanding how to fix these problems quickly saves time and effort. Below are some frequent troubles and ways to solve them.
Loose Anchors
Loose anchors often happen if the hole is too big. The anchor cannot grip the wall tightly. Try using a smaller drill bit for a snug fit. Push the anchor in firmly until it sits flush with the wall. If the hole is too large, fill it with a wall repair compound first. Let it dry completely before re-drilling and inserting the anchor.
Cracked Walls
Cracks may form around anchors if the wall is weak or old. Avoid forcing the anchor into the hole. Use a lighter touch and check the wall condition first. Reinforce the area with wall repair tape or patching plaster. Let it dry well before installing the anchor. This prevents further damage and ensures a steady hold.
Misaligned Fixtures
Misaligned fixtures often come from uneven anchor placement. Measure twice, drill once. Mark exact spots clearly before drilling. Use a level tool to keep fixtures straight. If holes are off, fill the wrong holes with patching compound. Wait for it to dry, then drill new holes carefully. This keeps your fixtures looking neat and secure.
Maintenance Tips
Proper maintenance keeps wall anchors with rounded corners safe and strong. Small steps help avoid big problems later. Regular care extends the life of your anchors. It also keeps your walls secure and looking good.
Regular Checks
Check the anchors often for any signs of wear or damage. Look for cracks, looseness, or rust. Use a flashlight to see inside the holes. Tighten any parts that feel loose. Early checks stop small issues from growing.
Reinforcing Anchors
Reinforce the anchors if they start to feel weak. Add extra support around the edges. Use stronger screws that fit well with the anchor size. Avoid over-tightening, as it can cause damage. Reinforcement makes the anchors hold weight better.
Replacing Damaged Parts
Replace any damaged anchors quickly to keep the wall safe. Remove old anchors carefully without hurting the wall. Choose new anchors that match the weight and wall type. Install the new ones following proper steps. Fresh parts keep your wall secure and stable.
Credit: www.amazon.com

Credit: www.amazon.com
Frequently Asked Questions
What Tools Are Needed To Install Wall Anchors With Rounded Corners?
You need a drill, screwdriver, wall anchors, screws, and a pencil. These tools help make precise holes and secure anchors firmly. Using the right tools ensures a strong, stable installation that supports your wall-mounted items safely.
How Do I Choose The Right Wall Anchor Size?
Select an anchor size based on the wall thickness and weight load. Use larger anchors for heavier items and thicker walls. Proper sizing prevents damage and ensures your anchor holds securely over time.
Can I Install Wall Anchors Without Drilling?
No, drilling is necessary to create a proper hole for the anchor. Drilling ensures the anchor fits snugly and holds weight effectively. Skipping this step risks weak support and potential wall damage.
How To Avoid Damaging Walls When Installing Anchors?
Use a level to mark holes precisely and drill slowly to avoid cracks. Choose the correct anchor type for your wall material. Proper technique minimizes damage and ensures strong, lasting support.
Conclusion
Installing wall anchors with rounded corners is simple and effective. Start by choosing the right anchor size for your wall and item. Drill a hole carefully and insert the anchor straight. Tighten the screw gently to avoid damage. Rounded corners help prevent wall cracks and give a neat finish.
With these steps, your items stay secure and your wall looks good. Practice a few times to feel confident. This method suits many wall types and keeps your space safe and tidy. Try it today and see the difference.