Are you looking to make your home safer with a sturdy deadbolt? Installing one might sound tricky, but you can do it yourself with the right steps.
Imagine having the confidence that your door is locked tight, keeping your family and belongings secure. In this guide, you’ll learn exactly how to put a deadbolt in your door, step by step. By the end, you’ll have the skills to boost your home’s security without calling a locksmith.
Keep reading, and take control of your home’s safety today.
Credit: www.schlage.com
Choose The Right Deadbolt
Choosing the right deadbolt is important for your door’s security. A good deadbolt keeps your home safe and gives you peace of mind. Picking the wrong type or size can cause problems later. Take time to understand your options and what fits best.
Types Of Deadbolts
Deadbolts come in three main types: single cylinder, double cylinder, and lockable thumbturn. Single cylinder deadbolts use a key outside and a thumbturn inside. Double cylinder deadbolts need a key on both sides. Lockable thumbturn deadbolts have a thumbturn that locks or unlocks with a key. Choose the type that matches your security needs and door setup.
Measuring Your Door
Measure your door’s thickness first. Most deadbolts fit doors between 1 3/8 and 1 3/4 inches thick. Check the backset too. Backset is the distance from the door edge to the center of the hole for the lock. Common backsets are 2 3/8 or 2 3/4 inches. Accurate measuring ensures the deadbolt fits and works properly.
Selecting Quality Materials
Pick deadbolts made from strong metals like brass, steel, or bronze. These materials resist wear and forced entry. Avoid cheap metals that can break easily. Look for finishes that resist rust and corrosion, especially for outdoor doors. A quality deadbolt lasts longer and keeps your home safer.
Gather Necessary Tools
Gathering the right tools is the first step to install a deadbolt correctly. Using proper tools makes the job easier and faster. Prepare everything before starting to avoid interruptions.
Basic Tools Needed
You need a drill with drill bits to make holes. A screwdriver is essential for screws and tightening the lock. A measuring tape helps place the deadbolt in the right spot. A pencil marks where to drill. A hammer might be useful for small adjustments. These tools are enough for most deadbolt installations.
Optional Tools For Precision
A chisel helps create a clean space for the lock plate. A level ensures the deadbolt is straight and works smoothly. A hole saw drill bit can make cleaner, round holes. These tools improve the finish but are not always necessary. They help make the installation look professional and neat.
Mark And Prepare The Door
Marking and preparing the door is the first step to install a deadbolt correctly. This step ensures the lock fits well and works smoothly. Careful measurement and marking help avoid mistakes and save time.
Take your time to check everything before drilling. Proper preparation makes the rest of the installation easier and safer.
Locate The Lock Height
Choose the height for the deadbolt on the door. Usually, it is about 6 to 12 inches above the doorknob. Use a tape measure to find this spot. Mark it clearly with a pencil. This height allows easy reach and good security.
Mark Drill Points
Mark the exact points where you will drill holes. One hole goes through the face of the door for the lock cylinder. Another hole goes into the edge for the latch. Use the deadbolt template or measure carefully. Double-check your marks before drilling.
Check Door Thickness
Measure the door thickness with a ruler or tape measure. Most deadbolts fit doors between 1-3/8 inches and 1-3/4 inches thick. If your door is thinner or thicker, find a compatible deadbolt. Proper fit ensures the lock works well and stays secure.
Drill Holes For The Deadbolt
Drilling holes for the deadbolt is a crucial step in installing a secure lock. Precise holes ensure the deadbolt fits well and works smoothly. This process involves drilling two main holes: the face bore and the edge bore. Taking your time here helps avoid mistakes and keeps the door strong.
Drill The Face Bore
The face bore is the large hole on the door’s face. Mark the spot where the deadbolt will go. Use a hole saw bit that matches the deadbolt size. Hold the drill steady and drill straight through the door. Drill slowly to keep the hole clean and smooth.
Drill The Edge Bore
The edge bore is the smaller hole on the side of the door. It connects with the face bore for the bolt to slide in. Mark the exact point on the door edge. Use a spade bit or hole saw to drill the hole. Drill carefully to avoid splintering the wood.
Clean Up The Holes
Remove any wood chips or splinters inside the holes. Use sandpaper to smooth the edges gently. Check the holes for any rough spots or uneven parts. Clean holes help the deadbolt fit perfectly and work easily. Take your time to make the holes neat and tidy.
Install The Deadbolt Mechanism
Installing the deadbolt mechanism is a key step in securing your door. This part fits inside the door and controls the locking bolt. Careful installation ensures smooth operation and strong security.
Follow the steps closely for a proper fit. Precision is important to avoid future problems. Let’s start with attaching the bolt to the door edge.
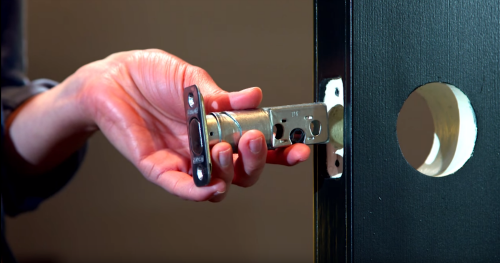
Attach The Bolt To Door Edge
First, take the deadbolt bolt piece. Line it up with the hole on the door edge. The bolt should slide easily into this space. Use screws to fasten the bolt securely. Tighten the screws but do not overdo it. The bolt must move freely without sticking.
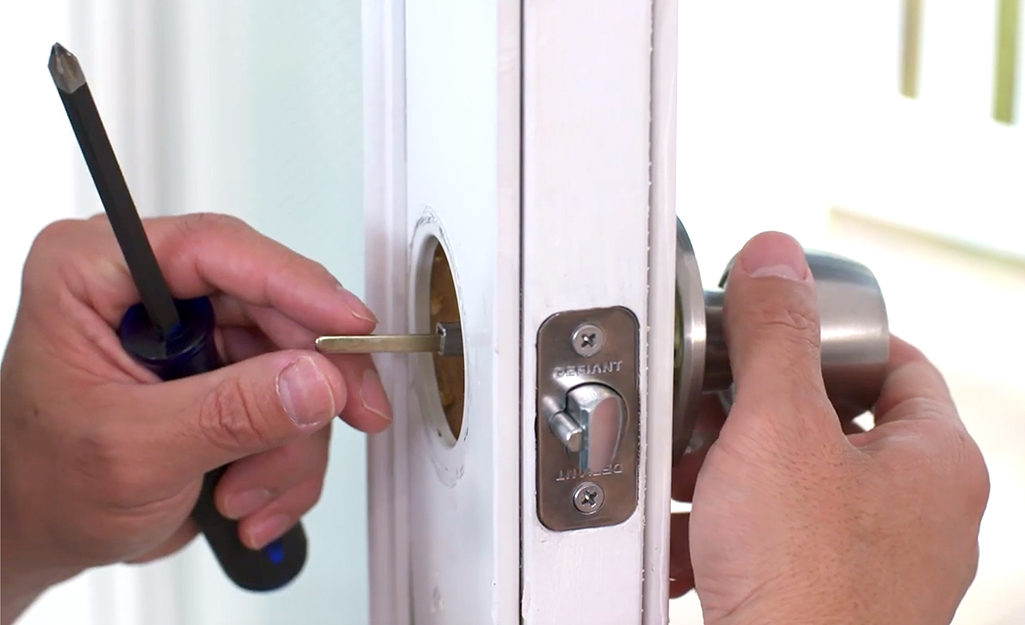
Insert The Deadbolt Assembly
Next, insert the deadbolt assembly into the door’s main hole. Align it so the bolt connects with the mechanism inside. Push the assembly in until it fits flush with the door surface. Use the screws provided to secure the assembly. Make sure everything is tight but not forced. Test the bolt by turning the thumb turn or key. It should slide smoothly in and out.
Attach Exterior And Interior Plates
Attaching the exterior and interior plates is a key step in installing a deadbolt. These plates hold the lock firmly in place. Proper attachment ensures the deadbolt works smoothly and keeps your door secure.
The process requires careful alignment and secure fastening. Each plate must fit perfectly to avoid any gaps or looseness. This step makes the lock sturdy and reliable.
Aligning The Plates
First, position the exterior plate on the outside of the door. Make sure the keyhole aligns with the hole in the door. Next, place the interior plate on the inside of the door. Both plates should line up perfectly with the bolt mechanism inside.
Check that the plates sit flat against the door surface. There should be no space between the plate and the door. Proper alignment prevents the lock from sticking or jamming.
Securing With Screws
Use the screws provided with your deadbolt kit. Insert each screw into the holes on the plates. Tighten them evenly to hold the plates firmly.
Do not overtighten screws as this can strip the holes. Tight screws keep the lock stable during use. After securing, test the deadbolt to confirm smooth operation.
Install The Strike Plate
Installing the strike plate is a key step in securing your deadbolt. It holds the bolt firmly in place when locked. Proper installation makes your door stronger and harder to open without a key. Follow these steps carefully to fit the strike plate perfectly.
Marking The Door Frame
Close the door and turn the deadbolt to mark where the bolt hits. Use a pencil to mark the exact spot on the door frame. Check the height and position. This ensures the strike plate will align with the bolt.
Chiseling For The Plate
Place the strike plate on the marked spot. Trace around it with a pencil. Use a chisel to carefully carve out a shallow recess. The strike plate should fit flush with the wood. Take your time to avoid splintering the frame.
Securing The Strike Plate
Put the strike plate into the recess. Align the screw holes with the door frame. Use screws to fasten the plate tightly. Check the bolt slides smoothly into the plate. Tight screws keep the plate steady and secure.
Credit: www.homedepot.com
Test The Deadbolt
Testing the deadbolt is a key step after installation. It ensures your lock works properly and keeps your home safe. This process lets you spot any issues early. Make sure the deadbolt moves smoothly and fits well into the strike plate. Don’t skip this step, as it affects security and ease of use.
Check Smooth Operation
Turn the key or thumb turn slowly. The deadbolt should slide in and out without sticking. Listen for any grinding or resistance. Try locking and unlocking several times. The bolt should move freely and align with the door frame. Test both sides of the door if possible. Smooth action means the lock is installed correctly.
Adjust If Necessary
If the deadbolt sticks, check the strike plate position. Loosen screws and move the plate slightly. Tighten the screws again and test the bolt. You may need to file the strike plate hole for a better fit. Adjust the latch or bolt alignment to prevent jamming. Small changes can make a big difference. Repeat testing after each adjustment to confirm smooth operation.
Maintain Your Deadbolt
Maintaining your deadbolt is key to keeping your home secure. A well-kept deadbolt lasts longer and works smoothly every time. Simple care steps prevent jams and wear. Spend a little time now to avoid big problems later.
Lubrication Tips
Use graphite powder or silicone spray for lubrication. Avoid oil-based lubricants; they attract dirt and cause clogs. Apply a small amount to the keyhole and bolt mechanism. Turn the key several times to spread the lubricant evenly. Do this twice a year to keep parts moving smoothly.
Regular Inspection
Check your deadbolt every few months for signs of damage. Look for loose screws or misalignment. Test the lock by turning the key and the thumb turn. Make sure the bolt slides in and out easily. Tighten any loose parts promptly to avoid malfunction. Early detection helps prevent costly repairs.

Credit: support.shopyalehome.com
Frequently Asked Questions
What Tools Are Needed To Install A Deadbolt Lock?
You need a drill, screwdriver, tape measure, pencil, hole saw, and chisel. These tools help ensure precise installation. Having the right tools makes the process faster and more accurate.
How Do I Choose The Right Deadbolt For My Door?
Select a deadbolt that fits your door’s thickness and security needs. Consider single or double cylinder types. Quality and durability are important for effective home security.
Can I Install A Deadbolt Without Professional Help?
Yes, with basic DIY skills and proper tools, you can install a deadbolt yourself. Follow manufacturer instructions carefully for safe and correct installation. It saves money and enhances your home’s security.
How Long Does It Take To Install A Deadbolt Lock?
Installing a deadbolt usually takes 30 to 60 minutes. Time depends on your experience and door type. Proper installation ensures maximum security and lock functionality.
Conclusion
Installing a deadbolt adds strong security to your door. It keeps your home safer and gives peace of mind. Follow the steps carefully to fit it right. Take your time and use the right tools. A well-installed deadbolt works smoothly and lasts long.
Now you can protect your space better than before. Safety starts with simple actions like this one. Keep your home safe, one lock at a time.