Are you tired of fumbling for the light switch in the dark? Installing a motion detector light switch can change that instantly.
Imagine lights that turn on automatically the moment you enter a room—saving you time, energy, and hassle. In this guide, you’ll discover simple, step-by-step instructions to install your own motion detector light switch safely and efficiently. By the end, you’ll have a smarter, more convenient home that responds to your every move.
Ready to make your lighting work for you? Let’s get started!
Tools And Materials Needed
Before installing a motion detector light switch, gather the right tools and materials. This step makes the process easier and faster. Having everything ready helps avoid delays and mistakes. Safety is also important, so prepare the necessary gear.
Essential Tools
- Screwdriver (flathead and Phillips)
- Wire stripper
- Voltage tester
- Drill with bits
- Electrical tape
- Needle-nose pliers
Required Materials
- Motion detector light switch
- Wire connectors (wire nuts)
- Electrical box (if needed)
- Light bulbs compatible with the switch
Safety Gear
- Insulated gloves
- Safety goggles
- Non-conductive shoes
- Flashlight or headlamp
Choosing The Right Motion Detector Switch
Choosing the right motion detector switch is important for safety and convenience. The right switch saves energy and works well with your home’s wiring. It also fits your lifestyle and needs. Understanding different types and features helps pick the best option.
Types Of Motion Detector Switches
There are several types of motion detector switches. Passive infrared (PIR) sensors detect body heat. Ultrasonic sensors use sound waves to sense movement. Dual-technology switches combine both PIR and ultrasonic sensors. Each type has pros and cons for different rooms.
Compatibility With Home Wiring
Check if the switch fits your home’s wiring system. Some switches need a neutral wire, common in modern homes. Older homes may lack a neutral wire, requiring special switches. Make sure the switch matches your voltage and wiring type. This ensures safe and proper installation.
Features To Consider
Look for adjustable sensitivity and time delay settings. These let you control how long the light stays on. Some switches have daylight sensors to avoid turning on in bright light. Consider the switch’s range and detection angle. Choose one that covers the area you need.
Preparing For Installation
Preparing for installation is the first step to ensure a safe and smooth process. This phase involves turning off the power, removing the old switch, and checking the wiring. Taking these steps carefully helps avoid accidents and makes the new motion detector light switch work properly.
Turning Off Power
Safety is the top priority. Locate your home’s circuit breaker panel. Switch off the breaker that controls the light switch’s circuit. Use a voltage tester to confirm no electricity flows to the switch. Never skip this step to avoid electric shocks.
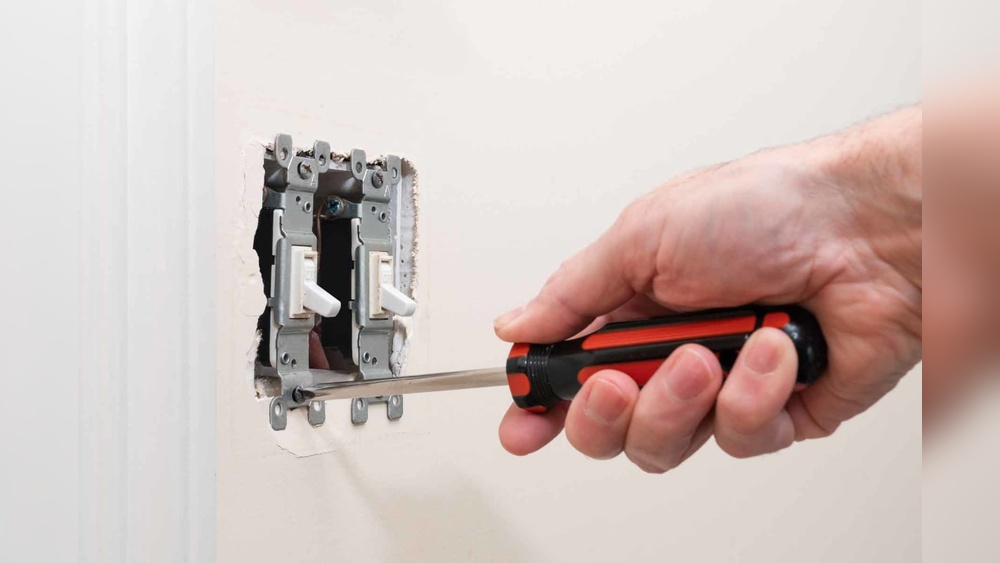
Removing Existing Switch
Remove the switch cover plate using a screwdriver. Unscrew the old switch from the electrical box. Gently pull the switch out to see the wires behind it. Keep track of how the wires connect to the switch. This helps when installing the new device.
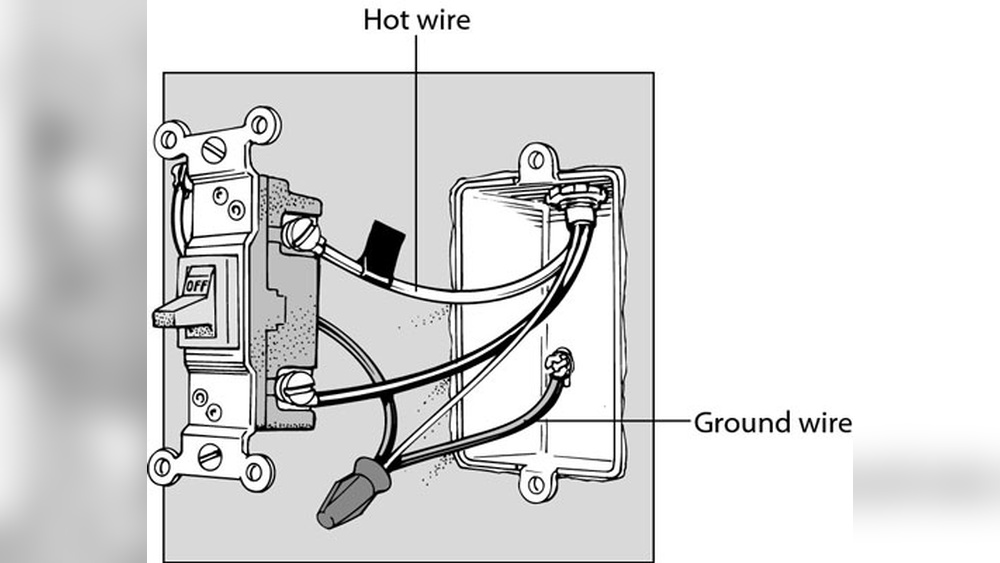
Checking Wiring Setup
Identify each wire: usually black is live, white is neutral, and green or bare is ground. Compare the wires to the new switch’s instructions. Confirm the wiring matches the new switch’s requirements. Fix any loose or damaged wires before proceeding. Proper wiring ensures the switch works correctly and safely.

Credit: www.beeslighting.com
Wiring The Motion Detector Switch
Wiring the motion detector switch is a key step in your installation process. It controls the light by detecting movement. Proper wiring ensures safety and functionality. Take your time and follow each step carefully.
Identifying Wires
Turn off the power before starting any wiring work. Open the switch box and look at the wires. Usually, you will find three main wires: live (black), neutral (white), and ground (green or bare copper). The motion detector switch may also have a load wire. Check the switch manual for color codes.
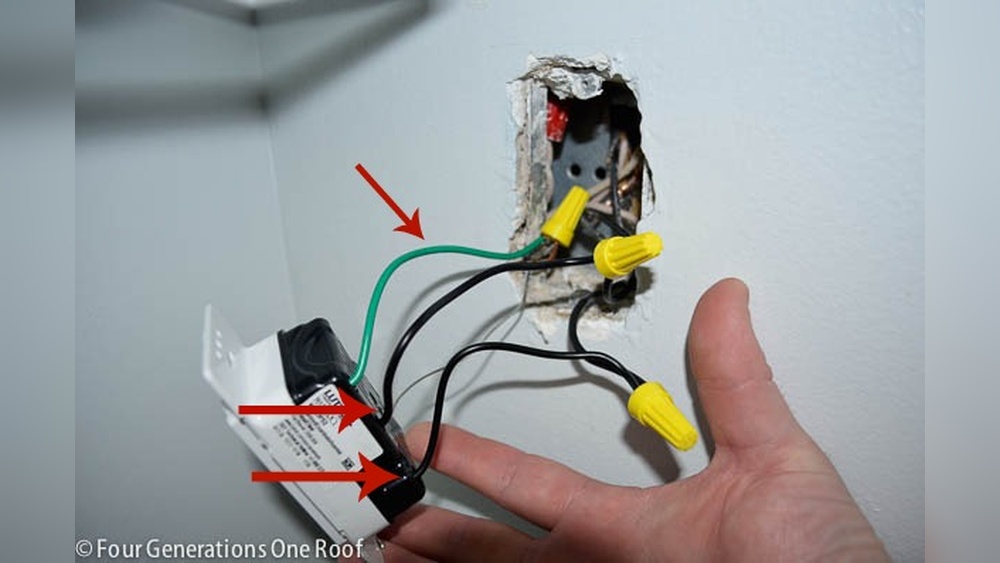
Connecting Wires Correctly
Match the wires from the wall to the switch wires. Connect live wire to live terminal, neutral to neutral, and ground to ground. Attach the load wire to the load terminal on the switch. Use wire connectors to join wires tightly. Loose connections can cause malfunctions or sparks.
Securing Connections
Push the wires neatly into the box. Make sure no bare wire is exposed outside connectors. Use electrical tape if needed. Screw the motion detector switch into place. Restore power and test the switch by moving in front of it. Secure and safe wiring gives reliable performance.
Mounting The Switch
Mounting the motion detector light switch is a key step in the installation process. This step ensures the switch works correctly and stays secure over time. Proper mounting improves sensor performance and helps maintain safety.
Positioning The Switch
Choose a spot that allows the sensor to detect movement clearly. Avoid placing the switch behind doors or furniture. The ideal height is usually around 48 inches from the floor. This height captures motion effectively in most rooms.
Attaching To Wall Box
Carefully align the switch with the wall box. Use the screws provided to secure the switch firmly. Tighten the screws just enough to hold the switch in place. Avoid over-tightening to prevent damage to the switch or wall.
Installing Cover Plate
Place the cover plate over the mounted switch. Make sure it fits snugly and covers all wiring. Secure the cover plate with screws or clips. This step gives a clean look and protects wiring from dust or damage.

Credit: www.fourgenerationsoneroof.com
Testing And Adjusting
After installing your motion detector light switch, testing and adjusting are key steps. These steps ensure the device works correctly and fits your needs. Testing confirms the switch detects motion and controls the light properly. Adjusting lets you set the right sensitivity and timer for your space. Follow these simple steps to finish the job smoothly.
Restoring Power
Turn the power back on at the circuit breaker. Check that the light switch is connected securely. Powering up the switch allows it to start sensing motion. Watch for any signs of malfunction or flickering lights. If the light does not turn on, turn off power and double-check wiring.
Testing Motion Detection
Walk in front of the sensor to test detection. The light should turn on as you move. Test from different angles and distances for full coverage. Stand still to see if the light stays on or turns off. This test ensures the motion sensor reacts properly to your presence.
Adjusting Sensitivity And Timer
Use the controls on the switch to set sensitivity. Lower sensitivity reduces false triggers from small pets or passing cars. Increase sensitivity to detect movement farther away. Adjust the timer to decide how long the light stays on. Shorter time saves energy, longer time gives more light. Make small changes and test each setting for best results.
Troubleshooting Common Issues
Troubleshooting common issues with your motion detector light switch can save time and frustration. Many problems are simple to fix. Understanding the cause helps you get the switch working properly.
Below are solutions to frequent problems you might face after installation. Follow these steps to diagnose and solve them quickly.
Switch Not Turning On
Check the power source first. Make sure the circuit breaker is on. Confirm the wiring matches the switch instructions. Loose wires often cause no power to the switch. Use a voltage tester to verify power at the switch box. Replace the switch if it is faulty.
Light Staying On
Adjust the sensor’s sensitivity and timer settings. Sometimes the light stays on because the sensor detects constant motion. Clean the sensor lens to remove dirt or spider webs. Ensure the switch is not installed near heat sources or vents. These can trigger the sensor incorrectly.
Motion Sensor Not Detecting
Check the sensor’s angle and placement. It should cover the area where motion occurs. Avoid blocking the sensor with furniture or plants. Test the sensor in different lighting conditions. Replace the sensor if it does not respond at all.

Credit: www.youtube.com
Maintenance Tips
Proper maintenance keeps your motion detector light switch working well. It helps avoid problems and extends its life. Small care steps can save time and money later.
Cleaning The Sensor
Dust and dirt can block the sensor. Gently wipe it with a soft, dry cloth. Avoid wetting the sensor or using strong cleaners. Clean regularly to keep the sensor sensitive and accurate.
Periodic Checks
Test the switch every few months. Walk past the sensor to see if the light turns on. Check for any flickering or delays. Make sure the sensor is not blocked by furniture or plants.
Replacing The Switch
Switches wear out after many uses. If the light stops working, it might need replacement. Turn off the power before changing the switch. Follow the installation steps carefully or call a professional.
Frequently Asked Questions
What Tools Are Needed To Install A Motion Detector Light Switch?
You need a screwdriver, voltage tester, wire stripper, and electrical tape. Always turn off power before starting. Having these tools ensures safe and efficient installation of the motion detector light switch.
How Do I Connect Wires To A Motion Detector Switch?
Connect the black (hot) wire to the switch’s black wire. Attach the white (neutral) wires together. Connect the ground wire to the switch’s green screw. Follow the manufacturer’s wiring diagram for accuracy.
Can I Install A Motion Detector Switch Myself Safely?
Yes, if you follow safety guidelines and instructions carefully. Turn off power at the breaker before working. Use a voltage tester to confirm no current. If unsure, consult a licensed electrician.
How Do I Adjust Motion Detector Sensitivity And Timer?
Most switches have dials or buttons to set sensitivity and timer duration. Adjust sensitivity to detect motion at desired range. Set timer for how long lights stay on after motion stops.
Conclusion
Installing a motion detector light switch can save energy and add convenience. Follow the steps carefully to stay safe and get it right. Double-check your wiring before turning the power back on. Test the switch to make sure it works well.
This small upgrade can make your home smarter and brighter. Taking time to install it correctly pays off in the long run. Now, enjoy hands-free lighting that turns on when you need it. Simple, practical, and effective—a great addition to any space.