Are you struggling to figure out if your light switch is getting power? Knowing how to test power to a light switch with a multimeter can save you time, money, and frustration.
Whether you’re a DIY enthusiast or just want to troubleshoot a problem safely, this simple skill puts control back in your hands. Keep reading, and you’ll learn easy steps that anyone can follow to check your light switch’s power quickly and confidently.
Don’t let electrical issues keep you in the dark—let’s get started!

Credit: www.youtube.com
Tools Needed
Testing power to a light switch requires specific tools. These tools help check voltage safely and accurately. Having the right equipment makes the job easier and safer. Below are the essential tools you need to start testing.
Choosing The Right Multimeter
Pick a multimeter that measures AC voltage. It should be easy to read and use. Digital multimeters are best for beginners. Look for one with clear display and simple settings. Make sure it can measure at least 250 volts. A compact size is good for home use.
Safety Equipment
Safety is key when working with electricity. Use insulated gloves to avoid shocks. Wear safety goggles to protect your eyes. Make sure your shoes have rubber soles. Avoid working in wet areas or with wet hands. Turn off the power before starting tests.
Preparing For Testing
Preparing for testing power to a light switch is important for safety and accuracy. This step helps avoid electric shock and protects your multimeter from damage. Follow clear steps before starting your test.
Turning Off Power
First, turn off the power at the circuit breaker. This stops electricity from flowing to the switch. Use the breaker panel to find the right switch and flip it off. Confirm the power is off by checking other devices on the same circuit.
Never test a light switch with the power on. This can cause injury or damage your tools. Safety comes first in every electrical test.
Accessing The Light Switch
Remove the switch cover plate with a screwdriver. Be gentle to avoid breaking the plate. After removing the cover, you see the wires connected to the switch.
Keep the wires separated and avoid touching them together. This prevents short circuits and ensures clear testing. Now, you are ready to use the multimeter safely.
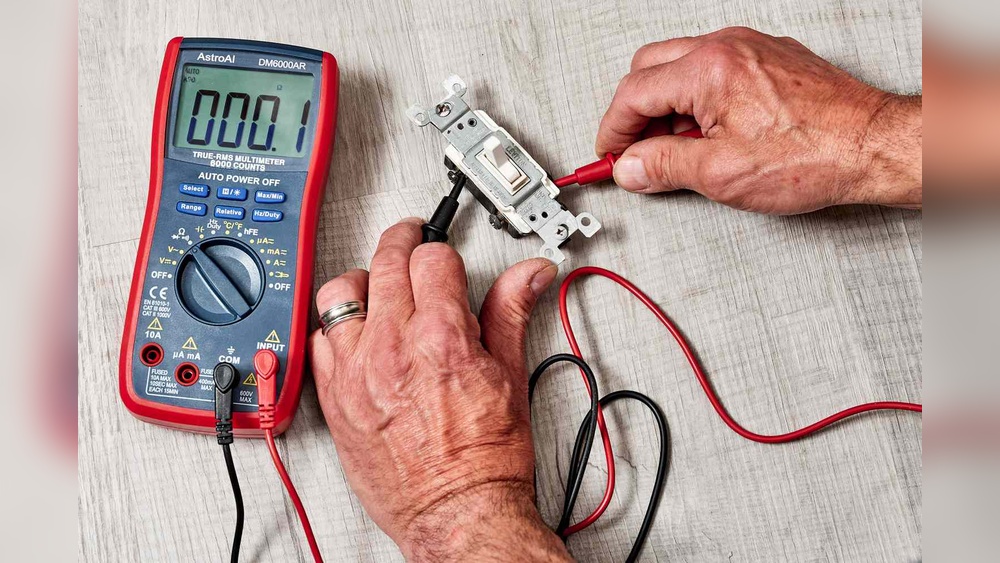
Setting Up The Multimeter
Start by turning off the power to the switch for safety. Set the multimeter to measure voltage, usually marked as “V” with a straight line. Connect the probes to the switch terminals to check if power flows correctly.
Selecting Voltage Measurement Mode
Start by turning on your multimeter. Most multimeters have a dial to choose the test mode. Look for the voltage setting, usually marked with a “V” and a straight or wavy line. The straight line means direct current (DC), and the wavy line means alternating current (AC).
Since household light switches use AC power, select the AC voltage mode. This mode measures the power coming through the switch. Setting the correct mode ensures accurate readings and protects the multimeter from damage.
Adjusting Multimeter Settings
After selecting the voltage mode, adjust the range if your multimeter does not auto-range. Choose a range higher than your expected voltage. For a typical home switch, select 200 volts or higher.
Set the probes correctly. The black probe goes into the common (COM) port. The red probe goes into the port labeled with a “V” or voltage symbol. Check that the probes are in good condition and hold them firmly during testing.
:max_bytes(150000):strip_icc()/testing-single-pole-switches-1152811-03-8b89394a236d499ebee520df31a0ce27.jpg)
Credit: www.thespruce.com
Testing Power At The Switch
Testing power at the light switch is a key step in troubleshooting electrical issues. It helps confirm if power reaches the switch before it goes to the light fixture. Using a multimeter makes this process safe and accurate.
Start by ensuring the switch is off and the power is connected at the breaker. Then, carefully open the switch cover to access the wiring. Identifying the right terminals and measuring voltage correctly ensures you get accurate results.
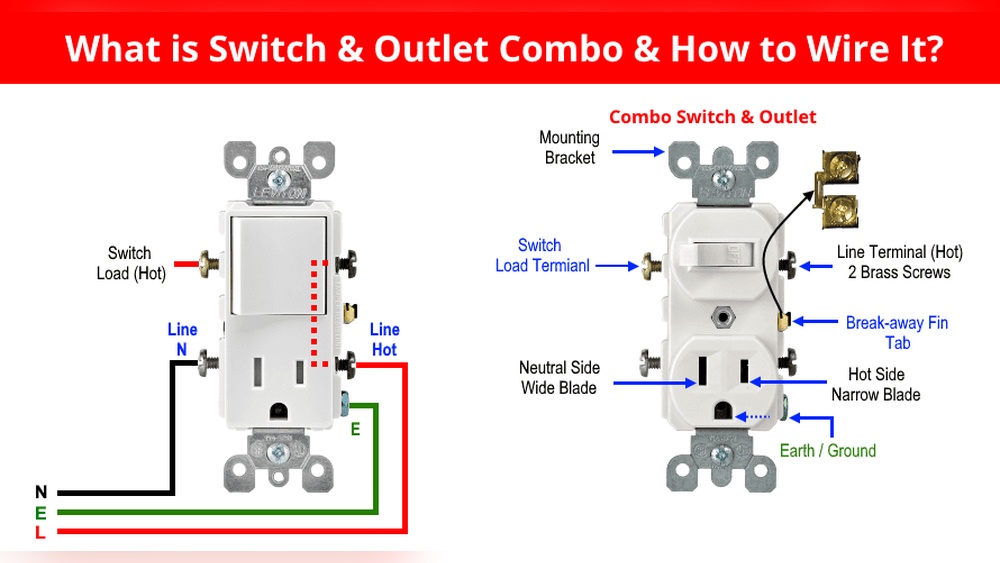
Identifying Terminals
Look for two main terminals on the switch. One terminal is the line, carrying power from the breaker. The other terminal is the load, sending power to the light fixture.
Often, the line terminal connects to the black wire. The load terminal usually connects to the wire going out to the light. Ground and neutral wires are separate and not tested here.
Measuring Voltage
Set the multimeter to measure AC voltage. Place one probe on the line terminal and the other on the ground or neutral wire.
The multimeter should show voltage close to your home’s supply, usually around 120 volts in the US. Then, test between the load terminal and ground. The reading changes based on the switch position.
Interpreting Results
If you get no voltage on the line terminal, power is not reaching the switch. This could mean a breaker trip or wiring issue.
Voltage on the line but not on the load terminal means the switch might be off or faulty. Voltage on both terminals means power flows through the switch correctly.
Use these readings to decide the next steps in your repair or replacement work.
Testing Continuity Of The Switch
Testing the continuity of a light switch helps check if the switch works properly. Continuity means the electric path inside the switch is complete. A broken path means the switch does not let electricity pass. This test shows if the switch turns the light on or off correctly.
Using a multimeter to test continuity is simple. The multimeter tells if the circuit is open or closed. This test does not need power to the switch. It is safe and easy to do.
Switch Position And Continuity
Set the light switch to the OFF position first. In this position, the switch should break the circuit. The multimeter should show no continuity or a high reading.
Flip the switch to the ON position. Now, the switch should close the circuit. The multimeter should show continuity with a low or zero reading.
If the readings do not change between ON and OFF, the switch may be faulty. Proper readings mean the switch works as it should.
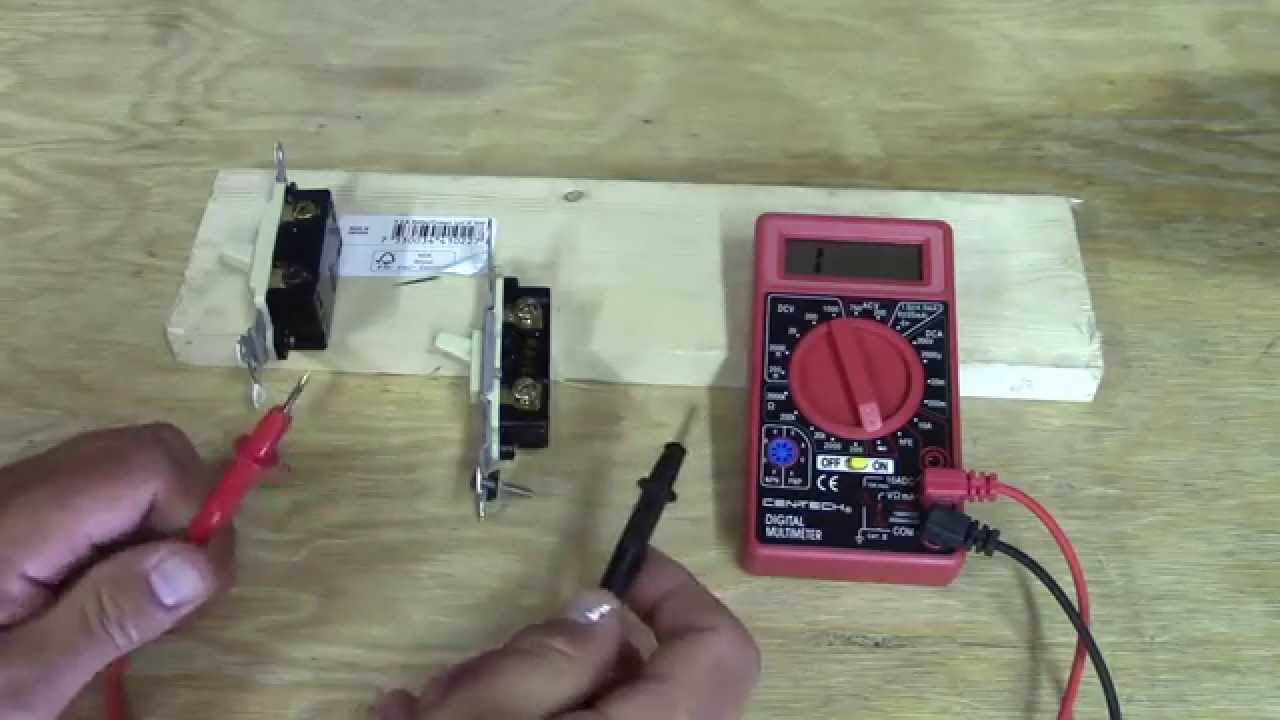
Using Multimeter Continuity Mode
Turn on the multimeter and select continuity mode. This mode often has a symbol like a sound wave or diode.
Touch the multimeter probes together first to check it works. The meter should beep or show zero resistance.
Place one probe on each terminal of the switch. Watch the multimeter screen or listen for a beep. A beep means the circuit is complete.
No beep or high resistance means no continuity. Test both switch positions for accurate results. This method quickly finds switch problems without complex tools.
Troubleshooting Common Issues
Troubleshooting common issues when testing power to a light switch with a multimeter helps you find simple fixes fast. Problems can arise from many sources like wiring, multimeter settings, or the switch itself. Understanding typical issues saves time and avoids mistakes.
Below are frequent problems and how to handle them during your testing process.
No Voltage Detected
No voltage means the multimeter shows zero or near zero volts. This can happen if the power is off or the circuit breaker is tripped. Check your home’s breaker panel first.
Loose or disconnected wires behind the switch also cause no voltage. Turn off power before inspecting wires for damage or poor connections.
Incorrect multimeter settings may show no voltage too. Set the meter to measure AC voltage in the correct range before testing again.
Inconsistent Readings
Inconsistent readings mean the voltage jumps or changes during the test. This may result from a weak battery in the multimeter. Replace the battery for stable readings.
Poor contact between the meter probes and the wires can cause this issue. Hold probes firmly or use alligator clips for better connection.
Worn out or faulty switches may create unstable voltage. Testing the switch separately or replacing it can solve this problem.
Safety Tips During Testing
Testing the power to a light switch with a multimeter needs care. Safety is the most important part of the process. Simple steps can prevent accidents and injuries. Keep these safety tips in mind before starting your test.
Avoiding Electric Shock
Always turn off the main power before testing. Use insulated gloves to protect your hands. Never touch exposed wires with bare skin. Check the multimeter leads for damage before use. Stand on a dry surface to avoid electric shock. Keep your hands away from metal parts of the multimeter.
Proper Handling Of Tools
Use a multimeter designed for electrical testing. Set the multimeter to the correct measurement type. Hold the probes by their insulated handles only. Do not force the probes into tight spaces. Store tools properly after use to avoid damage. Keep tools away from children and pets.
Credit: www.youtube.com
Frequently Asked Questions
How Do I Check Power At A Light Switch?
Turn off power at the breaker. Set your multimeter to AC voltage. Touch probes to switch terminals. A voltage reading means power is present.
What Multimeter Setting Tests A Light Switch?
Use the AC voltage setting to test power presence. Use continuity or resistance mode to check switch function.
Can I Test A Light Switch Without Removing It?
Yes, you can test power at terminals with the switch in place. Turn off power for continuity tests.
Why Does My Multimeter Show No Voltage At The Switch?
Possible causes: power off at breaker, faulty wiring, or a bad switch. Double-check connections and breaker status.
Conclusion
Testing power to a light switch with a multimeter is simple and safe. Follow each step carefully and take your time. Always turn off the main power before starting. Using a multimeter helps find electrical problems quickly. It saves time and prevents damage.
Practice these steps to feel more confident. Regular checks keep your home safe and working well. Keep your multimeter handy for future use. Small efforts make big differences in home repairs. Try testing with your multimeter today. You will see how easy it is.