Are you looking to add convenience and style to your room with a light switch and outlet combo? Connecting these two in one device can save space and make your electrical setup cleaner and more efficient.
But if you’re unsure where to start or worried about making mistakes, you’re not alone. This guide will walk you through every step, using simple language and clear instructions. By the end, you’ll feel confident handling your own wiring project safely and easily.
Keep reading, and let’s make your home smarter and more functional together!
Credit: www.electricaltechnology.org
Tools And Materials Needed
Before starting to connect a light switch and outlet combo, gather all the necessary tools and materials. Having the right items makes the work easier and safer. It helps avoid delays and mistakes during installation.
This section lists the essential tools and materials you will need for the job. Each item plays a key role in completing the wiring task correctly.
Basic Tools Required
- Screwdriver set with flathead and Phillips heads
- Wire stripper to remove insulation safely
- Voltage tester to check power status
- Needle-nose pliers for bending and holding wires
- Utility knife for cutting wires and cables
- Electrical tape for insulation and securing connections
Materials For Installation
- Light switch and outlet combo device
- Electrical box to mount the combo unit
- Wire nuts for connecting wires securely
- Romex or electrical cable suitable for your home wiring
- Wall plate to cover the switch and outlet
Safety Equipment
- Insulated gloves to protect from shocks
- Safety glasses to protect eyes from debris
- Flashlight or headlamp if working in low light
Safety Precautions
Safety is the top priority when working with electrical wiring. Connecting a light switch and outlet combo requires careful steps to avoid shocks and damage. Taking proper precautions protects you and your home from accidents.
Follow safety rules closely before starting any electrical work. Prepare your tools, space, and knowledge well. This section guides you through key safety measures.
Turn Off The Power
Always turn off the power at the circuit breaker. Test the switch or outlet with a voltage tester to confirm no electricity flows. This step prevents electric shock during installation.
Use Proper Tools
Choose insulated tools designed for electrical work. Avoid using damaged or worn-out tools. Using the right tools reduces risk and makes the job easier.
Wear Safety Gear
Wear rubber-soled shoes and safety goggles. These protect your body from shocks and sparks. Avoid wearing metal jewelry while working.
Work In A Dry Area
Keep your workspace dry and clean. Water and electricity do not mix well. Avoid working in damp or wet conditions to stay safe.
Follow Wiring Instructions
Read the wiring diagram carefully. Connect wires to the correct terminals. Wrong connections can cause short circuits or fires.
Identifying Wires
Before connecting a light switch and outlet combo, identifying wires is crucial. Each wire has a specific role. Knowing these roles keeps your work safe and effective. This guide helps you spot the live, neutral, and ground wires easily.
Live Wire
The live wire carries electricity from the power source. It usually has black or red insulation. Always handle this wire with care. It can cause electric shock if touched directly. Use a voltage tester to confirm it is live.
Neutral Wire
The neutral wire completes the circuit by carrying current back. It typically has white or gray insulation. This wire does not carry current under normal conditions. Still, treat it with caution during installation.
Ground Wire
The ground wire protects against electrical faults. It is usually bare copper or green. This wire directs excess electricity safely into the ground. Proper grounding prevents electric shocks and fires.
Preparing The Wall Box
Preparing the wall box is the first step in connecting a light switch and outlet combo. This step ensures safety and proper installation. A clean, organized wall box makes wiring easier and reduces mistakes.
Take time to inspect and clear the wall box before starting. Proper preparation helps the device fit securely and work correctly.
Turn Off The Power
Switch off the circuit breaker that controls the wall box. Use a voltage tester to confirm no electricity flows. Safety must come first to avoid shocks.
Remove The Old Device
Unscrew the existing switch or outlet carefully. Pull it out slowly to expose the wires. Note how the wires connect to guide the new installation.
Check The Wall Box Size
Measure the wall box to confirm it fits the combo device. Combo switches and outlets need enough space. Expand the box if it is too small.
Organize The Wires
Straighten the wires and strip the ends if needed. Group wires by function: hot, neutral, and ground. This organization speeds up wiring and reduces errors.
Inspect For Damage
Look for any damaged wires or loose connections. Replace frayed wires to ensure safety. A solid connection prevents future problems.
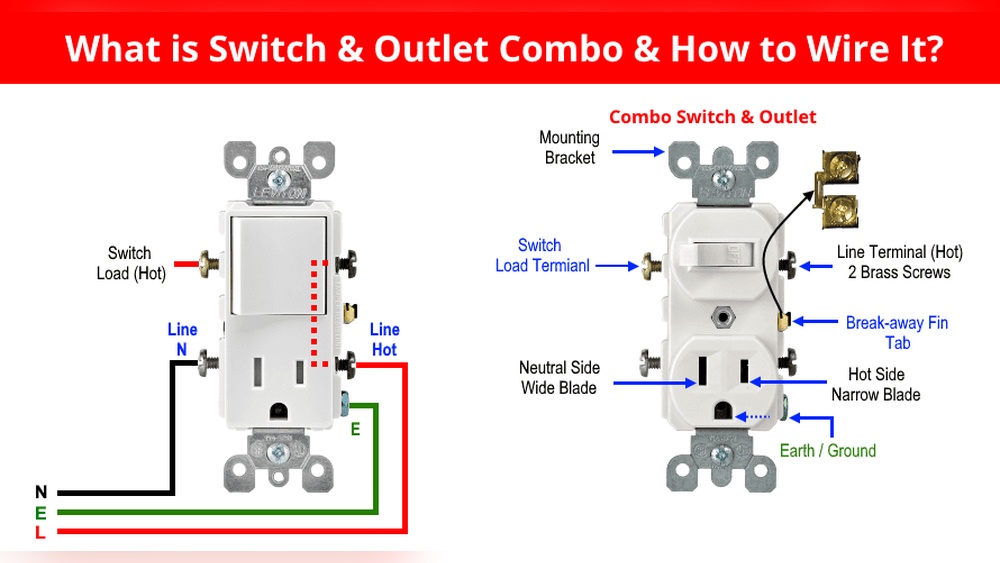
Wiring The Outlet
Wiring the outlet is a key step in installing a light switch and outlet combo. This task needs care and attention. Correct wiring ensures safety and proper function.
Before starting, turn off the power at the breaker. Use a tester to confirm no power flows to the wires. Gather tools and materials for wiring.
Connecting Hot Wire
The hot wire carries electricity to the outlet. It usually has black or red insulation. Connect the hot wire to the brass-colored screw on the outlet. Tighten the screw firmly to hold the wire in place. Avoid loose connections to prevent shorts or fires.
Connecting Neutral Wire
The neutral wire completes the circuit by carrying electricity back. It usually has white insulation. Attach the neutral wire to the silver-colored screw on the outlet. Make sure the wire is wrapped clockwise around the screw. Secure it tightly for a safe connection.
Connecting Ground Wire
The ground wire protects from electrical shocks. It is either bare copper or green insulated. Connect the ground wire to the green grounding screw on the outlet. This step is important for safety and code compliance. Check the connection to ensure it is solid.

Credit: www.reddit.com
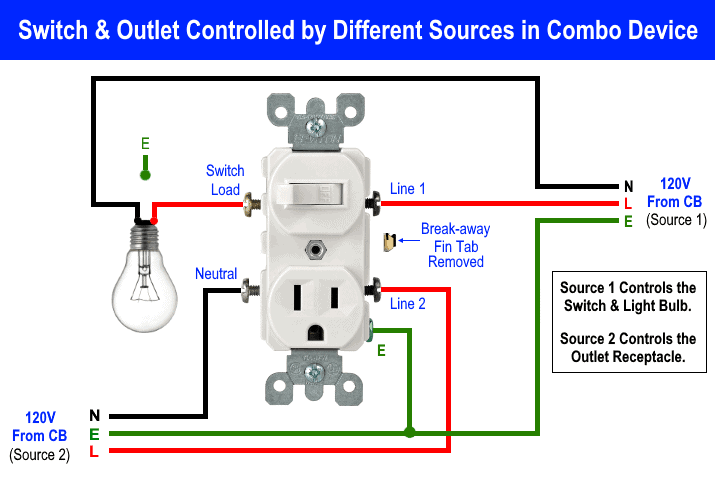
Wiring The Switch
Wiring the switch in a light switch and outlet combo is a key step. It controls the light and powers the outlet safely. Proper wiring ensures the device works correctly and avoids electrical hazards.
Careful attention is needed during this process. Each wire has a specific role and place to connect. Follow the instructions closely to keep your home safe and functional.
Connecting Line And Load
Identify the line wire first. This wire brings power from the electrical panel. Connect the line wire to the terminal marked “Line” on the switch. Next, find the load wire. It leads to the light fixture.
Attach the load wire to the terminal marked “Load”. Make sure connections are tight and secure. Loose wires can cause flickering lights or shorts. Double-check that line and load wires do not touch each other.
Ground Connection
Locate the ground wire, usually green or bare copper. Connect it to the green ground screw on the switch. Grounding protects against electrical shocks.
Ensure the ground wire is firmly attached. If the box is metal, connect the ground wire to it too. Proper grounding keeps the system safe and reliable.
Mounting The Combo Device
Mounting the combo device is a key step in connecting a light switch and outlet combo. Proper mounting ensures safety and a clean look. It holds the device firmly in place within the wall box. Take care to align the device correctly before securing it.
Start by checking the wall box for any debris or damage. Clear out dust and loose materials. Make sure the box is deep enough to hold the combo device. A shallow box can cause problems during installation. Ensure the box is level to keep the device straight.
Aligning The Combo Device
Place the combo device into the wall box carefully. Match the mounting holes on the device with those on the box. Double-check the switch and outlet orientation. The switch should be easy to reach, and the outlet should face outward. Proper alignment prevents stress on wires and connections.
Securing The Device
Use the screws provided with the combo device. Tighten them evenly to avoid bending the device. Do not overtighten, as this may crack the device or wall plate. The device should sit flush against the wall. Confirm it is stable and does not move.
Installing The Wall Plate
Attach the wall plate over the combo device. Align the plate’s screw holes with the device. Insert the screws and tighten gently. The wall plate hides wiring and adds a polished finish. Check that the plate is secure and even on the wall.

Credit: www.quora.com
Testing The Connection
Testing the connection is a key step after wiring a light switch and outlet combo. This step confirms the wiring works safely and correctly. Without testing, you may risk short circuits or no power at all. Follow these simple checks to ensure your installation is secure and functional.
Using A Voltage Tester
A voltage tester helps check if power flows properly. Touch the tester probes to the outlet terminals and switch wires. A light or sound from the tester means electricity is present. No signal means a wiring error or power issue. Always test with the power on for accurate results.
Checking The Outlet Function
Plug a device or lamp into the outlet. Turn on the switch to see if the outlet gets power. The outlet should work whether the switch is on or off, depending on the wiring type. If it doesn’t, double-check the connections or wiring diagram.
Testing The Light Switch Operation
Flip the switch to test the light fixture. The light should turn on and off smoothly. No flickering or delay means good wiring. If the light stays off or flickers, re-inspect the switch wiring and terminals. Tighten any loose connections.
Using A Multimeter For Advanced Testing
A multimeter can measure voltage, current, and continuity. Set it to voltage mode to verify outlet and switch power. Use continuity mode to check if wires are connected properly. This tool gives a detailed check beyond simple testers.
Troubleshooting Tips
Troubleshooting a light switch and outlet combo can be simple. Many common problems have easy fixes. This section shares key tips to help you find and solve issues quickly.
Check The Power Supply
Start by ensuring the power is on at the circuit breaker. A tripped breaker will stop electricity flow. Flip the switch off and on to reset it. Use a voltage tester to confirm power at the outlet and switch.
Inspect Wiring Connections
Loose or wrong wiring causes many faults. Turn off power before checking wires. Look for loose screws or disconnected wires. Tighten any loose connections and ensure wires match the correct terminals.
Test The Switch Function
A faulty switch can stop the outlet from working. Use a multimeter to test the switch’s continuity. Replace the switch if it fails to open or close the circuit properly.
Examine The Outlet Condition
Damaged outlets create safety hazards and functional problems. Check for cracks, burn marks, or melted parts. Replace the outlet if it shows any damage or wear.
Look For Grounding Issues
Proper grounding is critical for safety and function. Confirm the grounding wire is connected well. A missing ground can cause shocks or improper operation.
Use Correct Tools And Safety Gear
Always use insulated tools to prevent electric shocks. Wear safety gloves and goggles. Double-check power is off before touching wires. Safety first for every step.
Frequently Asked Questions
How Do I Wire A Light Switch And Outlet Combo?
To wire a light switch and outlet combo, first turn off power. Connect the hot wire to the switch terminal. Attach the neutral wires to the outlet. Use a jumper wire to connect the switch and outlet. Secure all connections with wire nuts.
Can I Install A Switch And Outlet Combo Myself?
Yes, you can install it yourself if you know basic electrical work. Always turn off power at the breaker first. Follow the wiring instructions carefully. Use proper tools and safety gear. If unsure, consult a professional electrician.
What Tools Are Needed For This Wiring Project?
You will need a screwdriver, wire stripper, voltage tester, wire nuts, and electrical tape. These tools help ensure safe and correct connections. A voltage tester confirms power is off before starting work. Proper tools make installation easier and safer.
Is It Safe To Combine A Switch And Outlet In One Box?
Yes, it is safe if done correctly. Ensure the box is rated for combo devices. Follow electrical codes and use proper wiring techniques. Avoid overloading the circuit. If unsure, get professional help to ensure safety.
Conclusion
Connecting a light switch and outlet combo can save space and add convenience. Follow the steps carefully to ensure safety and proper function. Double-check your wiring before turning the power back on. Take your time and work slowly to avoid mistakes.
With patience, you can complete this task successfully. Always remember to turn off the power at the breaker box first. This simple project can improve your room’s lighting and power options. Stay safe and enjoy your new setup!