Are you wondering how to tape your photograph to a mount board without damaging it? Choosing the right tape can make all the difference in preserving your precious memories and keeping your display looking clean and professional.
You’ll discover the best types of tape to use, how to apply them correctly, and tips to avoid common mistakes. Keep reading to ensure your photos stay secure and beautiful for years to come.
Choosing The Right Tape
Choosing the right tape to mount photographs is very important. The tape must hold the photo firmly without damaging it. Some tapes can cause yellowing or peeling over time. Others might not stick well enough. Knowing the types of tape and their qualities helps you make a safe choice for your photos.
Types Of Tape For Photos
Several tapes work for mounting photos. Double-sided tape sticks both sides and hides behind the photo. Photo corners hold photos without glue. Archival tape is designed for preservation. Masking tape can hold photos temporarily. Each tape serves a different purpose.
Pros And Cons Of Each Tape
Double-sided tape is strong but can damage photos if removed. Photo corners keep photos safe but may not hold heavier prints. Archival tape lasts long and protects photos well. Masking tape is easy to remove but may not stick firmly. Choose based on how long you want to keep the photo mounted.
Acid-free Options
Acid-free tapes prevent yellowing and damage to photos. They are made to protect the photo’s quality over time. Using acid-free tape is best for valuable or old photos. These tapes help preserve memories without harm. Look for labels that say “acid-free” or “archival-safe.”
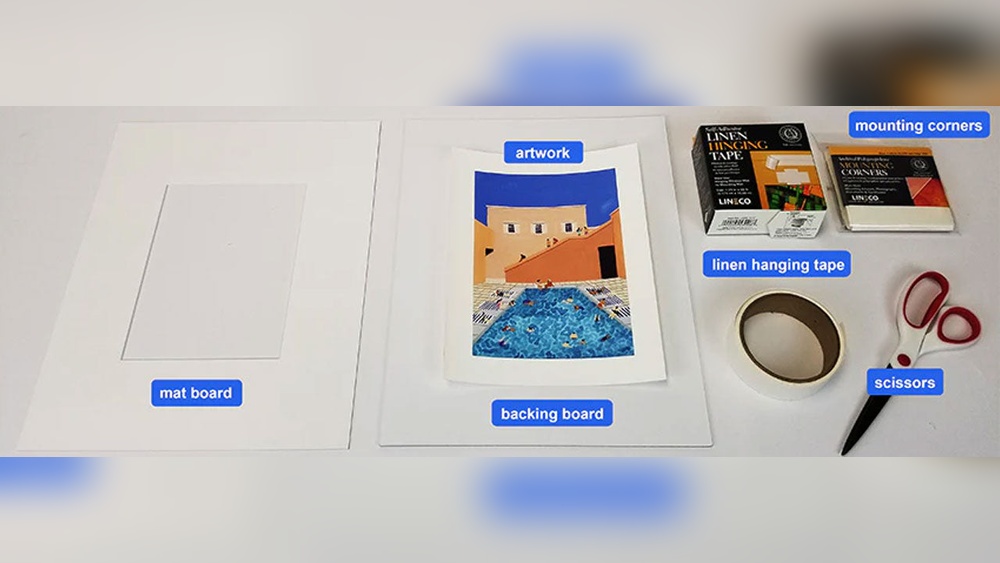
Preparing The Photograph And Mount Board
Preparing the photograph and mount board is the first step before taping. It helps ensure the photo stays safe and looks good. A clean, dry surface is important. Handling the photo carefully protects it from damage. These simple steps make a big difference in the final result.
Cleaning Surfaces
Start by cleaning the mount board. Use a soft cloth to remove dust and dirt. Avoid using water or liquid cleaners. They can warp the board or damage it. The board must be dry before taping the photo. A clean board helps the tape stick better.
Handling Photos Safely
Hold the photograph by its edges only. Avoid touching the image surface. Oils and dirt from your fingers can harm the photo. Use clean, dry hands or wear cotton gloves. Keep the photo flat and avoid bending it. This prevents creases or tears during mounting.
Applying Tape Correctly
Applying tape correctly is key to securing your photograph on a mount board. The right technique keeps the photo flat and prevents damage. It also ensures the tape stays hidden and clean. Follow these tips to get the best results every time.
Tape Placement Tips
Place tape on the back edges of the photograph. Avoid covering the photo’s front surface. Use small strips to keep the tape neat. Make sure tape touches both the photo and the mount board. This holds the photo firmly in place. Leave space around the edges for a clean look. Press the tape down gently but firmly. This stops air bubbles and wrinkles.
Avoiding Damage
Use acid-free tape to protect your photo. Regular tape can cause yellow stains over time. Avoid sticking tape directly on the photo’s image area. This can peel off ink or paper. Handle the photo with clean hands or gloves. Keep tape away from the photo’s surface as much as possible. Remove tape carefully if you need to reposition the photo. Pull slowly to avoid tearing or creasing. These steps keep your photograph safe and looking great.

Credit: www.framedestination.com
Alternative Mounting Methods
Mounting photographs on a board does not always require tape. There are other ways to attach photos neatly and securely. These methods protect your photographs and keep the mount board clean. They also allow easy removal or repositioning of the photos if needed.
Photo Corners
Photo corners are small adhesive pockets placed at the corners of a photo. They hold the photo firmly without sticking to the back. This method prevents damage to the photo’s surface. Photo corners come in different colors and styles. They are ideal for preserving valuable or delicate photographs.
Adhesive Sprays
Adhesive sprays provide a thin, even layer of glue on the back of photos. The spray sticks the photo smoothly to the mount board. It avoids wrinkles and bubbles that tape might cause. Use sprays in a well-ventilated area for safety. Choose acid-free sprays to protect photos from damage over time.
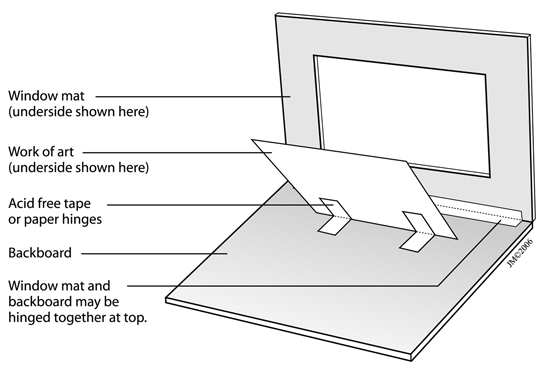
Hinges And Mounting Strips
Hinges are small strips of tape or paper attached to the photo’s edge. They create a flexible hinge that holds the photo in place. Mounting strips are double-sided and easy to remove. Both methods allow the photo to be lifted or moved without harm. They are perfect for temporary displays or archives.
Long-term Preservation
Long-term preservation of photographs on mount boards requires careful choice of tape. Using the wrong tape can cause damage, such as yellowing or warping. The right tape helps keep photos safe and looking good for many years. It protects the photo from environmental factors and physical harm. Understanding how to preserve your photographs helps maintain their beauty and value.
Preventing Yellowing And Warping
Choose acid-free, archival-quality tape for mounting photos. This tape does not release harmful chemicals that cause yellowing. Avoid regular adhesive tapes as they can stain the photo and paper. Use tape with low tack to prevent warping or bending of the mount board. Proper tape keeps photos flat and clean over time.
Storage Recommendations
Store mounted photos in a cool, dry place away from sunlight. Heat and moisture cause tape adhesive to break down. Keep photos in acid-free folders or boxes to add protection. Avoid stacking heavy objects on top of the mounted photos. Proper storage extends the life of both the photo and mount board.

Credit: www.framedestination.com
Common Mistakes To Avoid
Mounting a photograph on a board needs care. Mistakes can ruin your photo or make it look unprofessional. Avoiding common errors helps keep your photo safe and looking great. Let’s explore some common mistakes to watch out for.
Using Wrong Tape Types
Not all tapes suit photos. Some tapes have harsh adhesives. These can damage the photo surface or yellow over time. Avoid tape with strong glue or colored backing. Use acid-free or photo-safe tape for best results. This keeps the photo safe and clean.
Over-taping
Too much tape is a problem. It can cause wrinkles or bubbles under the photo. Excess tape also makes removal hard later on. Use small pieces only where needed. This keeps the photo flat and easy to remove if needed.
Ignoring Photo Condition
Photos with moisture or dirt do not stick well. Tape can pull off parts of the photo if it’s weak. Check the photo for damage before taping. Clean and dry it gently first. This ensures the tape holds without harm.
Credit: reframingphotography.com
Frequently Asked Questions
What Type Of Tape Is Best For Mounting Photographs?
Acid-free, archival-quality tape is best for mounting photographs. It protects photos from damage and yellowing over time. Avoid regular adhesive tapes that can harm the photo and mount board. Use photo-safe tape for long-lasting and secure attachment.
Can Double-sided Tape Damage Photographs?
No, double-sided tape made specifically for photos does not damage them. Choose acid-free, photo-safe varieties to ensure safety. Avoid regular tapes as they may cause stains or tears. Proper photo-safe double-sided tape ensures strong hold without harming your photograph.
How To Tape A Photo Without Leaving Marks?
Use acid-free, archival photo corners or photo-safe tape. Apply tape only on the mount board, not the photo’s surface. Avoid direct adhesive on photos to prevent marks or damage. This method keeps your photo clean and securely mounted.
Is Masking Tape Suitable For Mounting Photos?
No, masking tape is not recommended for mounting photos. It contains acids that can damage photos over time. Use acid-free, archival-quality tape designed for photographs instead. This ensures your photos remain protected and well-preserved.
Conclusion
Choosing the right tape keeps your photograph safe and neat. Acid-free tape works best to avoid damage over time. Double-sided tape offers a clean, hidden look. Always test a small piece first to check for any harm. Proper taping helps your photo stay flat and secure.
Use gentle methods to protect your memories. A careful approach makes your display last longer. This simple step keeps your photos looking great.
