Have you ever stood in a room trying to turn off the lights from two different switches, only to find one isn’t working? If your 3-way light switch is acting up, you might feel stuck or unsure about what to do next.
Replacing a 3-way switch might sound complicated, but with the right steps, you can fix it yourself and save time and money. In this guide, you’ll learn exactly how to replace your 3-way light switch safely and easily. Keep reading—by the end, you’ll feel confident handling this common home repair like a pro.

Credit: www.youtube.com
Tools And Materials Needed
Replacing a 3 way light switch requires some basic tools and materials. Having the right items helps you work safely and finish the job faster. This list covers everything needed for most 3 way switch replacements.
Essential Tools
A screwdriver set is key. You need both flathead and Phillips screwdrivers. A voltage tester checks if wires carry electricity. Wire strippers remove insulation from wires. Needle-nose pliers help bend and hold wires. A flashlight or headlamp improves visibility in dark areas. Electrical tape secures wire connections safely.
Required Materials
Start with a new 3 way switch matching your existing one. Use wire nuts to join wires securely. Optional but helpful: a faceplate to cover the switch. Always have extra wire in case you need to extend connections. Use insulated gloves for added safety during the job.
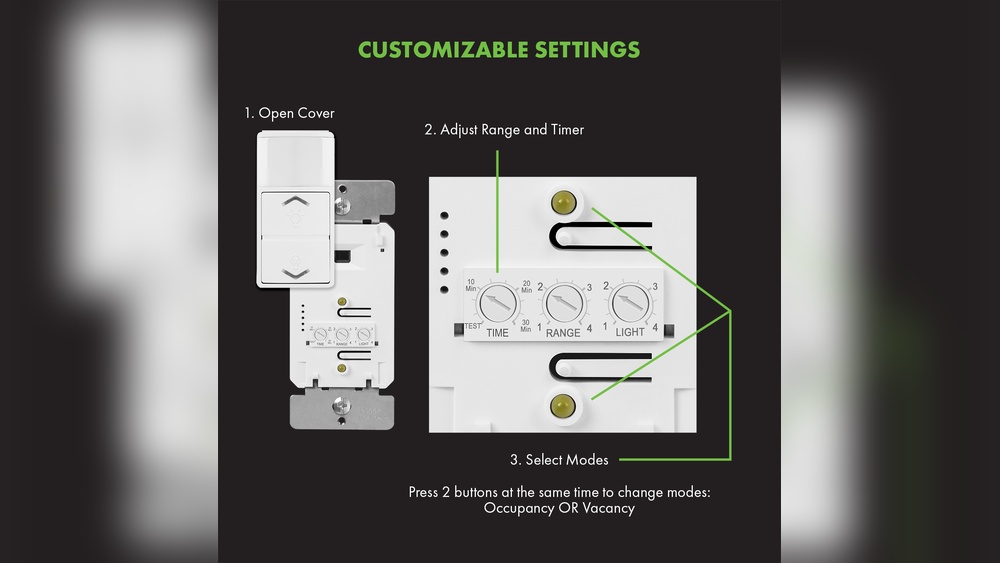
Credit: www.cnet.com
Safety Precautions
Safety comes first when replacing a 3 way light switch. Working with electricity can be dangerous. Simple mistakes may cause shocks or damage. Follow safety rules to protect yourself and your home.
Always prepare before starting the job. Take time to understand the steps. Use the right tools and wear safety gear.
Turn Off Power At The Circuit Breaker
Switch off the power to the light switch at the main circuit breaker. Do not rely on the wall switch alone. Use a voltage tester to check if the wires are live. This step stops electric shocks during work.
Use A Voltage Tester
Test all wires with a voltage tester before touching them. This tool shows if current flows through the wires. Never trust that the power is off without testing. Safe handling depends on confirming no live wires.
Wear Protective Gear
Wear rubber gloves and safety glasses to protect your hands and eyes. Rubber gloves reduce the risk of electric shock. Safety glasses shield your eyes from sparks or debris. Always keep safety gear on during the process.
Work In A Dry Area
Make sure the workspace is dry and free of moisture. Water and electricity do not mix. Dry conditions help prevent electric shocks. Avoid working in damp or wet places.
Follow Wiring Diagrams Closely
Use wiring diagrams to connect wires correctly. Wrong connections can cause short circuits or damage. Study the diagram carefully before removing the old switch. Correct wiring ensures the switch works safely and well.
Identifying Your 3 Way Switch Setup
Understanding your 3 way switch setup is the first step to a smooth replacement. These switches control one light from two places. This setup is common in hallways, staircases, and large rooms.
Identifying how your switches are wired helps avoid confusion and ensures safety. Each switch has three terminals and a ground wire. Knowing their roles makes the replacement easier and faster.
What Is A 3 Way Switch?
A 3 way switch works with another switch to control one light. You can turn the light on or off from two different spots. Unlike a regular switch, it has extra wiring.
How To Spot Your Switch Type
Check the switch for three terminal screws. Two screws are usually brass or black, and one is green or copper. This color coding helps identify the traveler and ground wires.
Finding The Traveler Wires
Traveler wires connect the two 3 way switches. They carry current between switches. Usually, these wires are red and black, but colors can vary. Testing helps confirm which wires are travelers.
Locating The Common Terminal
The common terminal is different from the traveler terminals. It connects to either the power source or the light fixture. It usually has a darker screw. Identifying this screw is key for correct wiring.
Turning Off Power Safely
Turning off power safely is the first and most important step before replacing a 3 way light switch. Electricity can cause serious injury or damage. Always take safety seriously to avoid accidents.
Make sure the power is completely off before touching any wires. Double-checking prevents shocks and keeps the work area safe.
Locate The Correct Circuit Breaker
Find the circuit breaker box in your home. Look for the switch that controls the room with the 3 way switch. The breaker should be labeled. If not, test by turning off one breaker at a time.
Turn Off The Power Switch
Flip the circuit breaker switch to the off position. This stops electricity from flowing to the switch. Confirm the power is off before starting work.
Use A Voltage Tester
Check the wires with a voltage tester. This tool shows if the power is still live. Test all wires in the switch box to be sure.
Double-check Power Is Off
Try turning on the light switch after turning off the breaker. The light should not work. This confirms no electricity is present.
Removing The Old Switch
Removing the old 3 way light switch is the first step in the replacement process. It helps to make sure the new switch works properly. Safety is very important here. Turn off the power at the circuit breaker before you start.
Take your time and follow each step carefully. This will prevent any damage or accidents. You will need a screwdriver and a voltage tester for this task.
Turn Off Power At The Circuit Breaker
Find the right breaker for the light switch circuit. Switch it off to cut power. Use a voltage tester on the switch wires. Check if the power is off. Never touch wires if power is on.
Remove The Switch Cover Plate
Use a screwdriver to remove the screws on the cover plate. Keep the screws safe to use later. Gently pull the cover plate away from the wall. Do not force it to avoid damage.
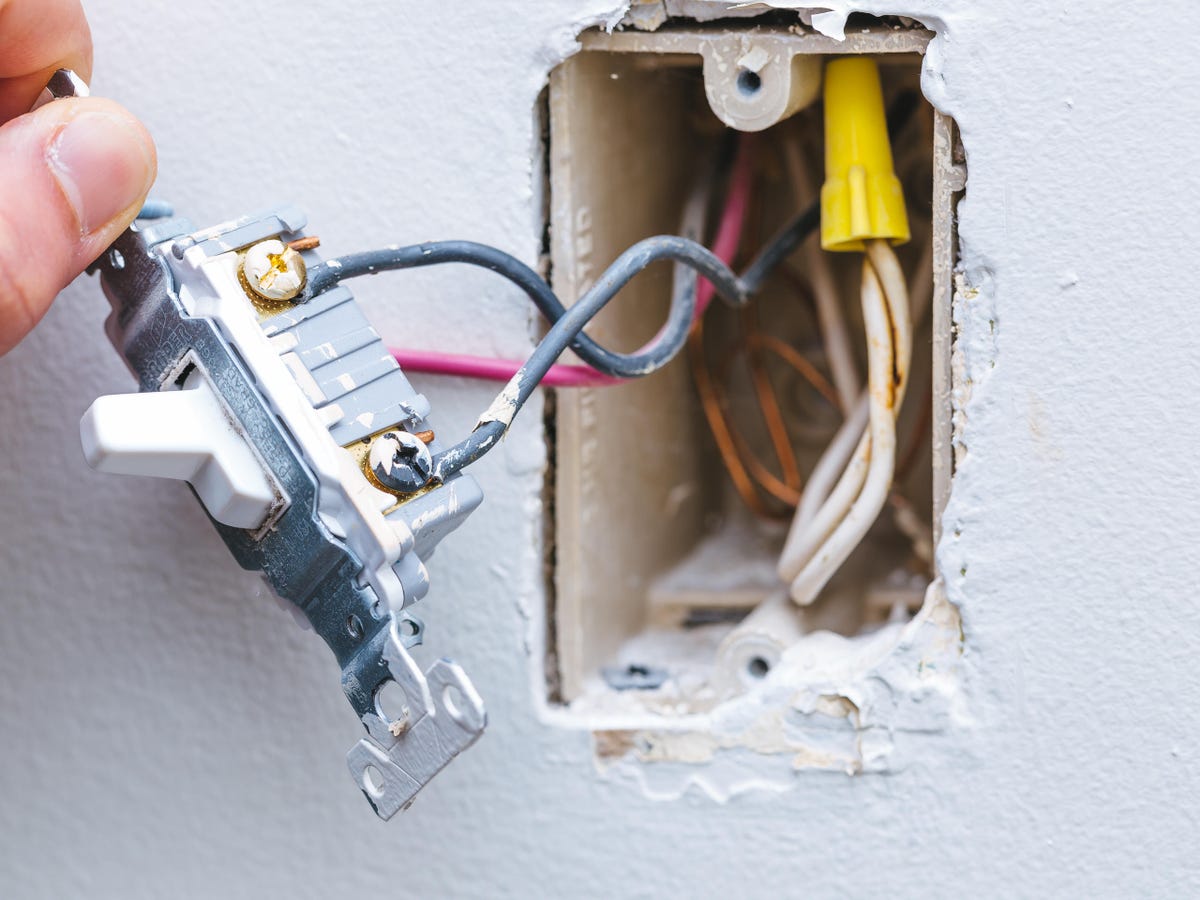
Unscrew The Old Switch From The Wall Box
Locate the screws holding the switch to the wall box. Unscrew them carefully. Pull the switch out slowly, exposing the wires behind. Hold the switch to keep wires from pulling out.
Identify And Disconnect The Wires
Look at how wires are connected to the switch. Take a picture for reference. Loosen the screws or remove wire nuts to free wires. Keep wires separated to avoid short circuits.
Wiring The New Switch
Wiring the new switch is a key step in replacing a 3-way light switch. It involves connecting the wires to the correct terminals on the switch. Careful wiring ensures the switch works correctly and safely. Follow each step slowly to avoid mistakes and power issues.
Connecting Common Terminal
Identify the common terminal on the new switch. This terminal is usually marked or a different color. Connect the black wire to the common terminal. Tighten the screw securely to hold the wire in place. The common terminal controls power flow in the switch.
Wiring Traveler Terminals
Locate the two traveler terminals on the switch. These terminals connect to the traveler wires from the old switch. Attach each traveler wire to a traveler terminal. Make sure the wires are tight under the screws. Proper traveler wiring allows the switches to work together.
Securing Ground Wire
Find the ground wire, usually bare copper or green. Attach the ground wire to the green ground screw on the switch. If the box has a ground wire, connect it to the same screw. Securing the ground wire protects against electrical shocks.
Testing The New Switch
Testing the new switch ensures it works correctly and safely. This step confirms the wiring is right and the light responds as expected. A thorough test prevents future electrical problems and saves time.
Turn The Power Back On
Switch the circuit breaker to the ON position. This restores electricity to the switch. Be careful and make sure no wires are exposed before turning power back on.
Operate Both Switches
Use both switches to control the light. Each switch should turn the light on and off. Test each position carefully to confirm proper function.
Check For Flickering Or Delay
Look for any flickering or slow response in the light. These signs indicate loose wiring or a faulty switch. Make adjustments if needed before finalizing.
Test The Switch With A Voltage Tester
Use a voltage tester to confirm power flows through the switch. Check both switch terminals for live voltage. This ensures the switch receives and sends power correctly.
Troubleshooting Common Issues
Troubleshooting common issues can save time and frustration when replacing a 3-way light switch. Problems often arise from wiring mistakes or faulty switches. Identifying the issue early helps fix the problem quickly. This section covers the most common issues and simple ways to solve them.
Checking For Loose Connections
Loose wires cause the switch to work irregularly or not at all. Turn off the power before touching any wires. Tighten all screw terminals firmly. Make sure wire strands are not broken or frayed. A loose connection often leads to flickering lights or no power.
Testing The Switch Functionality
Switches can fail internally. Use a multimeter to test for continuity. If the switch does not show continuity when toggled, it is defective. Replace the switch with a new one to restore proper function. Testing avoids replacing parts that still work.
Identifying Incorrect Wiring
Incorrect wiring is a common cause of 3-way switch problems. Check that each wire connects to the right terminal. The traveler wires must connect to traveler terminals on both switches. The common wire should go to the common terminal. Use the wiring diagram from the switch package for guidance.
Ensuring Proper Grounding
Grounding is essential for safety and switch operation. Confirm that the ground wire is connected to the green screw on the switch. The ground wire should also be connected to the electrical box if it is metal. Poor grounding can cause switches to fail or trip breakers.
Verifying Power Supply
Power supply issues can mimic switch problems. Use a voltage tester to confirm power at the switch box. Check the circuit breaker or fuse for any trips or blown fuses. Restore power before testing the switch again. No power means the problem is outside the switch.

Credit: www.dummies.com
Frequently Asked Questions
What Tools Do I Need To Replace A 3 Way Switch?
You need a screwdriver, voltage tester, wire stripper, and electrical tape. These tools ensure safety and proper installation. Always turn off power before starting work to avoid shocks.
How Do I Identify The Common Terminal On A 3 Way Switch?
The common terminal is usually a darker screw compared to others. It connects to the power source or the light fixture. Identifying it helps in correct wiring during replacement.
Can I Replace A 3 Way Switch Without Turning Off Power?
No, always turn off the power at the circuit breaker. This prevents electrical shocks and ensures safe handling of wires. Safety should be your top priority.
How Do I Test A 3 Way Switch After Replacement?
Use a voltage tester or test the light fixture by toggling both switches. If the light turns on and off from both locations, the switch is correctly installed.
Conclusion
Replacing a 3-way light switch is easier than it seems. Follow each step carefully and take safety first. Double-check all wires before turning power back on. Testing the switch ensures everything works well. This small fix can improve your home lighting quickly.
Keep tools and instructions handy for future repairs. You can save money and feel proud of your work. Simple tasks like this build your confidence with home projects. Try it yourself and see the difference it makes.