Are you ready to give your room a fresh new look? Changing your light fixtures is one of the easiest and fastest ways to brighten up your space.
But if you’ve never done it before, the idea might feel a bit overwhelming. Don’t worry—you’re in the right place. In this guide, you’ll learn simple, step-by-step instructions to switch your light fixtures safely and confidently. By the end, you’ll not only save money but also enjoy the satisfaction of completing a home project on your own.
Let’s get started and transform your lighting today!
Credit: www.wayfair.com
Tools And Materials Needed
Changing a light fixture is a simple home project. Having the right tools and materials helps you finish the job fast and safely. This section lists what you need before starting.
Essential Tools
Gather these tools to switch your light fixture easily. A screwdriver set is key. You will need both flathead and Phillips heads. A voltage tester ensures no electricity is flowing. Wire strippers help prepare the wires for connection. Pliers provide a good grip for twisting wires. A ladder or step stool may be necessary to reach the fixture. Keep a flashlight nearby in case of low light.
Choosing The Right Fixture
Select a fixture that fits your room’s style and size. Check the fixture’s weight to ensure your ceiling can hold it. Match the fixture’s base type to your electrical box. Look at the wattage limit to avoid overloading. Pick a fixture with easy installation instructions. Consider energy-saving LED bulbs for better efficiency.

Credit: www.youtube.com
Safety Precautions
Safety is the first step when switching light fixtures. Working with electricity can be risky. Taking the right precautions protects you from shocks and injuries. Never rush through the process. Careful preparation keeps the work safe and smooth.
Power Shutoff
Always turn off the power before you start. Find the correct circuit breaker in your home’s electrical panel. Switch it off to stop electricity flow to the fixture. Use a label or tape to mark the breaker. This prevents others from turning it back on by mistake.
Double-check that the power is off by flipping the light switch. The light should not turn on. This simple step avoids accidents during fixture removal or installation.
Testing For Live Wires
Use a voltage tester to check for live wires. Touch the tester to each wire inside the fixture box. No light or sound from the tester means the wires are safe.
If the tester shows power, recheck the circuit breaker. Never handle wires that still carry electricity. Testing ensures a safe workspace before any wire touching or fixture work begins.
Removing The Old Fixture
Removing the old light fixture is the first step in changing a light fixture safely. This process involves detaching the fixture from the ceiling or wall and disconnecting the wires. Proper care helps avoid damage and ensures safe handling.
Detaching The Fixture
Turn off power at the circuit breaker before you start. Use a ladder to reach the fixture comfortably. Remove any bulbs and glass covers carefully. Locate the screws or nuts holding the fixture in place. Unscrew them slowly while supporting the fixture with your other hand. Gently pull the fixture away from the mounting bracket. Set the fixture down on a soft surface to avoid damage.
Disconnecting Wires
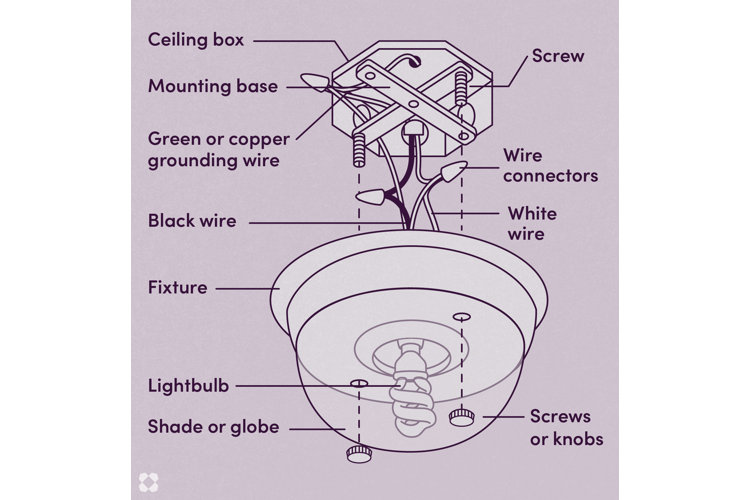
Check that the power is off using a voltage tester. Identify the wires connected to the fixture. Usually, you will see a black (hot), white (neutral), and green or copper (ground) wire. Unscrew the wire nuts or connectors holding the wires together. Separate the fixture wires from the house wires. Keep the house wires apart to prevent accidental contact. Wrap the exposed wires with electrical tape for safety.
Preparing For The New Fixture
Before installing a new light fixture, proper preparation is key. This step ensures safety and smooth installation. Take time to check the existing setup carefully. A well-prepared workspace helps avoid surprises later. Focus on the electrical box and wire condition to start.
Inspecting Electrical Box
Begin by examining the electrical box in the ceiling or wall. Make sure it is firmly attached to a support beam or bracket. A loose box can cause hazards or fixture damage. Check the box size too. It should fit the new fixture’s base comfortably. Look for cracks, rust, or signs of wear. Replace the box if it looks weak or damaged. A sturdy box holds the fixture securely and safely.
Checking Wire Condition
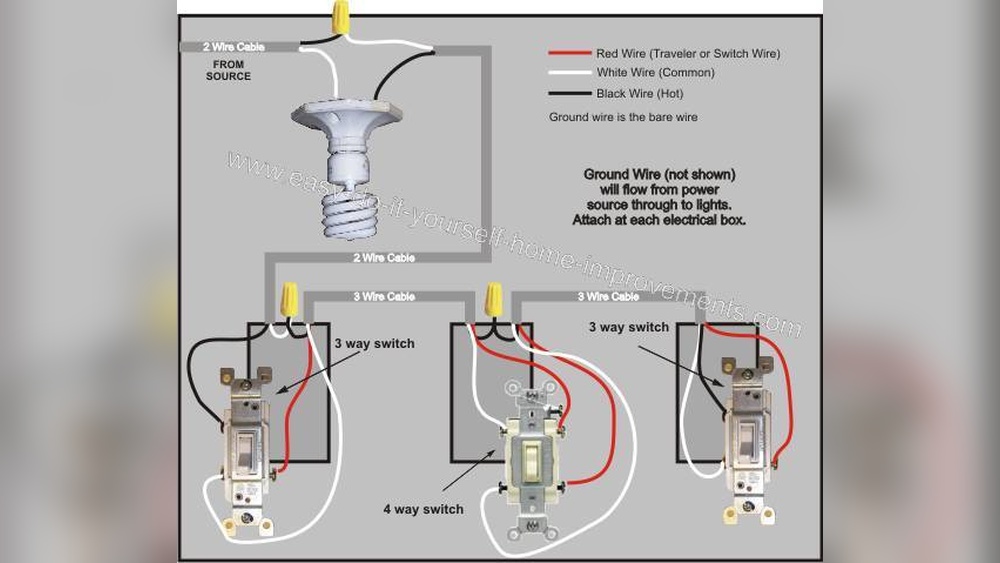
Next, inspect the wires coming from the electrical box. Look for frayed or cracked insulation on each wire. Damaged wires can cause shorts or electrical shocks. The wires should be clean and free of corrosion. Check that the wire colors match standard codes: black or red for hot, white for neutral, and green or bare copper for ground. If wires look old or unsafe, consider replacing them before installing the new fixture. Good wire condition ensures a safe and lasting connection.
Installing The New Fixture
Installing the new light fixture is the exciting step after removing the old one. It involves connecting wires and securing the fixture safely to the ceiling or wall. Follow these simple steps to make sure the fixture works well and stays fixed in place.
Connecting Wires
Start by matching the wires from the fixture to the wires in the electrical box. Usually, black wires connect to black, white to white, and green or copper to the ground wire. Use wire nuts to twist the wires together tightly. Make sure no bare wire is showing outside the nut. Push the connected wires gently into the box to keep them neat and safe.
Securing The Fixture
Hold the fixture base against the ceiling or wall. Align the mounting holes with the screws or brackets. Tighten the screws to fix the fixture firmly in place. Do not over-tighten, or you might crack the fixture. Check that the fixture feels stable and does not move. Attach any covers or shades that came with the fixture. Turn the power back on and test the new light.
Testing The Installation
Testing the installation is a key step after switching light fixtures. It makes sure the new fixture works safely and correctly. Skipping this step can lead to problems like flickering lights or electrical hazards. Follow these simple steps to check your work thoroughly.
Restoring Power
First, turn the circuit breaker back on. This restores electricity to the fixture. Use the switch to turn the light on. If the light does not turn on, check the breaker again. Make sure all wires are connected properly. Never force the switch if something feels wrong. Safety first.
Ensuring Proper Function
Watch the light closely for flickers or dim spots. These signs mean a loose wire or bad connection. Try turning the fixture on and off several times. The light should respond immediately and stay steady. Check if the switch operates smoothly without resistance. Confirm the fixture is secure and does not move. Proper function means your installation is solid and safe.
Troubleshooting Common Issues
Troubleshooting common issues is key when switching light fixtures. Problems can stop your new fixture from working properly. Knowing what to check saves time and effort. This section covers two frequent problems: the fixture not lighting and loose connections.
Fixture Not Lighting
Check if the power is off before starting any work. Make sure the circuit breaker is on. Test the light bulb in another socket. A bad bulb often causes no light. Confirm the fixture is compatible with the bulb. Some fixtures need specific bulb types or wattages. Look for a blown fuse or tripped switch. Also, check the light switch itself. A faulty switch can stop the fixture from lighting.
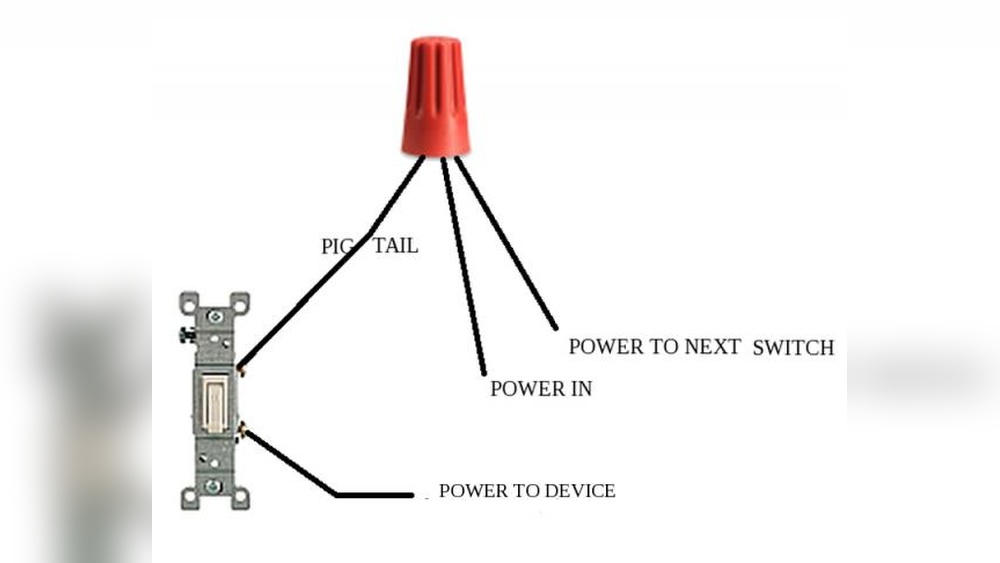
Loose Connections
Loose wires cause flickering or no light at all. Turn off the power before inspecting wires. Look at all wire nuts and connectors. Tighten any that feel loose. Make sure no wires are exposed or touching metal. Secure connections with electrical tape if needed. Check the fixture’s grounding wire for a good connection. Loose grounding can cause electrical problems. Proper wiring ensures your fixture works safely and well.

Credit: diy.stackexchange.com
Frequently Asked Questions
How Do I Safely Switch Light Fixtures?
Turn off power at the circuit breaker first. Use a voltage tester to confirm no electricity flows. Carefully disconnect wires and remove the old fixture before installing the new one.
What Tools Are Needed To Switch Light Fixtures?
You need a screwdriver, wire stripper, voltage tester, and wire nuts. A ladder and electrical tape are also helpful. Having the right tools ensures safe and efficient fixture replacement.
Can I Switch Light Fixtures Without An Electrician?
Yes, if you follow safety precautions and understand basic wiring. Always turn off power and verify with a tester. If unsure, consult a professional to avoid hazards.
How Do I Match Wires When Switching Fixtures?
Match wire colors: black (hot) to black, white (neutral) to white, and green or bare (ground) to ground screw. Use wire nuts to secure connections tightly.
Conclusion
Switching light fixtures can brighten any room quickly. Always turn off the power before starting work. Use the right tools to keep the job safe. Take your time to connect wires correctly. Testing the new fixture ensures it works well.
Small steps make a big difference in results. Now, you can enjoy your updated lighting easily. Feel confident tackling this simple home project. Light up your space with a fresh look today.