Changing a light switch might seem tricky, but you can do it yourself with just a few simple steps. Imagine flipping your old, worn-out switch for a brand-new toggle switch that works smoothly every time.
You don’t need to be an expert or spend a lot on an electrician. In this guide, you’ll learn exactly how to install a toggle light switch safely and quickly. By the end, you’ll have the confidence to upgrade your home lighting with ease.
Ready to get started? Let’s dive in!
Tools And Materials Needed
Installing a toggle light switch requires a few basic tools and materials. Having the right items ready makes the job easier and safer. This section covers what you need before starting.
Basic Tools
Start with a flathead screwdriver and a Phillips screwdriver. These help remove the old switch and install the new one. A voltage tester is crucial to check if wires are live. Wire strippers make it easy to prepare wires for connection. Needle-nose pliers help bend wires and hold small parts.
Safety Gear
Wear insulated gloves to protect against electric shocks. Safety glasses keep dust and debris out of your eyes. Use a flashlight if your work area is dark. Avoid loose clothing to prevent accidents. Always turn off the power at the circuit breaker before starting.
Choosing The Right Switch
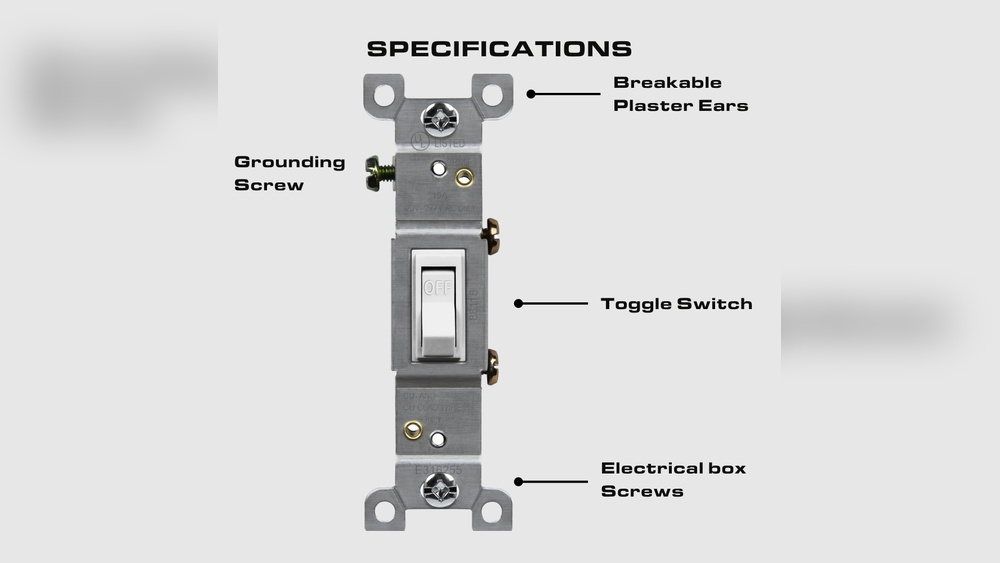
Pick a toggle switch that matches your home’s voltage and amperage. Look for switches labeled for residential use. Choose one with a matching color and style for your room. Double-check compatibility with your wiring type. This ensures the switch works correctly and safely.
Credit: www.kgcountry.com
Preparing For Installation
Preparing for installation is the first step to replace a toggle light switch safely. It helps you avoid mistakes and ensures the job goes smoothly. Understanding what to do before starting saves time and prevents accidents.
Turning Off Power
Always switch off the power at the circuit breaker. This stops electricity from flowing to the switch. Use a tester to check the switch is not live. Safety comes first when working with electrical parts.
Removing The Old Switch
Unscrew the switch cover plate carefully. Remove the screws holding the switch in place. Gently pull the switch out from the wall box. Keep track of the wires connected to the switch.
Inspecting Wiring
Look at the wires for any damage or wear. Check if the wires are firmly connected to the switch terminals. Make sure no wires are frayed or loose. Good wiring is key to a safe installation.
Wiring The Toggle Switch
Wiring the toggle switch is a key step in installing it correctly. This part involves handling electrical wires safely and making sure they connect properly. Take your time and follow each step carefully for a secure setup.
Identifying Wires
First, turn off the power at the breaker. Use a voltage tester to confirm no electricity flows. Look for three types of wires: black (hot), white (neutral), and green or bare copper (ground). The black wire carries power, the white returns it, and the ground protects you from shocks. Identify each wire clearly before proceeding.
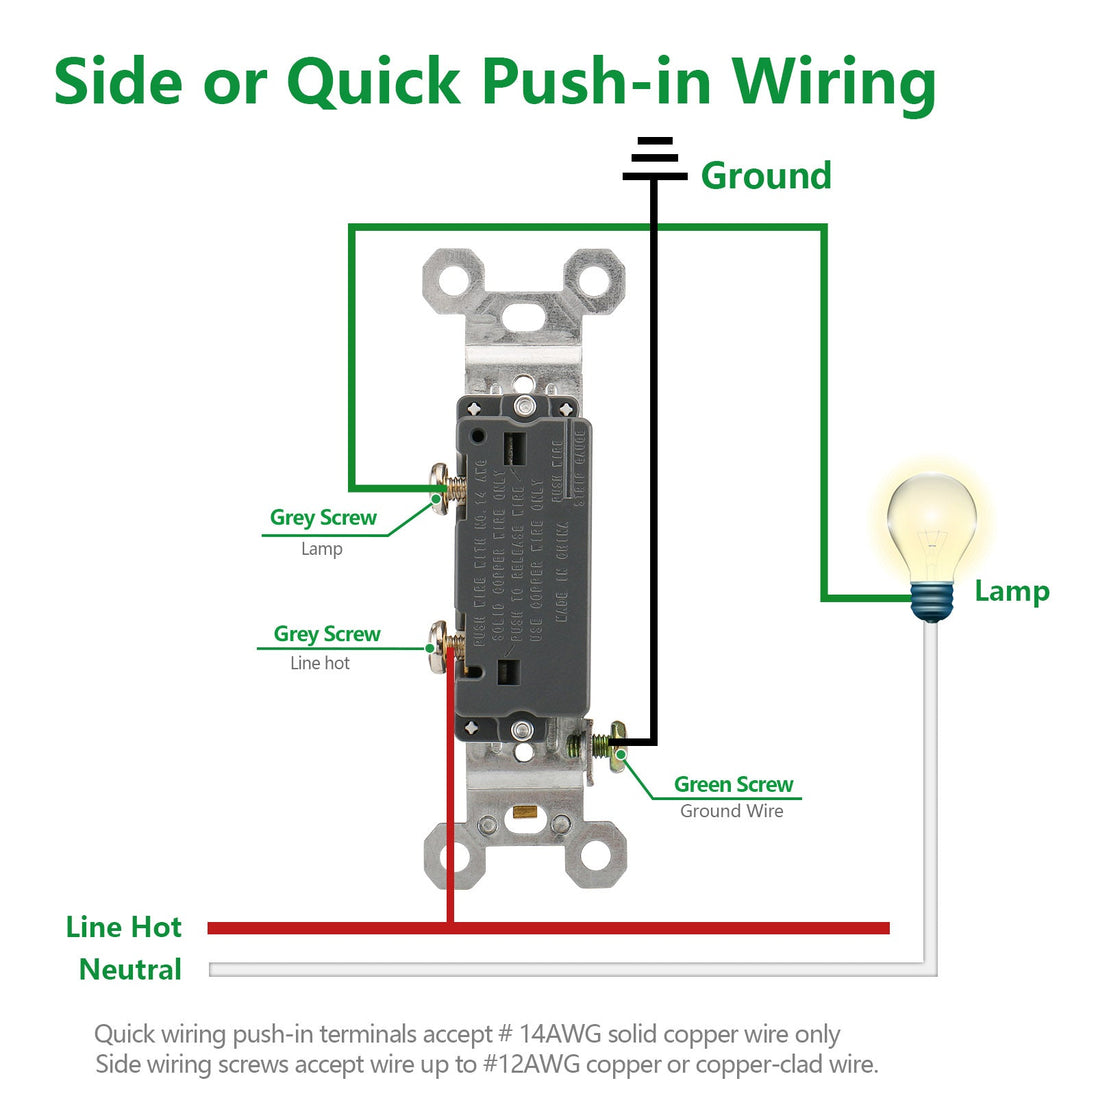
Connecting Wires To The Switch
Connect the black wire to the switch’s brass or black screw. The white wire usually connects to the white wire bundle in the box, not the switch. Attach the green or bare copper wire to the green ground screw on the switch. Make sure wires wrap clockwise around screws for a tight fit.
Securing Connections
Use a screwdriver to tighten each screw firmly. No loose wires allowed. Wrap wire nuts around any wire bundles inside the box. Tug each wire gently to check strength. Push the switch back into the box carefully. Proper connections prevent shorts and keep your switch working well.
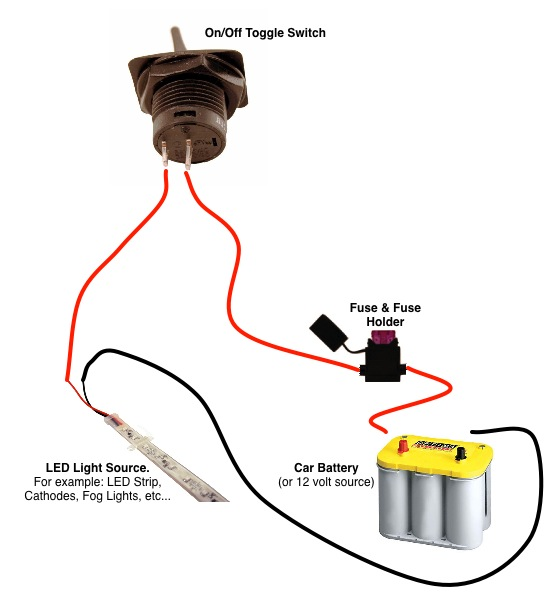
Credit: www.oznium.com
Mounting The Switch
Mounting the toggle light switch is the final step to make it work. This part is simple but important. It keeps the switch secure and safe inside the wall. Follow these steps carefully to mount your switch correctly.
Placing The Switch In The Box
First, hold the switch carefully. Push the wires gently back into the electrical box. Make sure no wires get pinched or twisted. Fit the switch flat against the box. Align the screw holes on the switch with the holes on the box. Check that the switch is straight. Use a screwdriver to fasten the screws tightly. Do not over-tighten to avoid breaking the switch.
Attaching The Faceplate
Next, place the faceplate over the switch. The faceplate hides the wires and gives a neat look. Align the faceplate screw hole with the hole on the switch. Insert the screw and tighten it with a screwdriver. Make sure the faceplate sits flush against the wall. Avoid overtightening to prevent cracking the plate. The switch is now mounted and ready for use.
Testing And Troubleshooting
Testing and troubleshooting are vital steps after installing a toggle light switch. These steps ensure the switch works safely and correctly. This section guides you through restoring power, checking the switch, and fixing common problems.
Restoring Power
Turn the circuit breaker back on after installation. Check that power is fully restored to the switch. Use a voltage tester to confirm electricity flows to the switch box. Never touch wires without confirming power is off.
Checking Switch Functionality
Flip the toggle switch up and down to test it. The light should turn on and off smoothly. If the light flickers or does not respond, double-check the wiring connections. Tighten any loose wires or screws. Ensure the switch is properly seated in the box.
Common Issues And Fixes
The light does not turn on. Check if the bulb is burned out or loose. Confirm the switch wiring matches the instructions. A buzzing sound may mean a loose connection. Tighten all wiring securely. If the switch feels hot, turn off power and inspect wiring again.
Safety Tips For Future Maintenance
Keeping your toggle light switch safe is important after installation. Regular care helps avoid electrical problems. Safety tips for future maintenance protect your home and family. Follow simple steps to ensure your switch works well for years.
Regular Inspections
Check your toggle switch every few months. Look for cracks, loose parts, or sparks. Make sure the switch feels firm when you flip it. Listen for buzzing sounds, which can signal trouble. Turn off the power before cleaning or touching the switch. Use a dry cloth to wipe dust and dirt away.
When To Call A Professional
Call an electrician if the switch flickers or does not work. Avoid fixing electrical problems if you are not sure what to do. Professionals have the right tools and knowledge to fix issues safely. Do not ignore burning smells or warm switches. These signs need immediate expert attention to prevent hazards.

Credit: www.youtube.com
Frequently Asked Questions
How Do I Safely Turn Off Power Before Installation?
Turn off the power at the circuit breaker to ensure safety. Use a voltage tester to confirm no electricity flows to the switch. This prevents electric shock during installation.
What Tools Are Needed To Install A Toggle Switch?
You need a screwdriver, voltage tester, wire stripper, and electrical tape. These tools help you safely remove the old switch and connect the new one. Having these ready makes installation smoother.
Can I Replace A Toggle Switch Myself?
Yes, if you follow safety steps and basic wiring knowledge. Turn off power, remove the old switch, and connect the wires correctly. If unsure, consult a professional to avoid hazards.
How Do I Identify The Wires For Toggle Switch Installation?
Typically, you’ll find a live (hot), neutral, and ground wire. The live wire connects to the switch’s brass terminal. Use a voltage tester to identify wires accurately before connecting.
Conclusion
Installing a toggle light switch is simple and quick. Always turn off the power before starting. Follow each step carefully for safety. Use basic tools and read the instructions well. Double-check your wiring to avoid problems. Testing the switch ensures it works correctly.
A new switch can improve your home’s lighting. Stay safe and take your time. Enjoy the ease of controlling your lights!