
Imagine walking into a room and the lights turn on automatically, saving you the hassle of fumbling for switches in the dark. You can make this convenience a reality by learning how to program a motion sensor light switch yourself.
It’s easier than you think, and once set up, it can boost your home’s security and help cut down on energy bills. In this guide, you’ll discover simple, step-by-step instructions to get your motion sensor light switch working just the way you want it.
Ready to take control of your lighting with smart, hands-free technology? Let’s get started!
Credit: homerepairtutor.com
Choosing The Right Motion Sensor Switch
Choosing the right motion sensor switch is important for your home’s lighting. It affects how well the switch works and saves energy. Picking the wrong switch can cause frustration and extra costs. Understanding key points helps you make a good choice.
Types Of Motion Sensors
Two main types of motion sensors exist: passive infrared and ultrasonic. Passive infrared sensors detect body heat. They work well in rooms with clear views. Ultrasonic sensors send sound waves to detect movement. They work around corners and obstacles. Some switches use both types for better detection.
Compatibility With Home Wiring
Check your home wiring before buying a switch. Some switches need a neutral wire to work. Older homes may not have this wire in light boxes. Make sure the switch matches your wiring setup. Incorrect compatibility can cause switch failure or safety issues.
Features To Consider
Look for adjustable settings like timer and sensitivity. Timer lets you set how long lights stay on. Sensitivity controls how much motion triggers the sensor. Some switches have daylight sensors to avoid turning on lights in bright rooms. Choose features that fit your needs and lifestyle.
Tools And Materials Needed
Before you start programming a motion sensor light switch, gather all necessary tools and materials. Having the right items ready makes the process smooth and safe. This section lists what you need to complete the job efficiently.
Essential Tools
You need a screwdriver, usually Phillips and flathead, to remove and install the switch. A voltage tester helps ensure power is off before you touch any wires. Wire strippers are useful for preparing the wires. A drill might be needed if new holes are required. Pliers can help twist wires together securely.
Safety Gear
Wear insulated gloves to protect against electric shocks. Safety glasses shield your eyes from dust or sparks. Use a dust mask if you drill or work in dusty areas. Wear closed-toe shoes to guard your feet. Always work in a well-lit space to avoid mistakes.
Additional Supplies
Get wire nuts to connect wires safely. Electrical tape helps secure wire nuts and prevent shorts. A flashlight or headlamp is useful if lighting is poor. Have the motion sensor light switch ready with its manual. Keep a ladder nearby if the switch is in a hard-to-reach place.
Preparing For Installation
Preparing for installation is the first step to program a motion sensor light switch. It ensures safety and smooth setup. Take time to understand your current switch and wiring.
Turning Off Power
Safety is the top priority. Switch off the power at the circuit breaker. Double-check by flipping the light switch to see if the light stays off. Use a voltage tester to confirm no electricity flows. Never skip this step.
Removing Existing Switch
Remove the wall plate by unscrewing it carefully. Unscrew the existing switch from the electrical box. Pull the switch out gently to expose the wires. Note how wires connect to the switch. Take a photo for reference. This helps during the new switch installation.
Identifying Wiring
Identify the wires: common, load, neutral, and ground. The common wire usually connects to the power source. The load wire goes to the light fixture. Neutral wires are often white and bundled together. Ground wires are green or bare copper. Use a voltage tester to verify wires. Proper identification prevents errors and ensures safe installation.
Wiring The Motion Sensor Switch
Wiring a motion sensor light switch is a key step in installing it correctly. This part needs careful attention to avoid electrical problems. You will connect the wires, secure the switch, and then restore power safely. Each step affects how well the switch works and how safe it is.
Connecting Wires Correctly
First, turn off the power at the breaker. Use a voltage tester to be sure no electricity flows. Identify the wires in your wall box: line, load, neutral, and ground. Match each wire to the correct terminal on the motion sensor switch. Tighten the screws firmly to hold the wires. Loose wires can cause flickering or no power.
Securing The Switch
Push the wires gently back into the wall box. Align the motion sensor switch with the screw holes. Use a screwdriver to fasten the switch to the box. Avoid overtightening to prevent damage. Make sure the switch sits flush with the wall for a clean look.
Restoring Power Safely
Turn the breaker back on after wiring and securing the switch. Test the motion sensor by moving in front of it. The light should turn on within seconds. If it does not work, turn off power and check connections again. Safety first—never touch wires with power on.
Programming Basic Settings
Programming basic settings for a motion sensor light switch is simple. These settings control how the sensor reacts to movement and light. Adjusting them helps save energy and improve convenience. Let’s explore key settings you need to program.
Adjusting Sensitivity
Sensitivity controls how much motion the sensor detects. Increase sensitivity to catch small movements. Lower it to avoid false triggers from pets or small objects. Adjust this setting based on the room size and activity level.
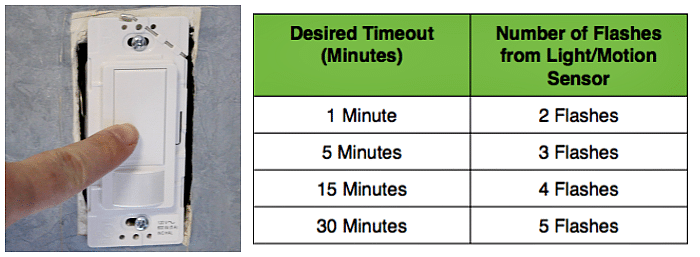
Setting Time Delay
Time delay sets how long the light stays on after motion stops. Short delays save energy but may turn off too soon. Longer delays keep the light on for comfort. Choose a time that fits your needs, from a few seconds to several minutes.
Configuring Light Levels
Light level settings decide when the sensor activates the light. Set the sensor to work only in low light or darkness. This prevents the light from turning on during the day. Adjust this to match the natural light in the room.

Credit: www.youtube.com
Testing And Troubleshooting
Testing and troubleshooting your motion sensor light switch ensures it works correctly. This step helps catch errors early and improves the switch’s performance. Simple tests can confirm the sensor activates properly. Troubleshooting fixes common issues that may arise during setup or daily use.
Verifying Sensor Activation
Start by standing in front of the sensor. Move slowly to see if the light turns on. If it does, the sensor detects motion correctly. Test from different angles and distances. This confirms the sensor covers the desired area. If the light does not activate, check the power supply and wiring first.
Adjusting For False Triggers
False triggers happen when the light turns on without motion. Adjust the sensor’s sensitivity settings to reduce this. Lower sensitivity if pets or small movements cause activation. Some models allow you to change the detection range. Use these settings to fit your room size and activity level.
Common Issues And Fixes
Sometimes the light stays on or off incorrectly. This could be due to wiring errors or sensor blockage. Clean the sensor lens to remove dust or dirt. Make sure no objects block the sensor’s view. Check the switch’s manual for reset options. Replace batteries if your model uses them. These steps often solve typical problems quickly.
Maintenance Tips
Maintaining your motion sensor light switch ensures it works well for a long time. Small efforts keep the sensor accurate and responsive. Follow these simple tips to keep your device in top shape.
Cleaning The Sensor
Dust and dirt can block the sensor’s view. Wipe the sensor gently with a soft cloth. Avoid using water or harsh chemicals. Clean it regularly to keep it sensing motion clearly.
Regular Function Checks
Test the light switch often to confirm it works correctly. Turn it on and move in front of the sensor. Make sure the light turns on and off as expected. Fix any problems quickly to avoid bigger issues.
Upgrading Firmware If Available
Some motion sensor switches have software updates. Check the manufacturer’s website for new firmware. Updating can improve performance and fix bugs. Follow instructions carefully to update safely.

Credit: support.lutron.com
Frequently Asked Questions
How Do I Program A Motion Sensor Light Switch?
To program a motion sensor light switch, first turn off power. Press the setup button on the switch. Adjust sensitivity, time delay, and ambient light settings as needed. Finally, restore power and test the sensor’s response to motion.
Can I Customize The Motion Sensor Sensitivity?
Yes, most motion sensor switches let you adjust sensitivity. Use the switch’s control buttons or dials to set how far it detects movement. Higher sensitivity detects movement from a greater distance, while lower sensitivity reduces false triggers.
What Is The Ideal Time Delay Setting?
The ideal time delay depends on your needs. Typically, 30 seconds to 5 minutes works well for most spaces. This setting controls how long the light stays on after motion stops, balancing convenience and energy savings.
How Do I Reset My Motion Sensor Light Switch?
To reset, turn off power to the switch. Press and hold the setup button for about 10 seconds. Release the button, then restore power. This returns the switch to factory default settings, clearing previous programming.
Conclusion
Programming a motion sensor light switch is simple and useful. It saves energy by turning lights off when no one is around. You control how long the light stays on. Adjust sensitivity to avoid false triggers. This small task improves home safety and convenience.
Try it yourself to see the difference. Enjoy smarter lighting with easy steps.