Adding a light and switch to a room can completely transform its look and feel. Imagine walking into a space where you control the brightness with just a flick of a switch.
It’s not as hard as you might think, and you don’t need to be an expert to do it. Whether you want to brighten up a dark corner or add a new light fixture, this guide will walk you through every step.
By the end, you’ll have the confidence to light up your room exactly the way you want. Ready to get started? Let’s make your space shine!

Credit: decoradventures.com
Tools And Materials Needed
Adding a light and switch to a room requires some basic tools and materials. Having the right items ready makes the task easier and safer. This section lists everything needed for the job.
Essential Tools
You need a few key tools for installing a light and switch. A screwdriver set is crucial for screws and fixtures. Wire strippers help remove insulation from wires. A voltage tester ensures the power is off before work starts. Pliers are handy for bending and holding wires. A drill with bits is useful for making holes in walls or ceilings.
Materials Required
Gather the right materials to complete the installation. Electrical wires connect the switch and light. A light fixture suits the room’s style and size. A single-pole switch controls the light easily. Wire nuts join wires safely. Electrical tape secures wire connections. A mounting box holds the switch or light firmly in place.
Safety Gear
Safety is important during electrical work. Wear insulated gloves to protect from shocks. Safety goggles guard your eyes from dust and debris. Use a sturdy ladder to reach high places. A flashlight helps when working in dark areas. Keep a fire extinguisher nearby for emergencies.
Planning Your Light And Switch Setup
Planning your light and switch setup is an important step before starting any electrical work. Good planning helps create a safe and functional lighting system. It also makes sure the room looks nice and works well for daily use.
Think about how you use the room and what kind of light fits best. Consider where the switch should be placed for easy access. A well-planned setup saves time and avoids future problems.
Choosing The Right Location
Pick a spot that lights the whole room evenly. Avoid placing lights too close to walls or corners. The center of the ceiling is often a good choice. Think about furniture and where people will sit or walk.
Place the switch near the room entrance. It should be easy to reach when entering or leaving. Avoid spots behind doors or furniture. Make sure the switch height is comfortable for all users.
Selecting The Light Fixture And Switch
Choose a light fixture that fits the room size and style. Small rooms need smaller lights. Big rooms need brighter or multiple lights. Pick fixtures that match your room decor and color scheme.
Select a switch type that suits your needs. A simple on/off switch works well in most cases. Consider dimmer switches for adjustable light levels. Make sure the switch is easy to use and reliable.
Turning Off Power Safely
Start by switching off the main power to avoid any electric shock. Double-check that the power is off before handling wires or devices. Safety first to keep your work smooth and accident-free.
Why Turning Off Power Is Crucial
Working with electricity can be risky without turning off power first. Even a small shock can cause injury. Turning off power protects you and your home from accidents. It stops current flow to wires and devices you will work on.
Locate The Correct Circuit Breaker
Find your home’s main electrical panel. Look for the breaker that controls the room’s power. Breakers are usually labeled by room or area. Switch the breaker to the OFF position to cut power safely.
Use A Voltage Tester For Safety
After switching off the breaker, test the wires. Use a voltage tester to check if electricity is still present. No light or sound from the tester means power is off. This step confirms your safety before handling wires.
Inform Others About The Power Off
Tell family members or roommates you turned off the power. This prevents someone from turning it back on by mistake. Place a note or sign near the panel as a warning. Clear communication avoids accidents and confusion.
Wiring Basics For Lights And Switches
Wiring a light and switch requires some basic knowledge of electrical systems. Understanding how wires work and connect is key to a safe and functional setup. This section explains the essential wiring basics for lights and switches.
Understanding Electrical Wires
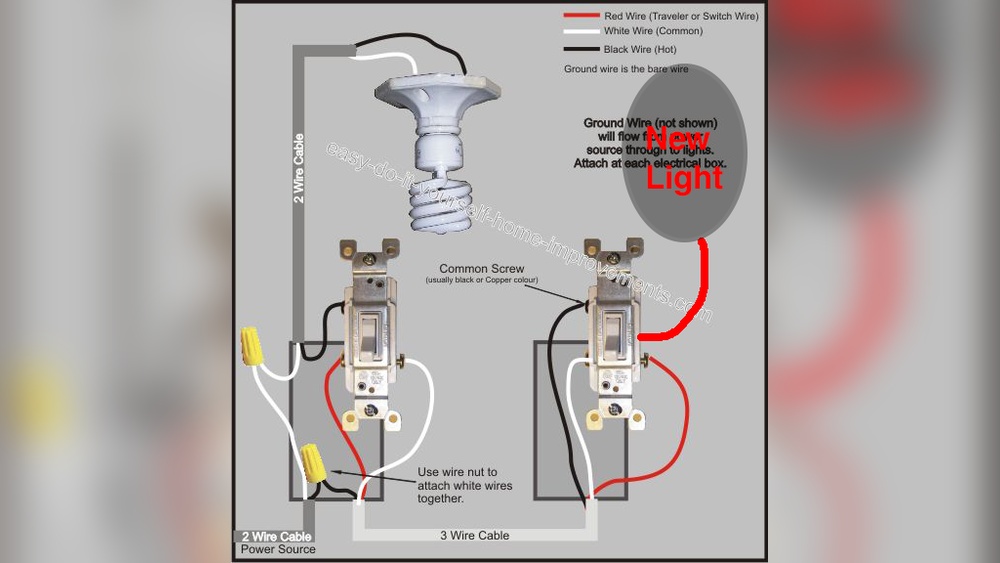
Electrical wires come in different colors and sizes. Each color tells you its role in the circuit. Black or red wires usually carry power. White wires are neutral and complete the circuit. Green or bare wires are ground wires for safety. Knowing these colors helps avoid mistakes.
The wire size matters too. Thicker wires carry more electricity. Most home lighting uses 14 or 12 gauge wires. Using the right wire size prevents overheating and fire risks.
How To Connect Wires Properly
Start by turning off the power at the breaker box. Always test wires with a voltage tester before working. Connect wires by matching their colors: black to black, white to white, and green to green or bare copper. Use wire nuts to secure the connections.
Twist wires together tightly before adding the wire nut. Tug lightly to check the connection is firm. Cover all wires inside the electrical box. Proper connections reduce the risk of shorts and shocks.
Installing The Light Fixture
Installing a light fixture is an important step in adding a new light and switch to any room. It involves attaching the fixture to the ceiling or wall and connecting the electrical wires safely. Proper installation ensures the light works well and stays secure.
Follow the steps carefully to mount the fixture and secure the wiring. This will help avoid any electrical problems and keep your home safe.
Mounting The Fixture
Start by turning off the power at the circuit breaker. This stops electricity flow to the wires. Use a voltage tester to check the wires are not live.
Next, remove the old fixture if there is one. Unscrew the mounting bracket and take it out. Attach the new mounting bracket to the electrical box with screws. Make sure it is tight and level.
Lift the new light fixture and align it with the bracket. Secure it using the screws provided. The fixture should sit flush against the ceiling or wall without gaps.
Securing The Wiring
Match the wires from the fixture to the wires in the electrical box. Typically, black wires connect to black, white to white, and green or bare copper to ground.
Twist the wire ends together clockwise. Cover each connection with a wire nut. Push the wires back into the box carefully.
Check all connections are tight and there are no loose wires. Finally, attach the fixture cover or shade according to the instructions.

Credit: www.youtube.com
Installing The Switch
Installing the switch is a key step in adding a light to your room. It controls the power flow to the light fixture. Proper installation ensures safety and functionality. Follow each step carefully for best results.
Preparing The Switch Box
First, turn off the power at the circuit breaker. This stops electricity and keeps you safe. Remove the old switch if there is one. Check the switch box for space and condition. Clean any dust or debris inside the box. Make sure the box is securely mounted to the wall. Use a voltage tester to confirm no power is present. This step avoids electrical shocks. Prepare the wires by stripping about half an inch of insulation. Straighten the wire ends for easy connection.
Wiring The Switch
Identify the wires: usually black (hot), white (neutral), and green or bare (ground). Connect the black wire to the switch’s brass terminal. Attach the ground wire to the green screw on the switch. Neutral wires typically connect together in the box, not to the switch. Tighten all screws firmly to prevent loose connections. Push the wires gently into the switch box. Mount the switch securely using the provided screws. Attach the switch cover plate last. Turn the power back on and test the switch. The light should turn on and off smoothly.
Testing Your Installation
Testing your new light and switch installation is a key step. It ensures everything works safely and correctly. Check each part carefully to avoid problems later. Follow simple tests to confirm a good setup.
Turn On The Power
Start by turning the power back on at the breaker. Make sure the switch is off before you restore power. This prevents sudden sparks or shocks. Once power is on, you can test the switch safely.
Check The Switch Function
Flip the switch to the “on” position. The light should turn on immediately. Flip it back to “off.” The light should go off without delay. If the light does not respond, double-check wiring connections.
Look For Flickers Or Buzzing
Observe the light closely for flickering. Flickering may mean loose wiring or a bad bulb. Listen for buzzing sounds from the switch or light. Buzzing signals electrical issues that need fixing.
Test Multiple Times
Switch the light on and off several times. This helps confirm stable operation. Consistent results show a solid installation. Any irregular behavior means re-inspection is needed.
Use A Voltage Tester
A voltage tester helps check if wires have power. Test the wires at the switch and light box. No power indicates wiring problems or a tripped breaker. Always use the tester carefully to avoid shocks.

Credit: www.youtube.com
Safety Tips And Common Mistakes
Adding a light and switch to a room improves comfort and style. Doing it safely is very important. Mistakes can cause electrical hazards or damage. Follow safety tips carefully to avoid common errors. This section covers key points to keep your project safe and smooth.
Turn Off The Power
Always switch off the power at the circuit breaker. Check with a tester to confirm no electricity flows. Working on live wires is very dangerous. This step protects you from shocks and injury.
Use The Right Tools
Use tools made for electrical work only. Insulated screwdrivers and wire strippers reduce risk. Avoid makeshift tools that can slip or break. Proper tools make the job easier and safer.
Check Local Codes
Follow local electrical codes and rules. These rules keep your installation safe and legal. Not following codes can cause fines or hazards. Check rules before starting your work.
Don’t Overload Circuits
Adding a light might overload the existing circuit. Know the circuit’s capacity before adding new fixtures. Overloading can cause breakers to trip or fires. Spread electrical load to avoid problems.
Secure Connections Properly
Loose connections cause sparks and failures. Twist wires tightly and use wire nuts or connectors. Check all connections twice before closing boxes. Good connections ensure long-lasting and safe wiring.
Avoid Common Wiring Mistakes
Do not confuse neutral and hot wires. Mixing wires leads to shorts and shocks. Label wires if unsure and double-check before connecting. Mistakes here can cause serious problems.
Frequently Asked Questions
How Do I Safely Add A Light Fixture In A Room?
Turn off the power at the breaker before starting. Use a voltage tester to confirm no electricity. Follow wiring instructions carefully and connect wires correctly. Secure the fixture firmly to avoid hazards. If unsure, consult a licensed electrician.
What Tools Are Needed To Install A Light And Switch?
You’ll need a voltage tester, wire stripper, screwdriver, drill, electrical tape, and wire nuts. These tools help you safely connect wires and mount fixtures. Having the right tools ensures a smooth installation process and safe electrical connections.
Can I Install A Light Switch Without Professional Help?
Yes, if you understand basic wiring and safety. Always turn off power before working. Follow step-by-step guides and local electrical codes. For complex wiring or doubts, hiring a professional electrician is safer and ensures compliance.
Where Is The Best Location For A Light Switch In A Room?
Place the switch near the room’s entrance, about 48 inches from the floor. This location is standard, convenient, and accessible. Proper placement improves usability and meets electrical code requirements for residential spaces.
Conclusion
Adding a light and switch can brighten any room quickly. Follow safety steps carefully to avoid accidents. Use the right tools to make the job easier. Test the switch and light before finishing the installation. This simple upgrade improves comfort and usability at home.
With patience and care, anyone can do it. Enjoy the new light and the cozy feel it brings.