Have you ever wished you could turn your ceiling light on and off without getting up or crawling under a lampshade? Adding a light switch to a ceiling light can make your daily routine easier and your space more convenient.
But if you’re unsure where to start, don’t worry—you’re in the right place. This guide will walk you through simple steps to install a light switch safely and effectively. By the end, you’ll have the power to control your ceiling light with just a flick of a switch.
Ready to transform your room? Let’s get started.
Tools And Materials Needed
Adding a light switch to a ceiling light requires some basic tools and materials. Having the right items makes the job easier and safer. Prepare everything before starting to avoid delays and mistakes.
Essential Tools
- Screwdriver (flathead and Phillips)
- Wire stripper
- Voltage tester
- Drill with drill bits
- Measuring tape
- Electrical tape
- Utility knife
- Flashlight or work light
Required Materials
- Single-pole light switch
- Switch box
- Romex electrical wire (14/2 or 12/2 gauge)
- Wire nuts
- Ceiling light fixture (if not already installed)
- Wall plate for the switch
Safety Precautions
Safety is the top priority when adding a light switch to a ceiling light. Electrical work can be dangerous without the right precautions. Always follow safety steps to avoid shocks or accidents. Taking time to prepare helps you work confidently and safely.
Power Off Procedures
Start by turning off the power at the circuit breaker. Do not rely on the wall switch alone. Confirm the power is off by switching the light on and off. Wait a few minutes for the wires to discharge. This step reduces the risk of electric shock during work.
Using A Voltage Tester
A voltage tester checks if wires carry electricity. Use it to verify the power is off before touching wires. Test the tester on a live wire first to make sure it works. Carefully test all wires in the ceiling light box. This simple tool helps prevent accidental shocks and keeps you safe.
Planning The Installation
Planning the installation of a light switch for a ceiling light is the first step to a smooth project. Careful preparation helps avoid mistakes and saves time. It also ensures safety during the work.
Start by thinking about the best place for the switch. Then, consider how to run the wires from the power source to the switch and the light. A clear plan makes the installation easier and safer.
Choosing The Switch Location
Pick a spot for the switch near the room entrance. It should be easy to reach and use. Avoid places behind doors or furniture. The switch height should be about 48 inches from the floor. This height suits most people.
Check for any obstacles inside the wall. Avoid areas with pipes or heavy wiring. Use a stud finder to locate wall studs. Mark the spot where you want to install the switch box.
Mapping The Wiring Route
Plan the path for the electrical wires from the power source to the switch and ceiling light. Look for the shortest and safest route. Avoid running wires near water pipes or heating ducts.
Trace the route along wall studs or ceiling joists. This makes it easier to secure the wires. Use a pencil to mark the path on the wall or ceiling. This map will guide you during the installation.

Credit: diy.stackexchange.com
Turning Off Power Supply
Turning off the power supply is the first step before working on any electrical project. It keeps you safe from electric shocks. This step is very important when adding a light switch to a ceiling light.
Always make sure no electricity flows to the wires you will handle. This prevents accidents and damage to your home wiring.
Locate The Circuit Breaker
Find the main circuit breaker panel in your home. It is usually in the basement, garage, or utility room. The panel has switches that control power to different areas.
Identify The Correct Breaker
Look for the breaker that controls the ceiling light’s circuit. It may be labeled by room or fixture. If not labeled, turn off breakers one by one and check if the light turns off.
Turn Off The Breaker
Flip the breaker switch to the off position. This cuts power to the ceiling light circuit. Double-check the light switch or fixture to confirm power is off.
Test For Power
Use a voltage tester or a non-contact tester on the wires. It shows if electricity is still flowing. Never trust just the breaker position. Test every wire you will touch.
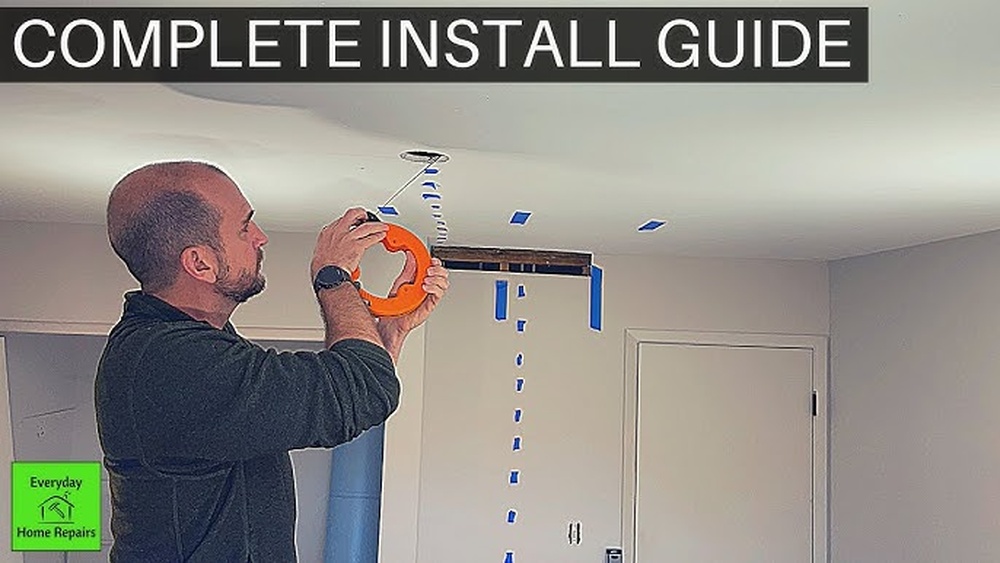
Accessing Ceiling Light Wiring
Accessing the ceiling light wiring is the first step to adding a light switch. You must safely reach the wires behind the fixture. This allows you to connect the new switch properly. Follow simple steps to remove the light and find the wiring.
Always turn off the power at the breaker before starting. Safety is key to avoid shocks or injuries. Use a voltage tester to check if the wires are live. Once safe, you can begin removing the light fixture.
Removing Light Fixture
Start by removing the light bulbs from the fixture. Next, look for screws or clips holding the fixture to the ceiling. Use a screwdriver to take out these screws carefully. Gently pull the fixture down from the ceiling.
Be careful not to pull too hard. The wires are still attached behind the fixture. Support the fixture with one hand while working with the other. This prevents dropping or damaging the light.
Identifying Existing Wires
Once the fixture is down, look at the wires inside the ceiling box. Usually, there are three types: black (hot), white (neutral), and green or copper (ground). These colors help identify each wire’s purpose.
Use a voltage tester to confirm which wire is live. Mark the wires with tape or a marker for easy reference. Understanding these wires is important for wiring the new switch correctly.
Running Wire To Switch Box
Running wire to the switch box is a key step in adding a light switch to a ceiling light. This process connects the power source to the switch, allowing you to control the light easily. Careful planning and proper tools make this task safe and efficient.
First, you need to guide the wire from the ceiling light fixture to the switch box. This step may require drilling holes and pulling wires through walls or ceilings. Taking your time helps avoid damage to the wires or your home structure.
Drilling And Fishing Wires
Start by drilling holes in the studs or joists between the light and switch locations. Use a drill bit large enough for the cable to pass through. Drill carefully to avoid hitting pipes or other wires.
Next, use a fish tape or wire puller to guide the wire through the holes. Attach the cable securely to the fish tape and pull it slowly. This technique helps the wire reach the switch box without getting stuck.
Securing The Cable
After pulling the wire, fasten it to the studs or joists using cable staples. Space the staples about every 12 inches for stability. Avoid overtightening to prevent damaging the cable.
Make sure the cable runs cleanly and does not sag or hang loosely. Proper securing protects the wire and keeps your installation neat and safe.
Connecting Wires At Switch
Connecting wires at the switch is a key step in adding a light switch to a ceiling light. This process controls the flow of electricity to the light fixture. Proper wiring ensures the switch works safely and correctly. Follow clear steps to connect the wires without confusion or risk.
Wiring The Switch
Start by identifying the wires in the switch box. Usually, you will see a black (hot) wire and a white (neutral) wire. The black wire connects to one screw on the switch. The other black wire, leading to the light, connects to the other screw. The white wires do not connect to the switch. Instead, they join together with a wire nut.
Make sure wires are stripped about half an inch. Wrap the wire clockwise around the screws. Tighten the screws firmly to hold the wires. Loose connections can cause flickering or a fire risk. Double-check each wire before moving on.
Grounding And Safety
Grounding is essential for safe electrical work. Find the bare copper or green wire in the box. Attach this ground wire to the green grounding screw on the switch. If no grounding wire exists, connect the ground to the metal box. This step protects against electrical shocks.
Turn off the power at the circuit breaker before starting. Use a voltage tester to confirm no power flows to the wires. Wear insulated gloves for added safety. Work in a well-lit area to see clearly. Safety first. Always.
Connecting Wires At Ceiling Light
Connecting wires at the ceiling light is a key step in adding a light switch. This step ensures the light works with the new switch. It involves joining the wires correctly to complete the electrical circuit. Proper connections keep the light safe and functional.
Completing The Circuit
First, identify the wires from the ceiling and the switch. Usually, there is a black (hot) wire, a white (neutral) wire, and a ground wire. Connect the black wire from the power source to the black wire of the switch. Then, connect the black wire from the switch to the light fixture’s black wire. This path allows electricity to flow when the switch is on.
Next, join the white wires together. These complete the circuit by returning electricity back. The ground wires, usually green or bare copper, must also connect. This step ensures safety by preventing electrical shocks.
Using Wire Nuts And Connectors
Use wire nuts to secure the wire connections. Twist the wires together tightly before screwing on the wire nut. The wire nut holds wires firmly and prevents them from coming loose. Choose the right size wire nut for the number of wires.
Check each connection by gently pulling on the wires. No wire should slip out. Wrap electrical tape around the wire nuts for extra safety. Good connections stop sparks and electrical fires. Proper use of wire nuts keeps your ceiling light working well with the new switch.
Installing The Switch And Fixture
Installing the switch and fixture is a key step to control your ceiling light. This part involves fixing the switch on the wall and putting the light fixture back in place. A careful approach ensures safety and functionality. Follow the steps below to mount the switch and reattach the ceiling light correctly.
Mounting The Switch
Start by placing the switch box into the wall opening. Make sure it fits tightly and is level. Connect the wires from the power source to the switch terminals. Use a screwdriver to tighten the screws firmly. Push the switch gently into the box without pinching any wires. Secure the switch with screws and attach the switch cover plate.
Reattaching The Ceiling Light
Check the wires coming from the ceiling. Connect them to the wires on the light fixture using wire nuts. Match the colors: black to black, white to white, and green or copper to ground. Carefully tuck the wires into the ceiling box. Align the fixture base with the mounting bracket. Fasten the fixture with screws to hold it firmly. Finally, install the light bulbs and attach any covers or shades.

Credit: www.do-it-yourself-help.com
Testing The Setup
Testing the setup is a key step after wiring a light switch to a ceiling light. It ensures everything works safely and as planned. This process confirms the switch controls the light properly without any electrical issues. Follow these steps carefully to test your new installation.
Restoring Power
First, turn the power back on at the circuit breaker. Make sure the breaker is fully switched to the “on” position. Avoid touching any wires or components while restoring power. This step supplies electricity to the switch and light fixture. It also prepares the circuit for testing.
Verifying Switch Operation
Next, flip the light switch to the “on” position. Check if the ceiling light turns on immediately. Then, switch it off and see if the light goes out. Repeat this a few times to confirm consistent function. If the light does not respond, turn off the power and double-check your connections.
Troubleshooting Common Issues
Troubleshooting common issues after installing a light switch is important. It helps you fix problems quickly and safely. You may face some typical problems like the switch not working or light flickering. Understanding these problems can save time and avoid extra costs.
Switch Not Working
Check if the power is off before starting any work. Sometimes, the circuit breaker may be off. Make sure the switch wires are connected tightly. Loose wires can stop the switch from working. Test the switch with a voltage tester to see if it gets power. Replace the switch if it is faulty or old. Ensure the light bulb is working and screwed in well. Confirm the wiring follows the correct color code for safety.
Light Flickering
Flickering lights often mean a loose connection. Check the wire nuts and screws on the switch and light fixture. Tighten any loose wires. Use a steady bulb type for your fixture. Sometimes, a bulb with the wrong wattage causes flickering. Inspect the light socket for damage or corrosion. Replace any damaged parts to stop flickering. Consider testing the light fixture with another switch to isolate the issue.

Credit: www.youtube.com
Tips For A Clean Finish
Getting a clean finish for your new light switch is important. It makes your work look professional. It also keeps your space safe and tidy. Small details can change the whole look of the room.
Focus on two key areas: hiding wires and choosing the right switch plate. Both help your switch blend in well.
Hiding Wires Neatly
Keep wires organized and out of sight. Use wire clips or cable covers to secure loose wires. Tuck wires inside walls or use plastic conduits. Avoid visible hanging wires. This reduces the risk of damage and keeps the area clean.
Paint cable covers the same color as your walls. This helps them blend in naturally. Use short wires and proper lengths. Too much extra wire looks messy and unsafe.
Using Decorative Switch Plates
Choose switch plates that match your room style. Simple designs work well in modern spaces. Vintage or decorative plates add charm to classic rooms. Pick plates made from durable materials.
Switch plates come in many colors and textures. Match them with wall color or light fixture. This creates a smooth, unified look. Tighten screws evenly to avoid crooked plates. A well-fitted plate gives a clean, polished finish.
Frequently Asked Questions
How Do I Add A Light Switch To A Ceiling Light?
To add a light switch, first turn off power at the breaker. Run electrical wire from the ceiling light to the switch location. Connect wires following electrical codes. Install the switch and secure the ceiling fixture. Finally, restore power and test the switch.
What Tools Are Needed For Installing A Light Switch?
You need a screwdriver, wire stripper, voltage tester, drill, electrical tape, and wire nuts. These tools ensure safe and proper installation of the switch and wiring connections.
Can I Add A Switch Without Rewiring The Ceiling Light?
If the existing wiring includes a switch loop, you can add a switch without full rewiring. Otherwise, new wiring is needed to connect the ceiling light to the switch.
Is It Safe To Install A Light Switch Myself?
Yes, if you follow safety guidelines, turn off power, and understand electrical wiring. Otherwise, consult a licensed electrician to avoid risks like shocks or fire hazards.
Conclusion
Adding a light switch to a ceiling light can be simple and useful. Always turn off the power before starting any work. Follow safety steps carefully to avoid accidents. Use the right tools and materials for the job. Take your time and check each connection twice.
This upgrade makes controlling your lights easier and safer. You can enjoy better lighting in your room with less effort. Remember, safety first and do not rush the process. You can handle this project with patience and care.
