Have you noticed your brake lights acting up or not turning on at all? This can be dangerous and might even lead to a ticket.
The culprit is often a faulty brake light switch. Luckily, replacing this small but important part is something you can do yourself. You’ll learn exactly how to replace the brake light switch step by step. By the end, you’ll have the confidence to fix this issue quickly and save time and money.
Keep reading to find out how simple the process really is!
Signs Of A Faulty Brake Light Switch
The brake light switch is a small but vital part of your vehicle. It tells the brake lights to turn on when you press the brake pedal. A faulty brake light switch can cause many problems. It can make driving unsafe and cause your car to fail inspections. Knowing the signs of a bad switch helps you fix it early.
Common Symptoms
One common sign is brake lights that do not turn on. Sometimes the lights stay on even when you do not press the pedal. The cruise control might not work correctly. You may notice the brake pedal feels different or loose. The car may not start if the switch fails. These symptoms show the switch needs attention.
Safety Risks
Brake lights warn drivers behind you. Faulty brake lights can cause accidents. Other drivers may not know you are stopping. This increases the risk of rear-end collisions. A bad switch can also stop your car from starting. It affects your vehicle’s safety systems. Fixing the brake light switch keeps you and others safe on the road.
Tools And Materials Needed
Replacing a brake light switch requires some basic tools and the right replacement part. Having everything ready makes the job easier and faster. Knowing what you need helps avoid delays and extra trips to the store.
Essential Tools
- Screwdrivers – both flathead and Phillips
- Socket wrench set – for loosening bolts
- Needle-nose pliers – for handling small clips
- Multimeter – to test the switch’s electrical function
- Flashlight – to see in tight spaces under the dashboard
Replacement Parts
- New brake light switch – specific to your car model
- Electrical tape – for securing any loose wires
- Zip ties – to keep wires neat and in place
Preparing Your Vehicle
Replacing the brake light switch starts with proper preparation of your vehicle. This step ensures the work is safe and smooth. Taking time now prevents problems later. It helps you avoid damage to your car or injury to yourself. Follow simple steps to get ready before you start.
Safety Precautions
First, park your car on a flat surface. Engage the parking brake to stop movement. Turn off the engine and remove the key. Disconnect the battery to prevent electrical shocks. Wear gloves and safety glasses for protection. Clear the area around the brake pedal. Keep tools organized and within reach.
Accessing The Brake Light Switch
The brake light switch is near the brake pedal. Look under the dashboard on the driver’s side. Use a flashlight to see clearly in tight spaces. Remove any covers blocking your view. Identify the switch attached to the brake pedal arm. Note how it is connected before removal. This helps with correct installation later.

Credit: www.youtube.com
Removing The Old Brake Light Switch
Removing the old brake light switch is the first step to fixing brake light problems. This part controls the brake lights. If it is broken, the lights may not work properly. Removing it carefully helps you install the new switch without any trouble.
Follow these clear steps to remove the old brake light switch safely and easily. Each step is important to avoid damage to your car’s electrical system.
Disconnecting The Battery
Start by disconnecting the car battery. This stops any electric flow and keeps you safe. Use a wrench to loosen the negative terminal first. Then remove the cable from the battery. This step prevents short circuits and shocks.
Unplugging The Switch
Next, find the brake light switch near the brake pedal. Look for the electrical connector attached to it. Press the tab or clip on the connector to unplug it. Pull gently to avoid breaking the wires or connector.
Taking Out The Switch
Look at how the switch is held in place. It may be clipped, screwed, or twisted in. If it has clips, press them to release the switch. For screws, use a screwdriver to remove them. Carefully pull out the switch from its position.
Installing The New Brake Light Switch
Installing the new brake light switch is an important step to restore your vehicle’s safety. This part controls your brake lights and alerts other drivers when you stop. Proper installation ensures the switch works correctly and avoids electrical problems.
Follow clear steps to position, secure, and reconnect the switch. Each part matters for a smooth operation.
Positioning The New Switch
First, place the new brake light switch where the old one was. Usually, it sits near the brake pedal arm. Align the switch so the plunger presses against the pedal arm. This alignment triggers the brake lights when you press the pedal. Check that the switch moves freely without sticking.
Securing The Switch
Next, fix the switch firmly in place. Use the mounting bracket or screws from the old switch. Tighten them gently but securely. The switch should not move or wobble. Loose installation can cause the brake lights to fail or stay on continuously.
Reconnecting The Wiring
Finally, connect the wiring harness to the new switch. Match the connector carefully to avoid bending pins. Push the connector in until it clicks. This ensures a good electrical connection. Double-check that all wires are secure and not loose. Proper wiring helps the brake lights respond every time you press the pedal.
Testing The New Switch
Testing the new brake light switch is a key step after installation. It ensures the switch works correctly and keeps you safe on the road. This process checks that your brake lights respond as they should.
Checking Brake Lights
Start by pressing the brake pedal gently. Watch the brake lights at the back of your vehicle. They should turn on right away. If the lights stay off, the switch may not be connected properly.
Ask someone to help if you cannot see the brake lights yourself. They can tell you if the lights come on when you press the pedal. This simple check saves you from driving with broken brake lights.
Ensuring Proper Function
Next, release the brake pedal. The brake lights must turn off immediately. If they stay on, the switch might be stuck or faulty. Adjust the switch position if needed.
Test the brake pedal several times. Each time, the lights should turn on and off smoothly. This confirms the new switch works well and signals drivers behind you correctly.
Troubleshooting Tips
Troubleshooting the brake light switch helps ensure safety and proper function. Problems can arise during or after replacement. Knowing common issues saves time and frustration. It also helps avoid costly repairs later. This section guides you through key troubleshooting tips.
Common Installation Issues
The brake light may not turn on after switch replacement. Check if the switch is aligned correctly. Misalignment prevents the switch from activating.
Loose wiring connections cause failure. Secure all wires firmly to the switch terminals. Inspect for damaged or frayed wires that may disrupt power flow.
Sometimes the switch plunger sticks. Gently press it several times to free it. Dirt or debris can block smooth movement.
Test the switch with a multimeter. This confirms if it opens and closes the circuit properly. Replace the switch if it shows no continuity.
When To Seek Professional Help
If troubleshooting does not fix the problem, consider a mechanic. Complex electrical issues need expert tools and skills. A professional can diagnose hidden faults quickly.
Faulty brake light wiring may affect other systems. Professionals ensure safe and reliable repairs. Avoid risking your safety by delaying expert help.
Uncertain about handling electrical parts? Leave it to a trained technician. They follow proper procedures to prevent damage or injury.
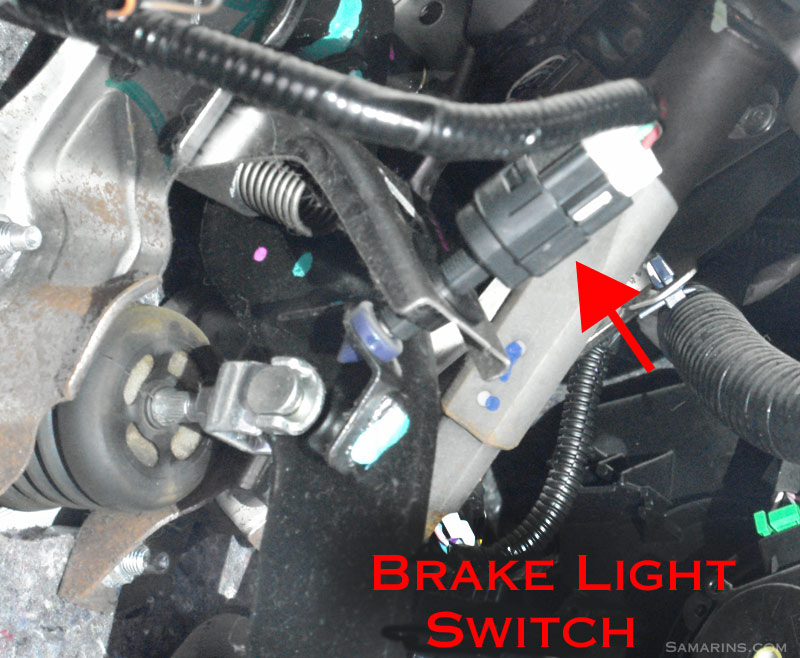
Credit: www.samarins.com

Credit: geobrakes.ca
Frequently Asked Questions
How Do I Know If My Brake Light Switch Is Faulty?
A faulty brake light switch causes brake lights to not illuminate. You may also experience cruise control issues or a brake pedal that feels off. Testing the switch with a multimeter confirms if it needs replacement.
What Tools Are Required To Replace A Brake Light Switch?
You typically need a screwdriver, pliers, and a multimeter for testing. Some vehicles may require socket wrenches. Always consult your vehicle manual to ensure you have the correct tools.
How Long Does It Take To Replace A Brake Light Switch?
Replacing a brake light switch usually takes 15 to 30 minutes. It’s a simple process involving unplugging the old switch and installing the new one. Time may vary based on vehicle model.
Can I Replace The Brake Light Switch Myself Safely?
Yes, replacing the brake light switch is safe with basic mechanical knowledge. Always disconnect the battery before starting. Follow your vehicle’s manual and take safety precautions to avoid injury.
Conclusion
Replacing the brake light switch is simple and important. It keeps your car safe on the road. Follow the steps carefully to avoid mistakes. Use the right tools and parts for best results. Test the brake lights after replacement to ensure they work.
Regular checks can prevent future problems. Taking care of your car helps you drive with confidence. Now you know how to fix this small but vital part. Keep your brakes and lights in good shape always.