Have you ever looked at your old, worn-out light switch and wondered if you could replace it yourself? Changing a light switch might seem tricky, but it’s often easier than you think.
Imagine saving money, adding a fresh look to your room, and gaining a small but powerful DIY skill—all in one simple step. You’ll discover how straightforward the process can be, what tools you need, and tips to keep you safe.
Ready to take control of your home lighting? Let’s dive in and make that switch change happen!
Tools And Materials Needed
Changing a light switch is a simple task with the right tools and materials. Having everything ready makes the job faster and safer. No need to worry about stopping midway because of missing items.
Below are the basic tools and materials you need for this small home project.
Essential Tools
A screwdriver is the most important tool. Most switches use a flathead or Phillips screwdriver.
A voltage tester checks if the power is off. This tool keeps you safe by preventing electric shocks.
Wire strippers help remove the insulation from wires without damaging them. It makes connecting wires easier.
Materials Required
You need a new light switch that matches the old one’s type and rating.
Wire connectors, also called wire nuts, hold wires together securely. They prevent loose connections.
Electrical tape helps cover wire connectors and adds extra safety.
Safety Gear
Wear insulated gloves to protect your hands from electric shocks.
Use safety glasses to protect your eyes from dust or wire bits.
Safety Precautions
Changing a light switch is a simple task but requires care. Safety is the top priority. Electric shocks can cause serious injury. Taking the right safety steps protects you and your home.
Before starting, make sure to prepare properly. This helps avoid accidents and keeps the work smooth. Understanding safety rules makes the job easier and safer.
Turn Off Power At The Circuit Breaker
Always switch off the power at the main circuit breaker. This stops electricity from flowing to the switch. Never rely only on the wall switch being off. Use a tester to confirm no power is present.
Use A Voltage Tester
A voltage tester checks if wires have electricity. Test each wire before touching them. This tool is simple and prevents shocks. Keep the tester handy during the entire work.
Wear Protective Gear
Wear rubber-soled shoes and insulated gloves. These protect you from electric shocks. Avoid working in wet or damp areas. Safety gear adds a strong layer of defense.
Work In A Well-lit Area
Good lighting helps you see wires and screws clearly. Use a flashlight if the room is dark. Clear visibility reduces mistakes and keeps you safe.
Follow Instructions Carefully
Read the switch installation instructions thoroughly. Follow each step without rushing. Correct installation prevents hazards and saves time. Keep the manual nearby for quick reference.
Turning Off The Power
Turning off the power is the first step in changing a light switch safely. It stops electricity from flowing to the switch. This step prevents shocks and accidents. Never skip this step, even for small jobs.
Before touching wires, always make sure the power is off. This keeps you safe and avoids damage to your home’s electrical system.
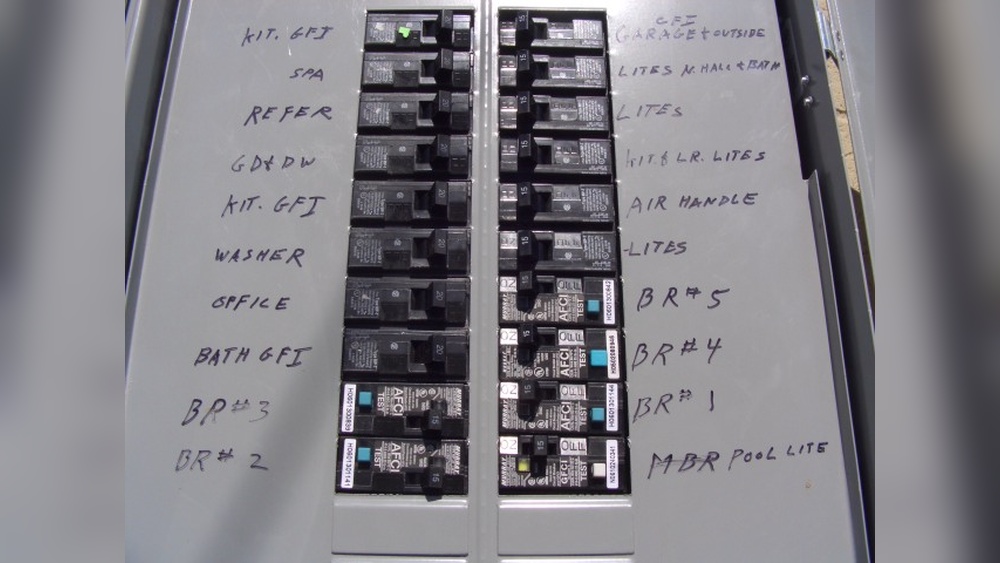
Locate The Circuit Breaker
Find your home’s circuit breaker panel. It is usually in the basement or garage. Look for labels next to each switch. They tell you which area of the house the switch controls.
Switch Off The Correct Breaker
Turn off the breaker that controls the light switch. Flip the switch to the “off” position. This stops power to that switch only. It keeps the rest of the house working normally.
Test For Power
Use a voltage tester to check the switch wires. The tester shows if electricity is still running. If it shows no power, it is safe to continue. Never touch wires without testing first.
:max_bytes(150000):strip_icc()/how-to-replace-a-light-switch-1824670_07_newswitch_40431-69f2872f4a734dc89e3c2bed8711fc69.jpg)
Credit: www.thespruce.com
Removing The Old Switch
Start by turning off the power to the switch at the breaker box. Unscrew the old switch carefully and pull it out to access the wiring. This step is simple but needs attention to safety.
Gathering Necessary Tools
Start by collecting the tools needed for the job. Usually, a screwdriver and a voltage tester are enough. Having the right tools ready makes the process smoother and safer.
Safety first. Switch off the power at the circuit breaker. Double-check by using a voltage tester on the switch. This step prevents electric shocks.
Removing The Switch Cover Plate
Use a screwdriver to remove the screws holding the cover plate. Gently pull off the plate to expose the switch and wiring. Be careful not to damage the wall.
Unscrewing The Old Switch
Next, remove the screws that attach the switch to the electrical box. Keep the screws safe for installing the new switch. The switch should now pull out slightly.
Disconnecting The Wires
Note how the wires connect to the old switch. Unscrew or unclip each wire carefully. Avoid letting wires touch each other or the metal box.
Identifying Wiring Types
Changing a light switch is easier when you know the wiring type. Identifying wiring helps avoid mistakes and keeps you safe. Different homes may have different wiring styles. Recognizing these types guides you on how to proceed.
Single-pole Wiring
Single-pole wiring is the most common type. It controls one light or a set of lights from one switch. You will usually find two wires connected to the switch. One is the live wire, and the other goes to the light fixture.
Three-way Wiring
Three-way wiring allows control of one light from two switches. It has more wires than single-pole. Usually, three wires connect to the switch. Two traveler wires and one common wire make up the setup.
Four-way Wiring
Four-way wiring lets you control lights from three or more switches. It has even more wires involved. You will find two traveler wires and two or more switches in the circuit. This type is common in large rooms or hallways.
Ground Wire
The ground wire is a safety feature in all modern wiring. It is usually green or bare copper. It helps prevent electric shocks by directing electricity to the ground. Always connect the ground wire when changing switches.
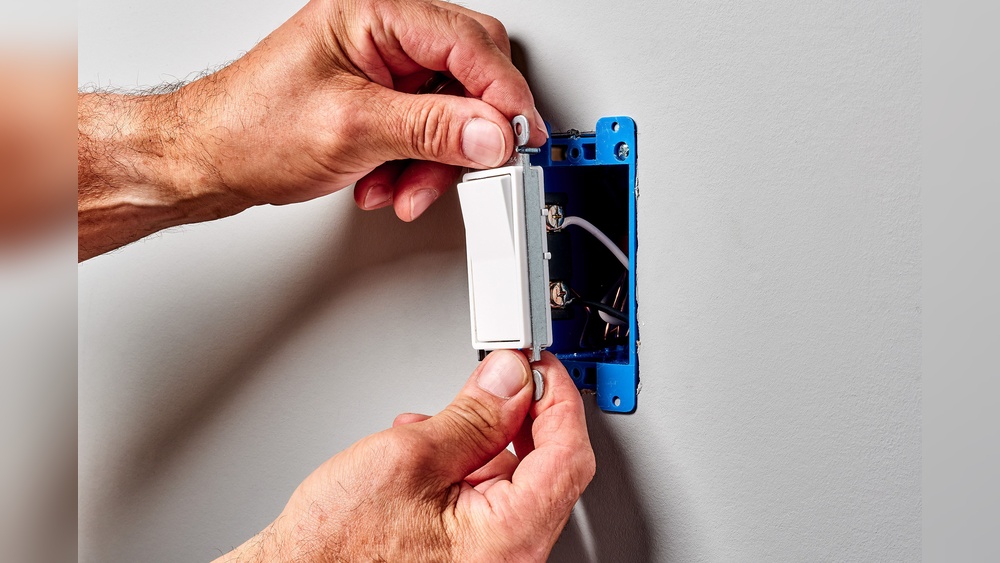
Connecting The New Switch
Connecting the new switch is the key step after removing the old one. This part needs care and attention to make sure the switch works well. Proper connection keeps your home safe and the light switch responsive. Follow the steps carefully to connect the wires to the new switch.
Identify The Wires
First, look at the wires coming out of the wall. Usually, there are two or three wires. They can be black, white, or green. Black wires are hot and carry electricity. White wires are neutral and complete the circuit. Green or bare wires are for grounding and protect from shocks.
Attach The Wires To The Switch
Match the wires to the switch terminals. Most switches have screws or clips to hold the wires. Connect the black wire to the brass or dark screw. Attach the white wire to the silver screw if the switch requires it. Connect the green or bare wire to the green screw for grounding.
Secure The Connections
Wrap the wires tightly around the screws. Turn the screws clockwise to hold the wires firmly. Loose wires can cause sparks or stop the switch from working. Use needle-nose pliers for a tight grip. Check each connection twice to avoid mistakes.
Test The Switch
Before closing the wall box, turn the power back on. Flip the switch to see if the light turns on and off. If it does, the connections are good. If not, turn off the power and check the wires again. Fix any loose or wrong connections before finishing.
Testing The New Switch
Testing the new switch is a crucial step in the light switch replacement process. It confirms that the wiring and installation were done correctly. A properly tested switch ensures safety and functionality. This step prevents future electrical issues and saves time.
Turn On The Power
Start by turning the power back on at the circuit breaker. This restores electricity to the switch. Avoid touching wires or terminals during this step to stay safe.
Operate The Switch
Flip the switch up and down. The connected light should turn on and off smoothly. No flickering or delays should occur. This means the switch works properly.
Check For Unusual Signs
Look for sparks, buzzing, or burning smells. These signs indicate wiring problems. If noticed, turn off the power immediately and consult a professional.
Test Multiple Times
Operate the switch several times. This confirms consistent performance. It also helps identify any loose connections early on.
Use A Voltage Tester
A voltage tester can verify power flow through the switch. It adds an extra layer of safety. Use it according to the device’s instructions.
Troubleshooting Common Issues
Troubleshooting common issues while changing light switches can save time and frustration. Many problems happen due to small mistakes or overlooked details. Understanding these issues helps fix them quickly. It also makes the switch replacement safer and more effective.
Checking Power Supply
Start by turning off the power at the circuit breaker. Use a voltage tester to ensure no electricity flows to the switch. If the tester shows power, the switch or wiring may be faulty. Confirm the breaker controls the correct circuit. Sometimes, multiple breakers affect the same switch.
Identifying Loose Wires
Loose wires cause flickering or no light at all. Inspect all wire connections on the switch. Tighten screws holding wires firmly. Look for broken or frayed wires. Replace damaged wires before installing the new switch. A poor connection can cause sparks or shorts.
Testing The Switch Function
Use a multimeter to test the switch’s continuity. The switch should show continuity when on and none when off. No reading means the switch is defective. Replace the switch if it fails this test. Do not guess; testing prevents future problems.
Handling Incorrect Wiring
Wiring mistakes are common, especially with older homes. Match wires by color and function. Black or red wires are usually live. White wires are neutral. Green or bare copper wires connect to ground. Use the switch’s instructions for correct wiring. Double-check connections before powering on.
Dealing With Dim Or Flickering Lights
Dim or flickering lights may not always mean a switch problem. Check the bulb and fixture first. Use a compatible bulb type and wattage. Loose wiring or a bad switch can cause flickering. Tighten all connections and replace faulty switches. Consistent flickering needs immediate attention.
Tips For Choosing Switches
Choosing the right light switch makes your home safer and more stylish. Different switches fit different needs. Think about how you use the room. Consider the switch style and features.
Types Of Light Switches
Toggle switches are common and easy to use. Rocker switches offer a modern look. Dimmer switches let you change the light brightness. Motion sensor switches turn lights on automatically.
Material And Finish
Switches come in plastic, metal, or glass. Pick a finish that matches your decor. Matte finishes hide fingerprints well. Glossy finishes look clean but show smudges.
Safety And Quality
Choose switches with good reviews and safety marks. Check for certifications like UL or CE. Quality switches last longer and work better. Avoid cheap switches to reduce fire risks.
Switch Size And Installation
Measure your current switch before buying. Some switches need more space behind the wall. Look for easy-to-install designs. Clear instructions help prevent mistakes.

Credit: www.youtube.com
When To Call A Professional
Changing a light switch can seem simple. Yet, some situations need expert help. Knowing when to call a professional keeps you safe and saves time. Electrical work can be risky without the right skills and tools.
Signs Of Complex Electrical Issues
flickering lights or frequent breaker trips signal deeper problems. Loose wiring or bad connections can cause shocks or fire. Professionals find and fix hidden issues safely.
Working With Older Or Faulty Wiring
Old homes often have outdated wiring. Replacing switches in these homes needs care. Experts know how to handle fragile or unsafe wires.
Upgrading To Smart Or Specialized Switches
Smart switches require proper setup and wiring changes. Incorrect installation can damage the device or home system. A technician ensures the switch works correctly.
When Local Codes And Permits Apply
Some areas need permits for electrical work. Licensed electricians understand local rules and get proper approvals. This avoids fines and legal issues.
Feeling Uncertain Or Unsafe
Any doubt about your skills or tools is a sign to hire help. Electrical work can cause serious injury. Professionals have training to work safely and efficiently.

Credit: www.wikihow.com
Frequently Asked Questions
How Difficult Is It To Change A Light Switch?
Changing a light switch is generally easy for most homeowners. It requires basic tools and safety precautions. Knowing how to turn off power and handle wiring is essential. Most switches can be replaced within 15-30 minutes by following simple steps.
What Tools Do I Need To Replace A Light Switch?
You need a screwdriver, voltage tester, wire stripper, and electrical tape. A voltage tester ensures power is off. Wire strippers help prepare the wires. These basic tools make the replacement process safe and efficient.
How Can I Safely Turn Off Power To A Light Switch?
Turn off the circuit breaker controlling the switch in your home’s electrical panel. Use a voltage tester on the switch to confirm no electricity flows. Always double-check to avoid electric shock or injury during the switch replacement.
Can I Upgrade To A Smart Switch Easily?
Yes, smart switches often fit standard switch boxes. You must ensure compatibility with your wiring and neutral wire presence. Installation steps are similar but may include connecting to Wi-Fi. Follow manufacturer instructions carefully for smooth setup.
Conclusion
Changing light switches is easier than many people think. Basic tools and safety steps make the job simple. Most switches come with clear instructions to follow. Taking your time helps avoid mistakes and keeps you safe. Small repairs like this can save money and boost confidence.
Trying it yourself can be a good learning experience. Just remember to turn off the power first. With care and patience, anyone can do it. Why not give it a try?