Are you ready to upgrade your home lighting with a Belkin Light Switch but don’t know where to start? Connecting your new switch might seem tricky, but with the right steps, you’ll have it up and running in no time.
Imagine controlling your lights smoothly, saving energy, and adding convenience—all with a simple setup. In this guide, you’ll discover clear, easy-to-follow instructions that make the process straightforward, even if you’re not a tech expert. Keep reading, and by the end, you’ll feel confident to install your Belkin Light Switch yourself.
Belkin Light Switch Features
The Belkin Light Switch offers smart features designed for easy use and better control. It changes how you manage lighting in your home. Simple setup and reliable performance make it a popular choice.
This switch connects to your Wi-Fi, so you can control lights from anywhere. It works with many smart home systems for smooth integration. The features are made to save energy and add comfort.
Wi-fi Connectivity
The Belkin Light Switch connects directly to your home Wi-Fi. No extra hub is needed. You control the switch using a smartphone app. This allows turning lights on or off remotely.
Voice Control Compatibility
It works with voice assistants like Amazon Alexa and Google Assistant. Use simple voice commands to control your lights. This makes hands-free operation easy and fast.
Energy Saving Features
The switch helps reduce electricity use by scheduling lights. Set timers to turn lights off automatically. This feature cuts down on wasted energy and lowers bills.
Easy Installation
Installation is straightforward and fits standard wiring. The package includes clear instructions and all needed parts. Most users can install it without special tools or help.
App Control And Scheduling
The Belkin app lets you set schedules for lights. Choose times to turn lights on and off automatically. Control multiple switches in different rooms from one app.
Credit: www.belkin.com
Tools Needed For Installation
Installing a Belkin light switch requires a few basic tools. These tools help make the process safe and smooth. Having the right tools ready saves time and avoids frustration.
Below are the essential tools needed for a successful installation. Each tool plays a key role in handling wires and securing the switch.
Screwdriver
A screwdriver is essential for removing and attaching screws. A flathead and a Phillips head screwdriver cover most needs. They help open the switch plate and secure the switch to the wall box.
Wire Stripper
A wire stripper removes the insulation from electrical wires safely. It ensures a clean connection without damaging the wire inside. This tool is important for proper wiring of the switch.
Voltage Tester
A voltage tester checks if wires carry electricity. It ensures the power is off before installation starts. This tool is crucial for safety and prevents electric shock.
Needle-nose Pliers
Needle-nose pliers help bend and twist wires. They assist in making tight connections inside the switch box. These pliers are handy for handling small wires.
Electrical Tape
Electrical tape insulates wire connections. It protects wires from short circuits and keeps the installation neat. Use it to wrap exposed wire ends securely.
Safety Precautions Before Setup
Safety is the first step before connecting your Belkin light switch. Taking the right precautions helps avoid accidents and protects your home. Electrical work can be risky without proper care. Follow these safety tips to keep the process smooth and safe.
Turn Off The Power
Switch off the main power at the circuit breaker. This stops electricity from flowing to the switch. Use a voltage tester to confirm no power is present. Never assume the power is off without checking.
Use Proper Tools
Choose insulated tools made for electrical work. Avoid using damaged or worn-out tools. Proper tools reduce the chance of electric shock or damage. Keep tools dry and clean during the setup.
Read The Manual Carefully
Review the Belkin light switch guide before starting. Understand each step and safety warning. The manual includes important information for a safe setup. Follow instructions exactly to avoid mistakes.
Wear Safety Gear
Wear rubber-soled shoes to prevent electric shocks. Use safety goggles to protect your eyes. Avoid loose clothing that can catch on wires. Safety gear adds an extra layer of protection.
Work In A Dry Area
Ensure the workspace is dry and free from moisture. Water increases the risk of electric shock. Do not install the switch in wet conditions or damp rooms. Wait for the area to dry completely before starting.

Credit: www.belkin.com
Turning Off Power Supply
Turning off the power supply is the first and most important step when connecting your Belkin light switch. It keeps you safe from electric shocks. Always make sure the power is completely off before touching any wires.
Electricity can be dangerous. Even a small mistake can cause injury or damage. Taking this precaution protects both you and your home.
Locate The Circuit Breaker
Find your home’s electrical panel. It is usually in the basement or garage. Look for the main circuit breaker that controls the power to the switch area. This breaker is often labeled for easy identification.
Turn Off The Correct Breaker
Flip the switch to the OFF position. This stops electricity flow to the light switch. Double-check by trying to turn on the light. If it does not work, the power is off.
Use A Voltage Tester
Test the wires with a voltage tester to confirm no electricity is present. Touch the tester to each wire terminal. No light or sound means the power is off and safe to work on.
Wear Safety Gear
Put on rubber gloves for extra protection. Use insulated tools to avoid shocks. Safety gear helps reduce risks during the installation process.
Removing The Existing Switch
Removing the existing switch is the first step in installing your Belkin light switch. This step requires care and attention to safety. Power must be turned off before touching any wiring. The goal is to safely detach the old switch without damaging wires.
Follow each step carefully to prepare for the new installation. Knowing how to remove the switch properly makes the process smoother.
Turn Off The Power
Locate your home’s circuit breaker panel. Switch off the breaker that controls the light switch. Double-check that the power is off by testing the light. This step prevents any electric shock during removal.
Remove The Switch Cover Plate
Use a screwdriver to take off the cover plate. Keep the screws safe for later use. The cover plate protects the wiring and switch components underneath.
Unscrew The Existing Switch
Loosen the screws holding the switch in the electrical box. Pull the switch gently out to expose the wires. Avoid pulling too hard to prevent wire damage.
Note The Wire Connections
Look closely at how wires connect to the switch. Take a photo or label wires for reference. This helps connect the new switch correctly later.
Disconnect The Wires
Loosen the screws or remove wire nuts holding the wires. Carefully separate wires from the old switch. Keep wires straight and untangled for the next step.

Credit: www.belkin.com
Wiring The Belkin Light Switch
Wiring the Belkin light switch is a key step in its installation. This process ensures the switch works safely and properly. Pay close attention to the wires inside your wall. Each wire has a specific role in the circuit.
Incorrect wiring can cause the switch to fail or create a safety hazard. Take your time and follow these steps carefully to connect the wires. This will help your Belkin light switch operate smoothly.
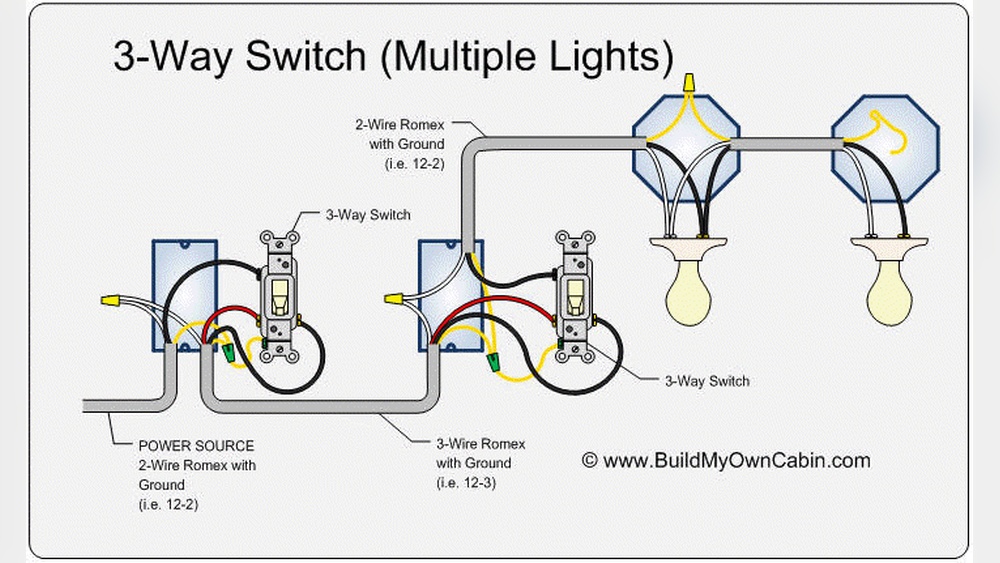
Identifying Wires
Start by turning off power at the circuit breaker. Use a voltage tester to check the wires for current. Look for three main types of wires: live, neutral, and ground. The live wire is usually black or red. The neutral wire is often white. The ground wire is green or bare copper. Some homes may have different colors, so check carefully.
Label each wire with tape if needed. This makes it easier to connect the switch later. Knowing each wire’s purpose reduces mistakes and increases safety.
Connecting Wires Correctly
Match the wires from the wall to the Belkin switch terminals. Connect the live wire to the switch’s live terminal. Attach the neutral wire to the switch’s neutral terminal. Secure the ground wire to the switch’s ground screw. Use wire nuts to join wires firmly. Wrap electrical tape around wire nuts for extra security.
Make sure no bare wire is exposed outside the wire nut. Push all wires back into the electrical box carefully. Tighten the switch to the wall plate. Restore power and test the switch to confirm it works.
Mounting The Switch
Mounting the Belkin light switch is the next step after wiring. It is important to secure the switch properly to avoid any issues later. The right mounting ensures the switch stays steady and works well every time you use it.
Follow the steps carefully. Take your time to align everything correctly. This will make the switch look neat and function smoothly.
Turn Off The Power
Safety first. Switch off the power at the circuit breaker. Double-check there is no electricity flowing to the wires. Use a voltage tester to be sure. This prevents accidents during mounting.
Attach The Switch To The Wall Box
Hold the switch inside the wall box. Align the holes on the switch with the box screws. Use a screwdriver to tighten the screws gently. Do not overtighten to avoid breaking the switch.
Check The Alignment
Make sure the switch sits flush against the wall. It should not stick out or tilt. Adjust the screws if needed. Proper alignment helps the cover plate fit well.
Install The Cover Plate
Place the cover plate over the switch. Align it with the screw holes. Tighten the screws carefully until the plate is secure. The cover plate gives a clean, finished look.
Restoring Power And Testing
Restoring power to your Belkin light switch is a key step after installation. This step ensures the switch works correctly. Testing the switch confirms proper wiring and operation. Follow these simple steps to restore power safely and test your new switch.
Turn On The Circuit Breaker
Locate the circuit breaker panel. Find the breaker that controls the switch’s circuit. Flip the breaker to the ON position. This restores electricity to your switch and the connected lights.
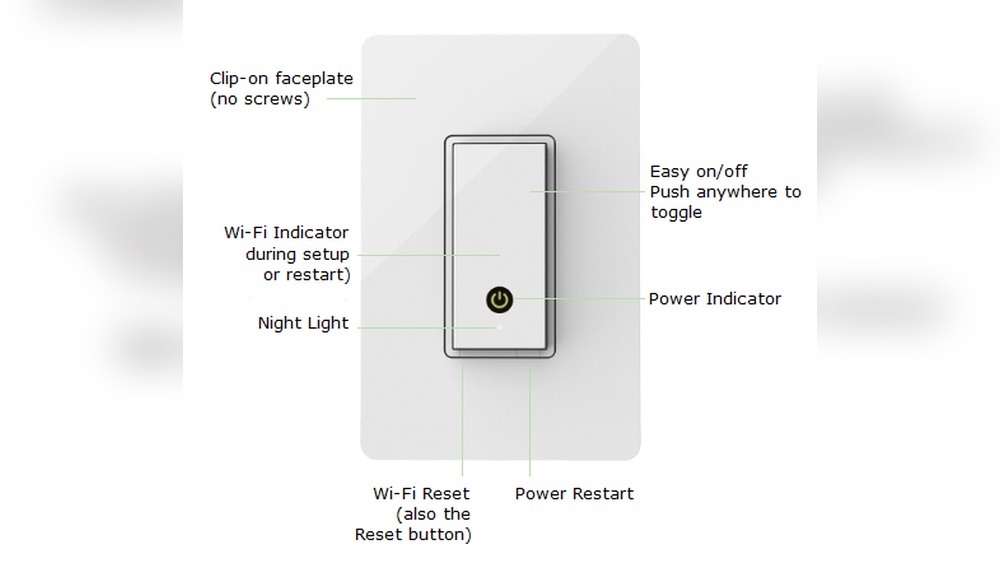
Check The Switch Indicator Light
Look at your Belkin switch. Most models have a small LED light. This light shows the switch is powered. If the light is off, check the breaker again or wiring.
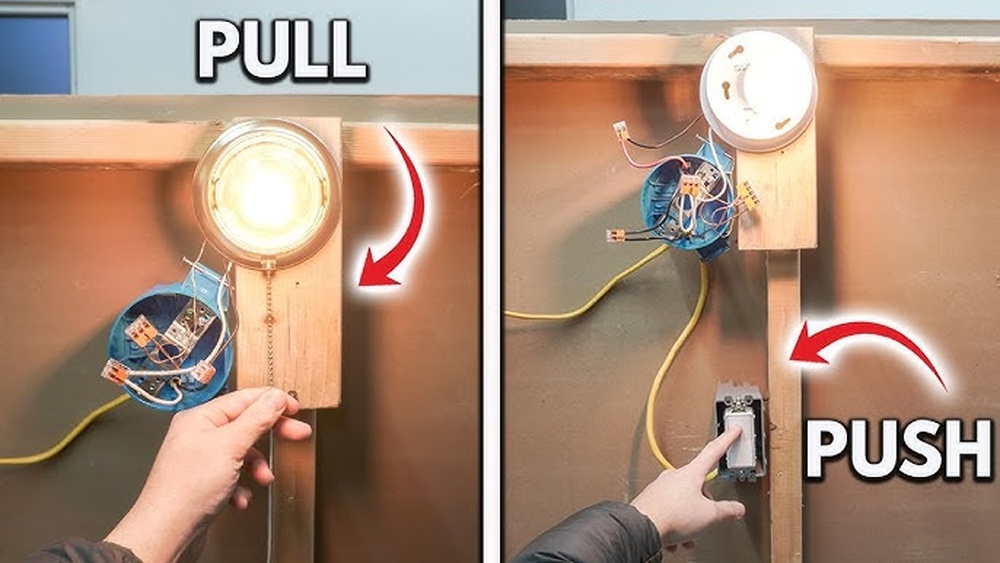
Test The Switch Operation
Press the switch to turn the light on. The light should respond immediately. Press again to turn it off. If the light does not work, recheck connections or wiring.
Use The Mobile App For Testing
Open the Belkin app on your smartphone. Connect to your switch via Wi-Fi. Use the app to turn the light on and off. This confirms the switch’s smart features work well.
Connecting To Wi-fi Network
Connecting your Belkin light switch to a Wi-Fi network is a key step. It allows you to control the switch from your phone or voice assistant. The process is simple and takes just a few minutes.
Before starting, make sure your Wi-Fi network is working well. The switch needs a strong signal to function properly. Keep your phone close to the switch during setup.
Preparing Your Wi-fi Network
Check your Wi-Fi network name (SSID) and password. The Belkin switch supports 2.4 GHz networks only. Make sure your router broadcasts on this band.
Turn off any VPN or firewall apps on your phone. These can block the connection during setup.
Using The Belkin App For Connection
Download and open the Belkin app on your smartphone. Create an account or log in if you have one.
Follow the app instructions to add a new device. Select the Belkin light switch from the device list.
The app will prompt you to connect to the switch’s temporary Wi-Fi network. Join this network on your phone.
After that, choose your home Wi-Fi network and enter its password. The switch will connect to your Wi-Fi.
Confirming The Connection
The app shows a success message once connected. Test the switch by turning it on or off through the app.
If the connection fails, restart your router and switch. Try the setup again in a different room if needed.
Configuring The Belkin App
Configuring the Belkin app is the next step after installing your light switch. The app lets you control the switch easily from your phone. It is simple to set up and use. Follow these steps to get started with the app and make your switch work the way you want.
Downloading The App
First, find the Belkin app in your phone’s app store. It is free to download and small in size. Make sure to choose the official Belkin app to avoid problems. After downloading, open the app and create an account or log in if you already have one. This account helps save your settings and controls securely.
Pairing The Switch
Turn on your Belkin light switch. Open the app and select the option to add a new device. The app will search for nearby devices. Choose your light switch from the list that appears. Follow the on-screen instructions to connect the switch to your Wi-Fi network. This step links your switch and app for remote control.
Setting Preferences
After pairing, customize your switch settings in the app. Set schedules to turn lights on or off automatically. Adjust brightness or other features if your switch supports them. You can also create scenes to control multiple devices together. Save your preferences to use the switch exactly how you want.
Troubleshooting Common Issues
Connecting a Belkin light switch can sometimes bring up small problems. These issues can slow down the setup or stop the switch from working right. Knowing common problems and how to fix them helps save time and frustration.
Most issues come from wiring errors, poor Wi-Fi, or app troubles. Checking these points step-by-step can clear most problems fast. Keep tools and your phone handy during the process.
Checking The Wiring Connections
Loose or wrong wires cause the switch to fail. Turn off power before checking wires. Make sure each wire fits tight in the right terminal. Use the manual to match wire colors and positions. Confirm the ground wire is connected properly.
Resolving Wi-fi Connectivity Problems
Weak Wi-Fi stops the switch from syncing with the app. Place your router close to the switch. Avoid thick walls or metal objects between them. Restart your router and switch to refresh connections. Use 2.4 GHz Wi-Fi, as the switch may not support 5 GHz.
Fixing App Setup Errors
The Belkin app controls the switch setup. Update the app to the latest version. Clear cache or reinstall if it freezes or crashes. Follow the app instructions slowly and carefully. Check your phone’s Bluetooth and location settings are on.
Tips For Optimal Performance
Getting the best from your Belkin Light Switch means following some simple tips. These tips help ensure the switch works smoothly and lasts longer. You will enjoy better control over your lights and fewer issues.
Proper Placement Of The Light Switch
Place the switch where the Wi-Fi signal is strong. Avoid metal objects or thick walls nearby. These can block the signal and cause problems. A clear path between your router and switch is ideal.
Secure Wiring Connections
Make sure all wires are tight and correctly connected. Loose wires can cause flickering or no power. Turn off the power before handling any wires. Check connections twice to avoid mistakes.
Regular Firmware Updates
Check for updates in the Belkin app often. Updates fix bugs and improve switch performance. Installing updates keeps your switch running well and secure.
Use Compatible Bulbs
Choose bulbs that work with smart switches. LED bulbs usually work best. Incompatible bulbs can cause flickering or poor dimming. Follow the bulb recommendations in the user guide.
Keep The Switch Clean
Dust and dirt can block the switch buttons. Clean the switch gently with a dry cloth. Avoid water or cleaning sprays. A clean switch stays responsive and safe to use.
Frequently Asked Questions
How Do I Connect A Belkin Light Switch To Wi-fi?
To connect your Belkin Light Switch to Wi-Fi, first turn off power at the breaker. Use the Belkin app to follow in-app setup instructions. Ensure your phone is on the same 2. 4 GHz network. Complete the pairing process to control your switch remotely.
What Tools Are Needed To Install Belkin Light Switch?
You need a screwdriver, voltage tester, wire stripper, and electrical tape. Always turn off power before installation. These tools help safely remove your old switch and connect the new Belkin Light Switch wires properly.
Can I Control Belkin Light Switch With Voice Commands?
Yes, Belkin Light Switch is compatible with voice assistants like Amazon Alexa and Google Assistant. After connecting the switch to Wi-Fi, link it to your voice app. Then, you can turn lights on or off using voice commands.
Is Belkin Light Switch Compatible With Smart Home Systems?
Belkin Light Switch works with major smart home platforms like Apple HomeKit, Alexa, and Google Home. This compatibility allows easy integration and remote control through your preferred smart home system.
Conclusion
Connecting your Belkin light switch is simple and quick. Follow each step carefully to avoid mistakes. Double-check all wires before turning on the power. Test the switch to ensure it works correctly. Enjoy the convenience of controlling your lights easily.
This small upgrade makes your home smarter. Stay safe and take your time during installation. Feel confident with your new Belkin light switch.