Have you ever wanted to control your lights with a simple flick of a switch but didn’t know where to start? Adding a switch to your light can make your home more convenient and energy-efficient.
Whether you’re looking to replace a faulty switch or install a new one from scratch, this guide will walk you through every step. By the end, you’ll have the confidence to handle the task yourself and enjoy the ease of turning your lights on and off exactly when you want.
Ready to get started? Let’s dive in!

Credit: www.wikihow.com
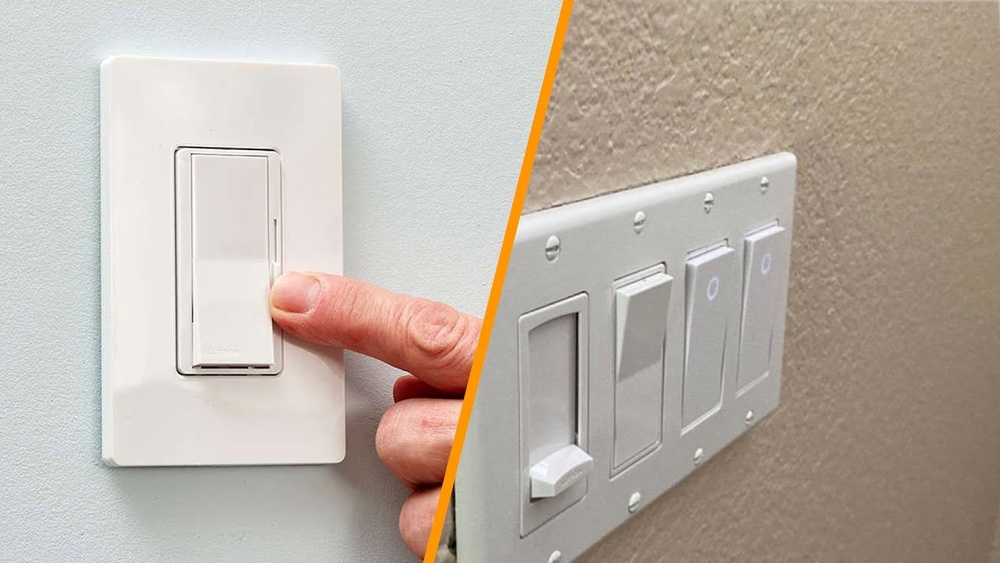
Choosing The Right Switch
Choosing the right switch for your light is important. The switch controls the light and affects how easy it is to use. Different rooms and lights need different switches. Picking the best one makes your home safer and more comfortable.
Types Of Light Switches
There are many types of light switches. The most common is the toggle switch. It flips up or down to turn lights on or off. Another type is the rocker switch. It works by pressing one side to turn lights on and the other side to turn them off. Dimmer switches let you change the brightness. Push-button switches use a simple press to toggle the light. Each type fits different styles and needs.
Compatibility With Existing Wiring
Not all switches fit every home’s wiring. Old homes often have different wiring than new ones. Check if your wiring supports the switch. Some switches need a neutral wire to work. Others do not. Using the wrong switch can cause problems or not work at all. Look at your current wiring before buying a switch. This saves time and money.
Smart Vs Traditional Switches
Traditional switches are simple and easy to use. They turn lights on or off with a flip. Smart switches connect to Wi-Fi. They let you control lights with your phone or voice. Smart switches need more power and sometimes extra wiring. Choose smart switches if you want remote control and automation. Choose traditional switches for basic on/off needs.

Credit: diy.stackexchange.com
Gathering Necessary Tools
Before adding a switch to a light, gather all necessary tools. Having the right tools makes the job easier and safer. Prepare everything before starting your work. This saves time and avoids frustration.
Basic Electrical Tools
Start with basic electrical tools. You need a screwdriver set for screws and plates. A wire stripper helps remove insulation from wires. Use a voltage tester to check if wires have power. Pliers are useful for bending and holding wires. These tools are essential for any electrical task.
Safety Equipment
Safety first. Wear insulated gloves to protect from electric shocks. Safety glasses shield your eyes from sparks or debris. Use a dust mask if working in a dusty area. Make sure your shoes have rubber soles. Safety gear reduces the risk of accidents.
Additional Supplies
Gather extra supplies beyond tools and safety gear. Electrical tape helps insulate wire connections. Wire nuts join wires securely. A flashlight or headlamp can improve visibility in dark spaces. Have a small container for screws and parts. These supplies help keep your work neat and safe.
Preparing The Work Area
Preparing the work area is an important first step before adding a switch to a light. It ensures safety and makes the job easier. Taking time to set up properly helps avoid accidents and confusion during the work. Follow these steps carefully to create a safe workspace.
Turning Off Power Safely
Locate the main circuit breaker panel. Switch off the breaker that controls the light you want to work on. This stops the electricity from flowing to the area. Use a label or tape to mark the switch you turned off. This prevents someone from turning it back on by mistake.
Clearing The Workspace
Remove any furniture or objects near the light switch or fixture. Keep the area clean and free of clutter. This gives you enough room to work comfortably. Good lighting is essential. Use a flashlight or portable lamp if needed to see wires and tools clearly.
Verifying Power Is Off
Use a voltage tester to check the wires in the switch box. Touch the tester to the wires to confirm no electricity is present. Test both the black (hot) and white (neutral) wires. Never assume power is off without testing. Safety is the top priority before starting any electrical work.
Removing The Old Switch
Removing the old switch is the first step in adding a new light switch. This process helps you safely disconnect the current switch before installing the new one. Take your time to work carefully and avoid any electrical hazards. Follow these simple steps to remove the old switch properly.
Unscrewing The Switch Plate
Start by turning off the power to the switch at the circuit breaker. Use a screwdriver to remove the screws holding the switch plate. Keep the screws in a safe place for later use. Gently pull the switch plate away from the wall to expose the switch.
Disconnecting Wires
Use a voltage tester to check if the wires are still live. After confirming no power, loosen the screws on the switch terminals. Carefully pull the wires off the switch. Avoid letting wires touch each other or the metal box.
Inspecting Wiring Conditions
Check the wires for any signs of damage or wear. Look for frayed insulation or corrosion on the terminals. If wiring looks unsafe, consider consulting a professional electrician. Good wiring condition is important for a safe and effective switch installation.
Installing The New Switch
Installing the new switch is an important step in adding a switch to your light. This process requires care and attention to ensure safety and proper function. Follow each step carefully to avoid mistakes.
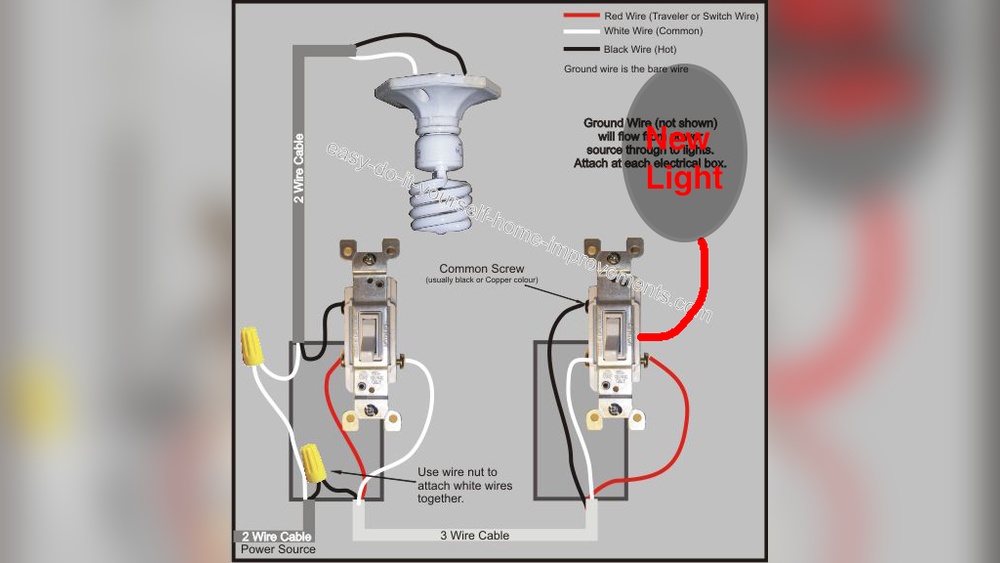
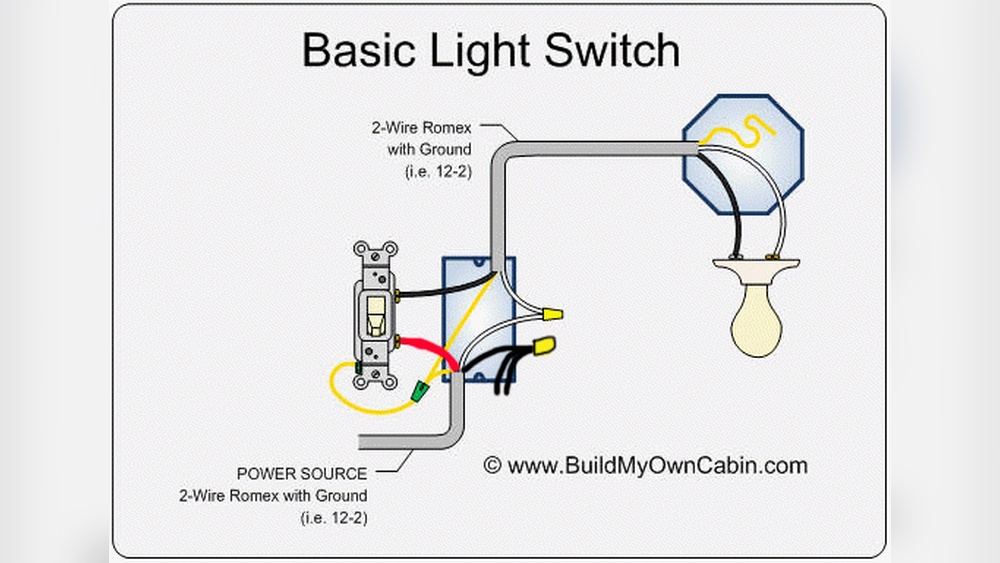
Connecting Wires Correctly
Turn off the power at the circuit breaker before starting. Identify the wires in the box: live, neutral, and ground. Connect the live wire to the switch’s live terminal. Attach the neutral wire to the neutral terminal if your switch needs it. Secure the ground wire to the green screw or ground terminal. Use a screwdriver to tighten all connections firmly. Check for any loose or exposed wires.
Mounting The Switch
Carefully push the connected wires back into the electrical box. Align the switch with the mounting holes on the box. Insert screws into the holes and tighten them with a screwdriver. Make sure the switch fits flush and is not tilted. Do not over-tighten screws to avoid breaking the switch.
Securing The Switch Plate
Place the switch plate over the mounted switch. Align its screw holes with the switch’s mounting screws. Insert the screws and tighten them gently. Check the plate sits flat against the wall. Avoid forcing the plate to prevent cracks or damage.
Testing The Installation
Testing the installation after adding a switch to your light is important. It helps ensure everything works safely and correctly. This step confirms that the wiring is right and the switch controls the light as expected. Follow these simple checks to verify your work.
Restoring Power
Start by turning the power back on at the circuit breaker. Make sure the breaker is fully switched to the “on” position. Check that the main power supply to the room is active. Never touch wiring before restoring power safely.
Checking Switch Functionality
Flip the switch on and off to see if the light responds. The light should turn on when the switch is up and off when down. Test the switch several times to confirm it works smoothly. If the light flickers or does not turn on, note the problem.
Troubleshooting Common Issues
If the light does not work, check the wiring connections again. Loose wires can cause the switch to fail. Make sure the switch is wired to the correct terminals. Use a voltage tester to check for power at the switch. Replace the switch if it feels hot or damaged.
Adding Advanced Control Options
Adding advanced control options to your light switch improves how you use your lights. It gives you more ways to change light brightness and turn lights on or off. These options make your home more comfortable and energy-efficient. Explore simple ways to upgrade your light control.
Using Dimmer Switches
Dimmer switches let you adjust light brightness easily. They replace regular switches and work with many bulbs. Choose a dimmer switch that fits your bulb type. Turn the knob or slide to get the perfect light level. Dimmer switches save energy and create a cozy mood.
Integrating Smart Home Features
Smart switches connect to your home Wi-Fi network. Use an app on your phone to control lights from anywhere. Set schedules to turn lights on or off automatically. Some smart switches work with motion sensors for hands-free use. They help reduce power use and add convenience.
Remote And Voice Control Setup
Remote controls let you manage lights without walking to the switch. Many smart switches include remote options. Voice control works with devices like Alexa or Google Assistant. Speak simple commands to turn lights on or off. This setup is perfect for people with mobility issues or busy hands.

Credit: www.do-it-yourself-help.com
Safety Tips And Best Practices
Adding a switch to a light is a simple task but requires care. Safety tips and best practices help prevent accidents. Following these rules keeps your home safe and your switch working well. Read these key points to do the job right.
Avoiding Electrical Hazards
Turn off power at the breaker before starting work. Use a voltage tester to confirm no current flows. Wear insulated gloves to protect your hands. Keep tools dry and avoid working in wet places. Do not touch bare wires with your fingers. Secure all wire connections with wire nuts. Properly ground your switch to prevent shocks. Double-check all wiring against the instructions.
When To Call A Professional
Call an electrician if you see damaged wires or outlets. Complex wiring or old electrical systems need expert help. If unsure about wire connections, do not guess. Professional electricians ensure work meets safety codes. They have tools to test and fix problems. A pro saves time and prevents costly errors. Avoid risks by hiring a licensed electrician when needed.
Maintaining Switch Longevity
Use switches gently to avoid damage. Clean switch covers regularly with a dry cloth. Avoid hanging heavy items on switch plates. Replace worn or loose switches promptly. Check for signs of heat or sparks. Keep switches free from dust and moisture. Proper maintenance extends switch life and safety. Regular checks prevent unexpected failures and hazards.
Frequently Asked Questions
How Do I Add A Switch To An Existing Light Fixture?
To add a switch, first turn off power at the breaker. Then, run wiring from the light to the switch location. Connect wires to the switch terminals and secure everything safely. Finally, restore power and test the switch function.
What Tools Do I Need To Install A Light Switch?
You’ll need a screwdriver, wire stripper, voltage tester, electrical tape, and wire nuts. These tools help safely connect wires and mount the switch. Always use insulated tools for electrical work to prevent shocks.
Can I Install A Light Switch Without Professional Help?
Yes, if you understand basic electrical safety and wiring. Always turn off power and use a voltage tester before starting. Follow local codes and instructions carefully. When in doubt, consult a licensed electrician.
What Types Of Switches Work Best For Lighting Control?
Common types include single-pole, three-way, and dimmer switches. Choose based on your lighting setup and control needs. Dimmer switches allow brightness adjustment, while three-way switches control lights from two locations.
Conclusion
Adding a switch to a light can improve your home’s convenience. It only takes a few basic tools and simple steps. Always turn off the power before starting any electrical work. Follow safety rules to avoid accidents. With some patience, anyone can do this task.
Enjoy the ease of controlling your lights with a switch. Small changes can make your daily routine easier. Try it yourself and see the difference it makes.