Have you ever wished you could control your room’s lighting from more than one spot? Adding another light switch can make your space more convenient and safer.
Imagine flipping a switch right by the door or next to your bed, without having to walk across the room in the dark. This simple change can transform how you use your space every day. In this guide, you’ll learn exactly how to add another light switch to your room—step by step, with easy instructions you can follow even if you’re not an expert.
Keep reading, and by the end, you’ll have the confidence to upgrade your lighting setup yourself.
Tools And Materials Needed
Adding another light switch to a room requires the right tools and materials. Using proper equipment makes the job safer and easier. This section lists what you need before starting the work.
Essential Tools
- Screwdriver set – flathead and Phillips
- Wire stripper and cutter
- Voltage tester or multimeter
- Drill with bits
- Electrical tape
- Measuring tape
- Level tool
- Flashlight or work light
Required Materials
- New light switch (single-pole or three-way)
- Electrical box for the new switch
- Romex or similar electrical wire
- Wire nuts/connectors
- Wall plate for the switch
- Wire clamps or staples
- Outlet box extender (if needed)

Credit: decoradventures.com
Safety Precautions
Adding another light switch involves working with electricity. Safety is the top priority. Follow these safety steps to avoid accidents and injuries. Careful preparation can protect you and your home.
Power Shutdown
Turn off the main power at the circuit breaker. This stops electricity from flowing to the room. Double-check the power is off before starting work. Never skip this step. It is the best way to stay safe.
Using A Voltage Tester
Use a voltage tester to check wires and switches. The tester shows if electricity is still present. Test every wire before touching it. This tool helps prevent electric shocks. Always trust the tester, not your feelings.
Protective Gear
Wear safety gloves and goggles. Gloves protect your hands from shocks and cuts. Goggles shield your eyes from sparks or dust. Dress in clothes that cover your skin. Protective gear is simple but very important.
Planning The New Switch Location
Planning the new switch location is the first step in adding another light switch to a room. This step ensures the switch is easy to reach and works well with your room’s layout. Careful planning helps avoid future problems and makes installation smoother.
Choosing The Spot
Pick a spot near the room’s entrance or where you often use the light. The switch should be at a comfortable height, usually about 48 inches from the floor. Avoid placing the switch behind doors or furniture. Think about daily use. Choose a place that feels natural to reach without stretching or bending.
Considering Wiring Paths
Check where existing wires run inside the walls. The new switch needs power, so plan a path from the current wiring box to the new spot. Look for studs, pipes, or insulation that might block wiring. Use easy routes to save time and effort. Keep wiring inside the walls neat and safe to prevent future issues.

Credit: www.youtube.com
Turning Off The Power
Turning off the power is the first and most important step before adding another light switch. It keeps you safe from electric shocks. Always make sure the power is completely off before starting any electrical work.
Locating The Circuit Breaker
Find your home’s main electrical panel. It is usually in the basement, garage, or utility room. Open the panel door to see the switches inside. Each switch controls power for different parts of your home. Look for the switch labeled for the room where you want to add the light switch. Flip this switch to the off position. This stops electricity from flowing to that room.
Double Checking Power Off
Never trust the breaker alone. Use a voltage tester or a non-contact voltage detector. Test the wires where you will work. If the tester shows no power, it is safe to proceed. Also, try turning on the light or switch in the room. It should not work. Always check twice to avoid accidents.
Removing The Existing Switch
Removing the existing light switch is the first step in adding another switch to a room. This process requires care and attention to avoid electrical hazards. Always turn off the power at the circuit breaker before starting. Safety is the top priority.
Unscrewing The Cover Plate
Start by unscrewing the cover plate of the current light switch. Use a flathead or Phillips screwdriver depending on the screws. Place the screws safely aside for later use. Gently pull the cover plate away from the wall. This exposes the switch and wiring behind it.
Disconnecting Wires
Next, carefully disconnect the wires attached to the switch. Note where each wire connects for easier reinstallation. Use a screwdriver to loosen the terminal screws holding the wires. If wires are pushed into holes, release them with a small tool or by pressing the release tab. Handle wires with care to avoid damage.
Running The New Wiring
Running new wiring is a key step when adding another light switch. It connects the switch to the power source and the light fixture. Proper wiring ensures safety and good performance. Take your time and work carefully to avoid mistakes.
Use the right tools and materials for the job. This includes wire fish tape, electrical wire, wire nuts, and a voltage tester. Always turn off the power at the breaker before starting any wiring work.
Fishing Wires Through Walls
Start by planning the path for the new wire. Walls can block easy access, so use a stud finder to avoid obstacles. Cut small holes near the switch and light fixture locations.
Use fish tape to guide the wire through the wall. Push the tape slowly to prevent damage. When the tape reaches the other hole, attach the wire and pull it back gently. Avoid sharp bends in the wire.
Connecting To Power Source
Locate the main power source for the room’s lighting circuit. Usually, it is inside the existing switch box or electrical panel. Use a voltage tester to confirm the power is off before touching wires.
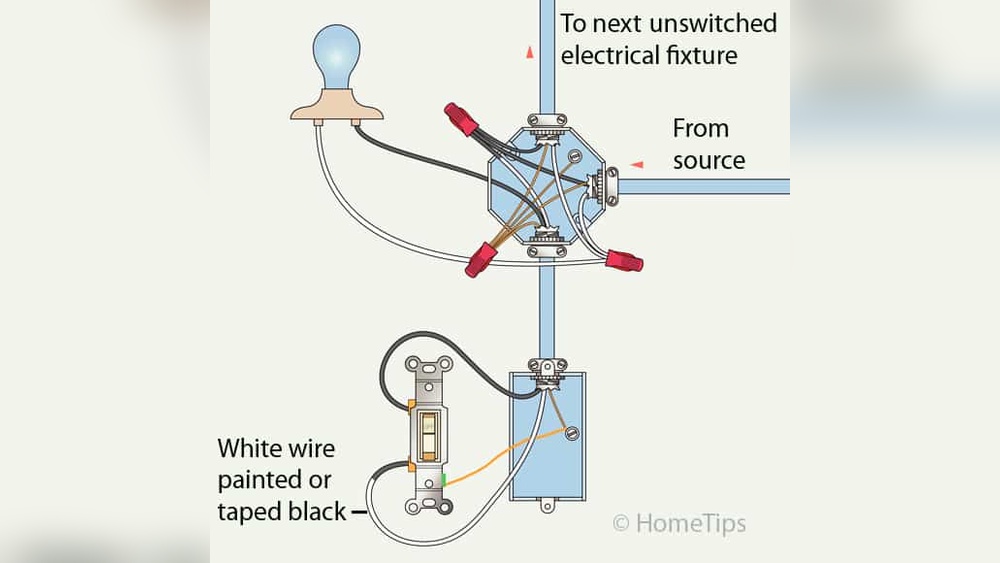
Connect the new wire to the live (hot), neutral, and ground wires. Match wire colors carefully: black or red for live, white for neutral, and green or bare for ground. Secure all connections with wire nuts and electrical tape.
Installing The New Switch
Installing the new switch is a key step in adding another light switch to your room. This process involves connecting wires safely and fixing the switch in place. Careful handling ensures the switch works correctly and lasts a long time.
Wiring The Switch
Turn off the power at the circuit breaker before starting. Identify the wires: live, neutral, and ground. Connect the live wire to the switch’s common terminal. Attach the traveler wires to the other terminals if it is a three-way switch. Secure the ground wire to the green screw. Use wire nuts to join wires safely. Check all connections are tight and neat.
Mounting And Securing
Push the wired switch gently into the electrical box. Align the switch with the mounting holes. Use screws to fix the switch firmly in place. Avoid over-tightening to prevent damage. Attach the wall plate over the switch. Ensure the plate sits flush against the wall. Restore power and test the switch for proper function.

Credit: diy.stackexchange.com
Testing The Setup
Testing the setup is a key step after installing a new light switch. It ensures the switch works safely and correctly. Skipping this step can cause electrical problems or safety risks. Follow these simple steps to test your new light switch setup.
Restoring Power
Turn the circuit breaker back on. This restores power to the room. Check that the main switch is on. Never touch wiring until power is restored. Use caution during this step to avoid shocks.
Checking Switch Functionality
Flip the new light switch on and off. The light should turn on and off smoothly. Test the original switch too. Both switches should control the light without problems. If the light does not respond, check your wiring again. Confirm all connections are tight and correct.
Troubleshooting Common Issues
Troubleshooting common problems helps ensure your new light switch works correctly. Simple fixes often solve most issues. Understanding these problems saves time and effort. Stay calm and follow these tips to fix the switch.
Switch Not Working
Check if the power is off before starting. Loose wiring is a common cause. Tighten all wire connections inside the switch box. Use a voltage tester to confirm power is present. Replace the switch if it feels loose or damaged. Sometimes the circuit breaker might be off. Reset the breaker and test the switch again.
Flickering Lights
Flickering often means a loose connection or poor wiring. Ensure all wires are firmly connected to the switch. Check the light bulb for damage or poor fit. Try a different bulb to rule out bulb issues. If flickering continues, the switch may be faulty. Replace the switch or call an electrician for help.
Frequently Asked Questions
How Do I Add A Second Light Switch To A Room?
To add a second light switch, install a three-way switch system. This allows control of one light fixture from two locations. You’ll need to run additional wiring between switches and connect them correctly to the fixture.
What Tools Are Needed To Install Another Light Switch?
You need a voltage tester, wire stripper, screwdriver, drill, and electrical tape. These tools help you safely handle wiring and mount the new switch properly.
Can I Add A Light Switch Without Rewiring The Entire Room?
Yes, if existing wiring supports it, you can add a switch using a three-way switch setup. Otherwise, limited rewiring may be necessary to connect the new switch.
How Much Does It Cost To Add An Extra Light Switch?
Costs vary but typically range from $50 to $150 for parts and tools. Hiring an electrician may increase the price depending on labor rates and wiring complexity.
Conclusion
Adding another light switch can make your room more convenient. It helps control lighting from different spots easily. Follow safety steps carefully to avoid risks. Use the right tools and check local codes before starting. Taking your time ensures a neat and safe setup.
You can enjoy better light control with just a little effort. Ready to brighten your space?