Have you ever wanted to control a light with a simple flip of a switch but didn’t know where to start? Connecting a light to a switch might seem tricky, but with the right steps, you can do it yourself quickly and safely.
Imagine the satisfaction of turning your light on and off exactly when you want, without needing to call an electrician. In this guide, you’ll discover how to make the connection in a clear, easy-to-follow way. By the end, you’ll have the confidence to handle this common home upgrade on your own.
Let’s get started!

Credit: www.youtube.com
Tools And Materials Needed
Connecting a light to a switch needs specific tools and materials. These help you work safely and finish the job well. Preparing the right items saves time and avoids mistakes. Here is what you need to get started.
Basic Electrical Tools
Essential tools include a screwdriver set, wire strippers, and pliers. A voltage tester is crucial to check if power is off. Electrical tape helps secure wire connections. A drill may be needed for mounting fixtures or switches.
Types Of Switches
Choose from single-pole, three-way, or dimmer switches. Single-pole switches control one light from one spot. Three-way switches control a light from two locations. Dimmer switches adjust light brightness. Pick a switch that fits your room’s needs.
Choosing The Right Light Fixture
Select a fixture that matches your room size and style. Consider the fixture’s wattage rating for safety. Look for easy-to-install designs for beginners. Pick lights that provide enough brightness for the space.
Credit: futurehousestore.co.uk
Safety Precautions
Working with electrical wiring can be dangerous without the right safety steps. Taking precautions protects you from shocks and accidents. Follow these simple but important safety tips before connecting a light to a switch.
Turning Off Power
Start by turning off the power at the circuit breaker. This stops electricity from flowing to the wires. Double-check that the power is off before touching any wires. Never assume the power is off just by flipping the switch.
Using A Voltage Tester
Use a voltage tester to make sure no electricity runs through the wires. Touch the tester to each wire to check for current. If the tester shows power, do not continue. Wait until the power is fully off to avoid shocks.
Wearing Protective Gear
Wear rubber gloves and safety glasses to protect your hands and eyes. Rubber gloves reduce the risk of electric shock. Safety glasses shield your eyes from sparks or debris. Always keep your protective gear on while working.
Preparing The Wiring
Preparing the wiring is a key step before connecting a light to a switch. This ensures safety and a proper electrical connection. Proper preparation helps avoid shorts and wiring mistakes. It also makes the installation process smoother and faster.
Start by carefully handling the wires. Take your time to prepare each wire properly. This will make the connection work perfectly and last longer.
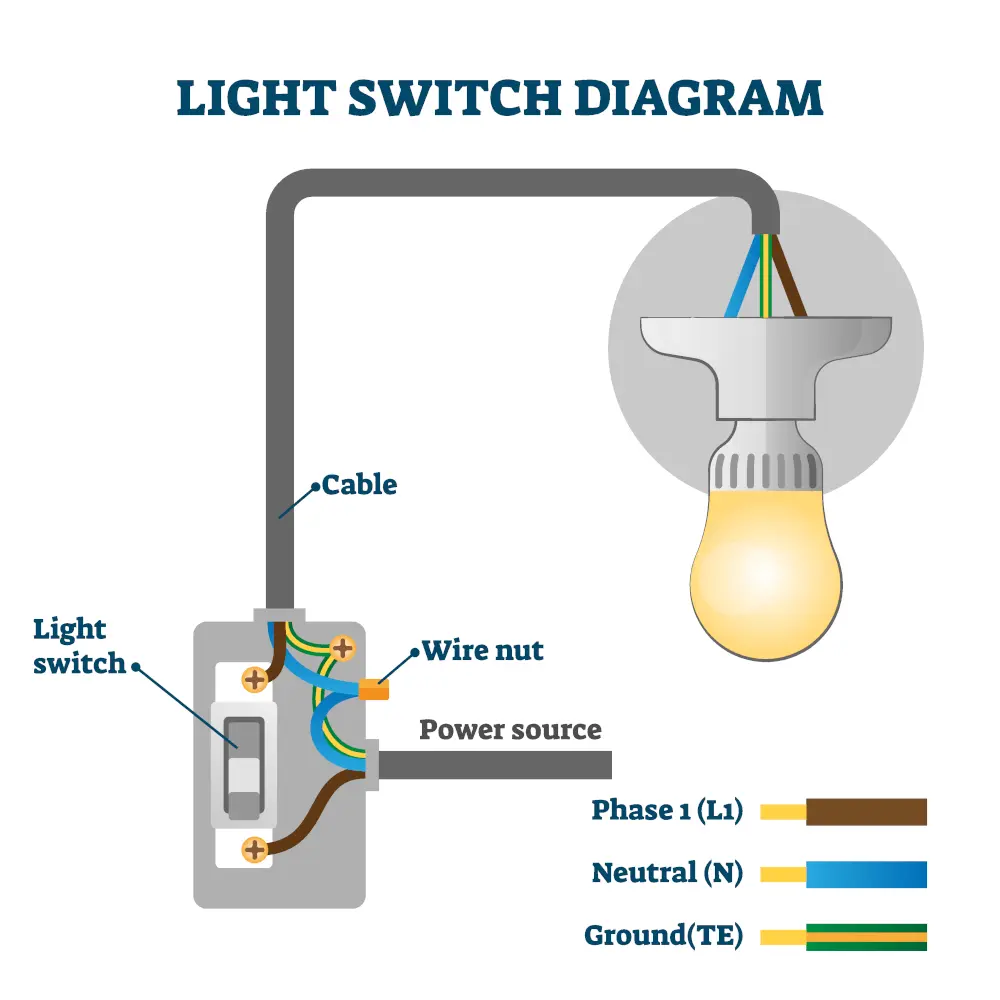
Identifying Wires
First, find the live, neutral, and ground wires. The live wire carries electricity to the switch. The neutral wire completes the circuit. The ground wire provides safety in case of faults.
Use a voltage tester to check which wire is live. The live wire is usually black or red. The neutral wire is often white. The ground wire is green or bare copper. Mark each wire clearly before moving on.
Stripping Wire Ends
Remove about half an inch of insulation from each wire end. Use a wire stripper tool for this task. Avoid cutting the wire strands inside. Expose enough wire for a solid connection with the switch.
Check the stripped ends for damage. If strands break, cut and strip again. Clean, neat ends make better contact and reduce fire risk.
Organizing Cables
Keep the wires neat and separated after stripping. Use cable ties or clips to hold them in place. Avoid tangling wires together or crossing them unnecessarily.
Organizing wires helps you see each wire clearly. This reduces errors during connection. It also makes future maintenance easier and safer.
Connecting The Switch
Connecting the switch is a key step in wiring a light to a switch. It controls the power flow to the light. Proper connection ensures safety and functionality. Follow these steps carefully to connect the switch correctly.
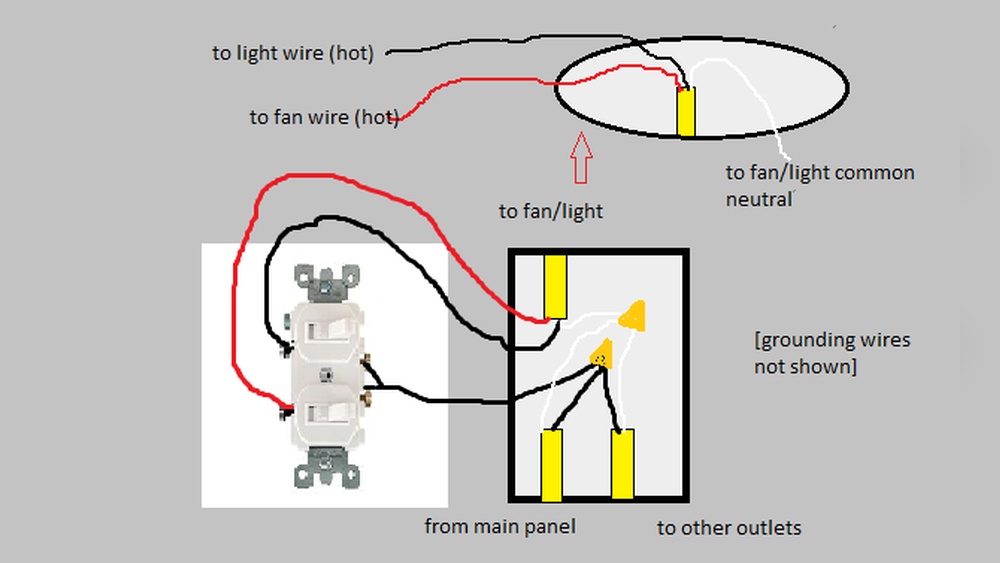
Wiring The Switch Terminals
Identify the terminals on the switch. Usually, there are two or three terminals. Connect the live wire to the common terminal. Attach the other wire to the terminal marked for the light. Use a screwdriver to secure the wires tightly. Make sure no wires are loose or exposed.
Securing Connections
Twist wire ends to prevent fraying. Use wire nuts to join wires safely. Check that all connections are firm. Loose wires can cause shorts or shocks. Wrap connections with electrical tape for extra safety.
Mounting The Switch
Place the switch into the electrical box. Align the screw holes with the box. Insert screws and tighten them to hold the switch. Avoid overtightening, which can crack the switch. Attach the switch cover plate to finish the job.
Installing The Light Fixture
Installing the light fixture is a key step in connecting a light to a switch. This process ensures the light works safely and correctly. Follow these steps carefully to secure the fixture and connect the wires. Take your time and use the right tools. Safety first.
Attaching The Fixture
Start by turning off the power at the circuit breaker. Remove the old fixture if there is one. Hold the new fixture up to the ceiling box. Use screws to fasten the fixture base securely. Make sure it is tight and does not wobble. This keeps the light safe and stable.
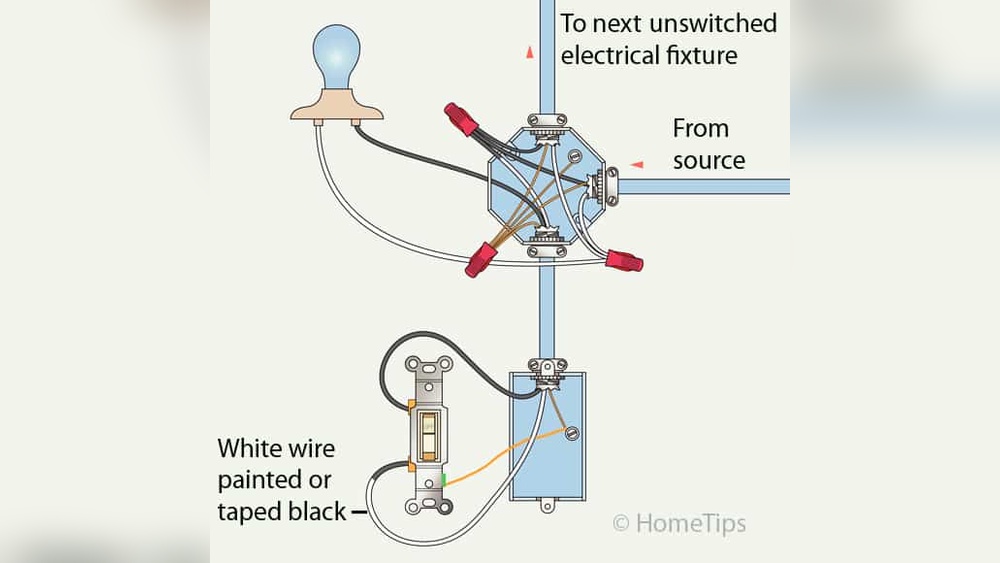
Connecting The Light Wires
Identify the wires: usually black, white, and green or copper. Connect the black wire from the light to the black wire from the switch. Join the white wires together. Attach the green or copper wire to the grounding screw. Use wire nuts to secure each connection. Wrap with electrical tape for extra safety.
Testing The Setup
Turn the power back on at the breaker. Flip the light switch to check if the light turns on. If it does not, turn the power off again and check the wire connections. Tighten any loose wires. Test the light switch again once all connections are secure. Ensure the fixture works properly before finishing.
Troubleshooting Tips
Troubleshooting a light connected to a switch can be tricky. Many issues come from wiring mistakes or faulty parts. This section helps you find common problems and fix them quickly. Follow these simple tips to get your light working again.
Common Wiring Issues
Check all wires for loose connections. Loose wires cause the light to flicker or not work. Make sure the wires match the switch terminals. Use a voltage tester to see if power flows correctly. Avoid crossing the live and neutral wires. Always turn off power before touching wires.
Switch Not Working
If the switch does not turn the light on, test the switch itself. Use a multimeter to check for continuity. Replace the switch if it shows no connection. Sometimes, the switch box may have no power. Check the circuit breaker to make sure it is on. Tighten any loose screws inside the switch.
Light Not Turning On
Confirm the bulb is not burnt out. Try a new bulb to be sure. Check the light fixture for broken parts or damage. Look for loose wires inside the fixture. If the wiring is correct, test the power at the fixture with a tester. Replace the fixture if it still does not work.
Upgrading And Alternatives
Upgrading your light switch offers more control and better functionality. Traditional switches work well but lack features found in newer models. Exploring alternatives can improve convenience and energy savings. Choose options that fit your lifestyle and budget.
Smart Switch Options
Smart switches connect to your Wi-Fi network. Control lights from your phone or voice assistant. Some models allow scheduling and remote access. They often include energy monitoring features. Installation is similar to regular switches but needs a neutral wire.
Dimmer Switch Installation
Dimmer switches let you adjust light brightness. They create a cozy or bright room mood. Choose dimmers compatible with your bulbs. Installation requires wiring similar to a standard switch. Some dimmers also work with smart home systems.
Wireless Control Solutions
Wireless controls use remote or app-based systems. No need to change existing wiring. Easy to install and move between rooms. Some systems use Bluetooth or Zigbee technology. Wireless controls add flexibility without major work.

Credit: diy.stackexchange.com
Frequently Asked Questions
How Do I Connect A Light To A Switch Safely?
Turn off power before starting. Connect the live wire from the switch to the light. Use proper wire connectors and follow local electrical codes to ensure safety.
What Tools Are Needed To Wire A Light To A Switch?
You need a screwdriver, wire stripper, voltage tester, wire nuts, and electrical tape. These tools help you safely connect and secure the wiring.
Can I Use A Single Switch For Multiple Lights?
Yes, a single switch can control multiple lights. Connect the wires in parallel to ensure all lights turn on or off simultaneously.
How Do I Identify The Live And Neutral Wires?
Use a voltage tester to identify live wires. Live wires carry current; neutral wires complete the circuit. Proper identification ensures correct and safe connections.
Conclusion
Connecting a light to a switch is simple with the right steps. Always turn off power before starting any work. Use correct wires and tools for safety. Double-check all connections to avoid problems later. Testing the switch after installation ensures it works properly.
Taking time and care makes the project easier. Now, you can control your light with ease. Enjoy the convenience of your new setup.