Are you tired of juggling multiple lights with just one switch? Changing your single light switch to a double switch can give you better control and convenience in your space.
Imagine being able to control two sets of lights separately without getting up or searching for another switch. It’s easier than you think, and you don’t need to be an expert to do it. In this guide, you’ll learn step-by-step how to make this simple upgrade safely and quickly.
Keep reading, and you’ll have your double switch installed before you know it!
Tools And Materials Needed
Changing a single light switch to a double switch needs the right tools and materials. Getting these ready makes the job safer and faster. It also helps avoid common mistakes and electrical problems.
Gather all items before starting the work. This ensures you do not stop in the middle to find something important. Below are the essential tools and materials for this task.
Tools Needed
- Screwdriver set – flathead and Phillips
- Wire stripper
- Voltage tester
- Needle-nose pliers
- Electrical tape
- Drill (optional)
- Flashlight or work light
Materials Required
- Double light switch
- Electrical box (if current box is too small)
- Wire nuts
- Replacement wires (if needed)
- Faceplate for double switch
Safety Precautions
Changing a single light switch to a double switch involves working with electricity. Safety is the top priority in this task. Taking the right precautions can prevent accidents and injuries. Follow the steps carefully to protect yourself and your home.
Turn Off The Power
Always switch off the power at the circuit breaker. Do not rely on the wall switch alone. Use a tester to confirm no electricity flows to the switch. This step stops electric shocks during work.
Use Proper Tools
Pick tools designed for electrical work. Insulated screwdrivers and wire strippers reduce the risk of shock. Avoid using damaged or worn tools. Good tools make the job safer and easier.
Wear Safety Gear
Wear rubber-soled shoes and gloves. These items protect against electric shocks. Safety glasses protect your eyes from sparks or debris. Dress carefully to stay safe throughout the task.
Check The Wiring
Inspect wires for damage before starting. Frayed or exposed wires can cause shorts or shocks. Replace any faulty wiring to ensure safety. Proper wiring is key to a safe switch installation.
Follow Local Codes
Abide by local electrical codes and regulations. These rules exist to keep work safe and legal. Check rules before starting any electrical project. This step helps avoid fines and hazards.
Turning Off Power
Before starting any electrical work, turning off the power is the first step. It keeps you safe and prevents accidents. Never skip this important step when changing a single light switch to a double switch.
Electricity can cause serious injury. Turning off the power cuts the electric current flowing to the switch. This means you can work without fear of shocks or short circuits.
Locate The Circuit Breaker
Find your home’s circuit breaker box. It is usually in the basement, garage, or utility room. Open the box carefully to see the switches inside.
Look for the breaker that controls the room where the light switch is. It might be labeled with the room name or the word “lights.”
Switch Off The Correct Breaker
Flip the breaker switch to the off position. This stops the electricity to the light switch you want to change. Double-check by flipping the switch in the room. The light should not turn on.
Use A Voltage Tester
Always test the switch for power before touching wires. Use a voltage tester or a multimeter. Place the tester on the wires connected to the switch. If it shows no voltage, the power is off.
Testing confirms your safety before you start work. Never trust the breaker alone.
Removing The Existing Switch
Removing the existing switch is the first step in changing a single light switch to a double. Safety is very important here. You must cut off power to avoid electric shock. Take your time and work carefully. This ensures a smooth and safe process.
Turn Off The Power
Go to your home’s circuit breaker panel. Find the switch that controls the light you want to change. Flip the breaker to the off position. Use a voltage tester to make sure the power is off. This step prevents accidents.
Remove The Switch Cover Plate
Use a screwdriver to take off the cover plate. Unscrew the small screws holding it in place. Set the screws and plate aside safely. The switch will now be visible and ready to remove.
Unscrew The Existing Switch
Loosen the screws that hold the switch to the electrical box. Pull the switch gently out from the wall. Avoid pulling too hard to not damage wires. Now, you can see the wires connected to the switch.
Disconnect The Wires
Note how the wires connect to the switch. Use a screwdriver to loosen the screws on the switch terminals. Carefully detach the wires. Keep them separated and do not let them touch. This prepares the switch for replacement.
Identifying Wiring Types
Identifying the wiring types is the first step to change a single light switch to a double. Knowing the wiring helps you understand how your current switch is connected. This knowledge ensures a safe and correct installation of the new double switch.
There are different types of wiring setups in homes. Each type requires a specific approach when upgrading switches. Learning to spot these types makes the process easier and prevents mistakes.
Understanding Single-pole Wiring
Single-pole wiring is the most common type for single switches. It uses two wires: one hot and one neutral. The hot wire carries electricity to the switch. The neutral wire completes the circuit back to the power source. This simple setup controls one light or device.
Recognizing Three-way Wiring
Three-way wiring controls one light from two switch locations. It has three wires: one common and two travelers. The common wire connects to the power or light. Travelers allow the switches to work together. This setup is more complex than single-pole wiring.
Identifying Ground Wires
Ground wires provide safety by directing electricity away from shocks. They are usually bare copper or green insulated. Ground wires connect to the switch’s green screw. Always check for ground wires before any switch work.

Credit: diy.stackexchange.com
Preparing The Wall Box
Start by turning off the power to the switch at the breaker box. Remove the old switch and check the wiring inside the wall box carefully. Make sure there is enough space for the new double switch and its wires.
Understanding The Wall Box Size
The first step is to check the size of your current wall box. Single switch boxes are often smaller than double switch boxes. You need enough space to fit the new double switch and wiring safely. Use a tape measure to find the depth, width, and height of the box. If the box is too small, you may need to replace it with a larger one.
Turning Off The Power
Safety is very important. Before starting work, turn off the power at the circuit breaker. Use a voltage tester to confirm no electricity flows to the switch. This step prevents electric shock and keeps you safe during the project.
Removing The Old Switch And Cover Plate
Remove the screws holding the cover plate and switch in place. Gently pull the switch out of the wall box. Take note of how the wires connect to the switch. Keep the wires untangled and organized to make installation easier later.
Checking The Wiring For Compatibility
Look at the wires inside the wall box. You need enough wires to control two switches. Typically, this includes a live wire, neutral wire, and ground wire. Make sure the wires are in good condition and long enough to connect to the new double switch.
Preparing The Box For Expansion
If your wall box is too small, you must expand it. Use a wall box extender or replace the box with a larger one. This step ensures enough room for the double switch and wiring. Secure the box firmly to the wall studs for stability.
Wiring The Double Switch
Wiring the double switch is a key step in changing a single light switch to a double one. This process involves careful handling of wires to ensure safety and proper function. Each wire must be connected correctly to avoid electrical problems. Follow these simple steps to wire your new double switch.
Connecting The Hot Wire
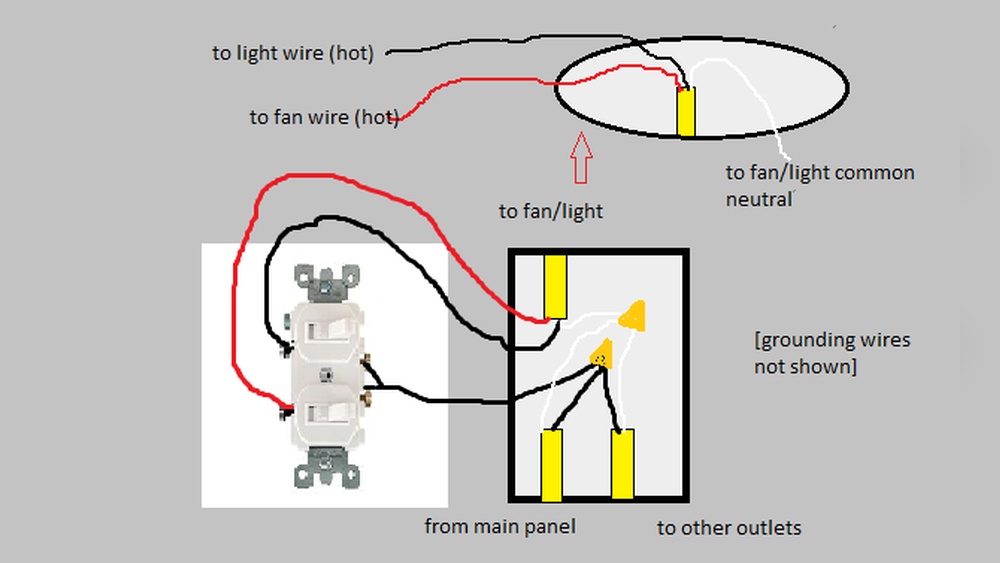
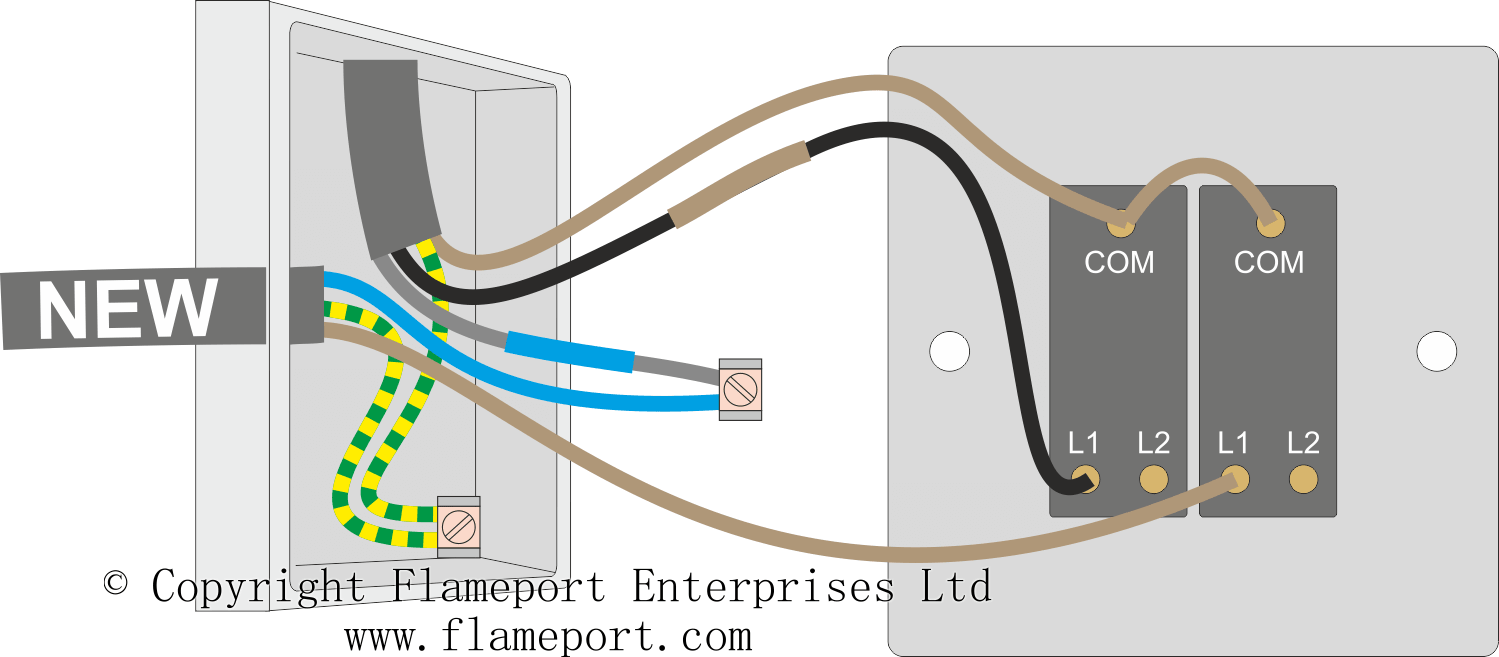
Start by identifying the hot wire. It usually has black insulation. This wire carries electricity from your power source. Connect the hot wire to the common terminal on the double switch. Tighten the screw to hold the wire firmly. This connection powers both switches.
Wiring The Load Wires
Next, find the load wires. These wires go to the light fixtures. They often have black or red insulation. Attach each load wire to its own terminal on the switch. Make sure each wire is secure under the screw. These connections control the lights separately.
Ground Wire Connection
The ground wire is usually green or bare copper. It provides safety by directing electricity to the ground. Connect the ground wire to the green screw on the switch. If there is a ground wire in the box, twist all ground wires together. This step prevents electrical shocks.
Mounting The Double Switch
Mounting the double switch is a key step in upgrading from a single switch. It ensures the new switch fits properly and works safely. This part of the process involves preparing the wall box, placing the switch, and securing it firmly. Careful mounting prevents loose connections and switch movement.
Start by checking the electrical box size. A double switch needs more space than a single one. Use a box extender if the current box is too small. This keeps wires safe and allows room for the switch.
Turn off the power at the circuit breaker. Remove the old switch and clear any debris inside the box. Check for enough space for the double switch. Adjust the wiring by straightening or trimming wires if needed. Organize wires to avoid crowding.
Placing The Double Switch
Align the new double switch with the box holes. Push wires gently into the box behind the switch. Make sure wires are not pinched or bent sharply. Position the switch so the toggle or rocker faces the correct direction.
Securing The Switch
Use screws provided with the switch to attach it to the box. Tighten screws evenly to avoid tilting. Do not overtighten to prevent cracking the switch frame. Attach the wall plate carefully for a clean look.
Testing The Switch
Testing the switch is a key step when changing a single light switch to a double. It makes sure everything works safely before finishing the job. This step helps avoid electrical problems and saves time later.
Always test the switch after wiring but before securing it in the wall. Use basic tools and follow clear steps for accurate results.
Using A Voltage Tester
First, turn off the power at the circuit breaker. Use a voltage tester to check wires. Touch the tester to each wire terminal. No light or sound means no power. This confirms it is safe to work on the switch.
Checking Switch Function
Turn the power back on. Flip the switch on and off. Check if both switches control their lights correctly. If a light does not respond, check wiring connections again.
Testing With A Multimeter
Set the multimeter to continuity mode. Touch the probes to the switch terminals. Flip the switch and watch the meter. It should show continuity when on. No continuity when off means the switch works right.
Credit: flameport.com
Troubleshooting Common Issues
Changing a single light switch to a double switch can sometimes bring problems. These issues can stop the new switch from working properly. Knowing how to fix these common problems helps keep your project smooth and safe.
Below are some typical issues and simple ways to solve them. Understanding these helps you avoid mistakes and get better results.
Incorrect Wiring Connections
One common problem is wrong wiring. Double switches need more wires connected correctly. Check that each wire goes to the right terminal. Use a tester to confirm power is off before touching wires.
Switch Feels Loose Or Does Not Fit
If the new switch feels loose, check the mounting box size. Double switches need bigger boxes than single ones. Tighten screws carefully but do not over-tighten to avoid damage.
Switch Does Not Control The Light
This happens when wires are mixed up. Double-check connections for each switch. Make sure wires are tight and secure. Sometimes, the light fixture wires also need checking.
Breaker Trips After Installation
A breaker trip means a short circuit or overload. Look for bare wires touching each other or metal parts. Fix any wire damage. Use proper wire nuts and ensure all connections are insulated.
Switch Makes Buzzing Or Crackling Noise
Noises usually mean loose wires or poor contact. Turn off power and tighten all screw terminals. Replace the switch if the noise continues. Avoid using a noisy switch for safety.

Credit: www.youtube.com
Frequently Asked Questions
How Do I Change A Single Switch To A Double Switch?
First, turn off the power at the breaker. Remove the single switch and disconnect wires. Install a double switch box if needed. Connect wires to each switch according to their function. Secure the new double switch and turn power back on.
What Tools Are Needed To Replace A Single Switch?
You will need a screwdriver, wire stripper, voltage tester, and pliers. A new double switch and electrical box may also be required. Having electrical tape and wire nuts is useful for safe connections. Always ensure power is off before starting work.
Can I Upgrade A Single Switch Without Rewiring?
It depends on your wiring setup. If existing wires support two switches, you can upgrade easily. If not, additional wiring is necessary. Inspect your wiring or consult an electrician to ensure safe installation and functionality.
Is It Safe To Change A Light Switch Myself?
Yes, if you follow safety precautions. Always turn off power at the breaker. Use a voltage tester to confirm power is off. If unsure, consult a professional electrician to avoid electrical hazards or damage.
Conclusion
Changing a single light switch to a double switch is simple with the right steps. Always turn off power before starting work. Take your time to connect wires carefully and securely. Test the switches to make sure they work well.
This small upgrade adds convenience and control to your lighting. You can handle this project safely with basic tools and clear instructions. Enjoy the improved lighting setup in your home today!