Have you ever wanted to move a light switch but felt unsure where to start? Changing the position of a switch can seem tricky, but with the right steps, you can do it yourself safely and confidently.
Imagine having your light switch exactly where you need it, making your space more convenient and stylish. In this guide, you’ll discover simple, clear instructions that anyone can follow—even if you’ve never done electrical work before. Ready to take control of your home’s lighting?
Let’s get started!
Tools And Materials Needed
Moving a light switch requires the right tools and materials for safety and success. Prepare everything before you start. This saves time and avoids mistakes.
Each tool has a specific job. Using the correct tools makes the work easier and safer. Some materials protect you from electric shock. Others help connect wires properly.
Safety Gear
Always wear safety gloves to protect your hands. Use safety glasses to keep dust and debris out of your eyes. These simple items prevent injuries during work.
Basic Tools
A screwdriver set is essential for removing and installing switch covers. A voltage tester checks if the power is off. Wire strippers help remove insulation from wires.
Materials For Wiring
Use electrical tape to secure wire connections. Wire nuts join wires safely. New light switch and electrical box may be needed depending on the move.
Additional Helpful Items
A flashlight or headlamp improves visibility in dark spaces. A pencil helps mark positions on the wall. A level ensures the switch is straight.

Credit: www.reddit.com
Turn Off Power Safely
Turning off power safely is the first and most important step when moving a light switch. It stops electric shocks and keeps you safe. Never skip this step, even if you think the power is off. Always be sure before you touch any wires or switches.
Electricity can be dangerous. A small mistake can cause serious injury. So, take time to turn off the power correctly. Use the right tools and follow clear steps. Safety is the key to a smooth switch move.
Locate The Correct Circuit Breaker
Find your home’s electrical panel. Look for the circuit breaker that controls the light switch. It may be labeled by room or area. If not labeled, turn off breakers one by one to find the right one. This stops power to the switch safely.
Switch Off The Circuit Breaker
Flip the circuit breaker switch to the OFF position. This cuts power to the switch and wires. Do not just unplug or remove the switch. Turning off the breaker is the safest way to stop electricity flow.
Test The Switch For Power
Use a voltage tester or multimeter to check the switch. Place the tester on the wires or terminals. If the tester shows no power, it is safe to proceed. Always test twice to be sure. Never trust just the breaker switch.
Use Safety Gear
Wear rubber-soled shoes and insulated gloves. These protect against accidental shocks. Avoid standing on wet floors. Keep your hands dry. Safety gear helps prevent injuries during the move.
Remove The Existing Switch
Removing the existing light switch is the first step in moving it. This task requires care and attention to safety. Before starting, turn off the power to the switch at the circuit breaker. This prevents electrical shocks and keeps you safe during the process.
Once the power is off, you can begin to remove the switch cover and access the wiring behind it. This section guides you through each step, making it easy to follow.
Turn Off Power At The Circuit Breaker
Locate the circuit breaker that controls the light switch. Switch it off to cut the power supply. Use a voltage tester to confirm no electricity flows to the switch.
Remove The Switch Cover Plate
Use a screwdriver to unscrew the cover plate. Keep the screws safe for later. Gently pull the cover plate away from the wall.
Unscrew The Light Switch
Unscrew the screws holding the switch to the electrical box. Pull the switch out slowly. Be careful not to damage the wires attached to it.
Disconnect The Wires
Note how the wires connect to the switch. Use a screwdriver to loosen the terminal screws. Carefully disconnect the wires from the switch.
Inspect The Wiring
Check the wires for any damage or wear. Ensure they are in good condition before moving the switch. Repair or replace damaged wires if needed.

Credit: www.youtube.com
Plan The New Switch Location
Planning the new switch location is a key step in moving a light switch. The position affects convenience, safety, and wiring. Careful thought saves time and effort later. Think about where the switch will be easiest to reach and use.
Consider Room Layout And Traffic Flow
Look at the room’s shape and how people move through it. Place the switch near the entrance or exit. This helps turn lights on or off quickly. Avoid spots hidden behind doors or furniture.
Check Wall Structure And Obstructions
Inspect the wall for studs, pipes, or wires. Avoid cutting into places with obstacles. Use a stud finder to locate safe spots. This protects the wall and makes installation easier.
Measure Height And Reachability
Set the switch at a comfortable height, usually about 48 inches from the floor. Make sure everyone can reach it easily. This includes children and people with limited mobility.
Plan For Wiring Access
Think about how to run wires from the power source to the new switch. Choose a spot near existing electrical boxes or cables. This reduces the need for extra wiring and cuts costs.
Run New Wiring
Running new wiring is a key step to move a light switch safely. This process connects the switch to the power source and the light fixture. Proper wiring ensures the switch works correctly and meets safety codes.
Before starting, turn off the power at the circuit breaker. Use a voltage tester to confirm no electricity flows in the wires. Safety first.
Plan The Wiring Route
Decide the path for the new wires from the power source to the switch and light. Look for the easiest path with minimal obstacles. Avoid areas with water pipes or heating ducts.
Choose The Right Cable
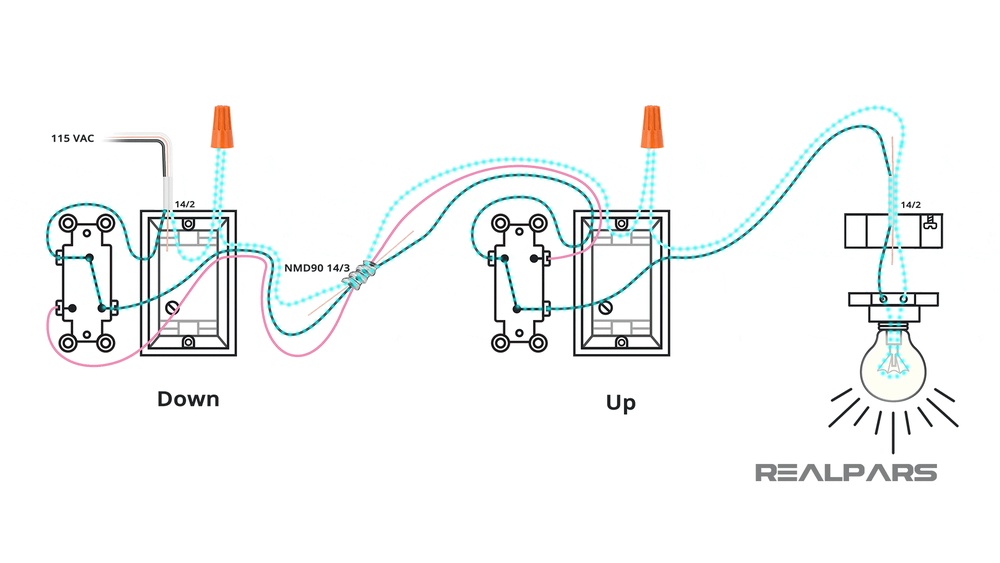
Use electrical cables that fit your home’s wiring system. Most light switches use 14/2 or 12/2 NM cable. Check local codes for cable type and size.
Drill Holes For Wiring
Drill holes in wall studs to run the cable. Keep holes centered to protect wires from nails or screws. Use a drill bit slightly larger than the cable diameter.
Pull The Cable Through Walls
Feed the cable carefully through drilled holes. Use fish tape if needed to guide the wire. Leave extra length at each end for connections.
Secure The Wiring
Staple the cable to studs every 12 inches. Do not pinch or damage the cable. Keep the wiring neat and away from sharp edges.
Install The Light Switch
Installing a light switch is a key step in moving it to a new location. It involves connecting wires correctly and securing the switch in the wall. Proper installation ensures the switch works safely and smoothly. Follow these steps carefully to install the light switch.
Turn Off The Power
First, switch off the circuit breaker that controls the light switch. This stops electricity flow and keeps you safe. Use a voltage tester to check the wires. Make sure no power is present before touching anything.
Connect The Wires To The Switch
Identify the wires: usually black (hot), white (neutral), and green or bare (ground). Attach the black wire to the brass terminal on the switch. Connect the white wire to the silver terminal if needed. Attach the ground wire to the green screw. Tighten all screws firmly but do not overtighten.
Secure The Switch In The Wall Box
Push the wires gently into the wall box. Place the switch into the box carefully. Use screws to fasten the switch to the box. Make sure it is level and tight against the wall. Avoid pinching or damaging the wires.
Attach The Switch Plate
Put the switch cover plate over the switch. Align the screw holes and insert the screws. Tighten them until the plate sits flush with the wall. The plate protects the switch and gives a clean look.
Test The Switch Operation
Testing the switch operation is a key step after moving a light switch. It ensures the switch works correctly and safely. You avoid surprises like lights not turning on or off. This step confirms the wiring is right and the switch functions well.
Turn The Power Back On
First, restore power to the circuit at the breaker box. This step is necessary before testing the switch. Make sure the breaker is fully on. Never test the switch with the power off.
Flip The Switch
Next, press the switch up and down slowly. Check if the light turns on and off as expected. Listen for any unusual sounds like buzzing or crackling. These sounds can signal wiring problems.
Check The Light Fixture
Look at the light fixture while toggling the switch. The light should respond immediately. If the light flickers or stays off, the wiring may need adjustment. Make sure the bulb is working too.
Use A Voltage Tester
Use a voltage tester on the switch terminals. This device confirms if electricity flows properly. Test the switch in both on and off positions. The tester helps find wiring errors safely.
Observe For Any Issues
Watch for sparks, smoke, or burning smells. These signs indicate serious electrical problems. Turn off power immediately if you see or smell these. Fix issues before using the switch again.
Safety Tips And Common Mistakes
Moving a light switch requires care to avoid accidents and damage. Safety is the top priority. Small mistakes can cause electrical shocks or short circuits. Understanding common errors helps keep the project safe and smooth.
Turn Off The Power At The Circuit Breaker
Always switch off the power before starting. Do not rely on the wall switch alone. Use a voltage tester to confirm the power is off. This prevents shocks and injuries during work.
Use The Right Tools For The Job
Use insulated screwdrivers and wire strippers. Avoid using damaged or worn tools. Proper tools make the job safer and easier. They also prevent damage to wires and switches.
Check For Live Wires Twice
Double-check wires with a voltage tester. Sometimes wires still carry electricity even if the breaker is off. Testing twice reduces the risk of electric shock.
Avoid Overloading The Circuit
Do not connect too many devices to one switch. Overloading can cause overheating and fires. Know the circuit’s limit and keep it safe.
Do Not Mix Wire Colors
Use correct wire colors for live, neutral, and ground. Mixing colors confuses the wiring and causes faults. Follow standard color codes strictly.
Secure All Wire Connections
Loose wires cause sparks and failures. Twist wires tightly and use wire nuts. Check each connection before closing the switch box.
Do Not Ignore Local Electrical Codes
Follow local rules for electrical work. Ignoring codes may cause hazards and legal problems. Always check the rules before starting.

Credit: www.youtube.com
Frequently Asked Questions
How Do I Safely Turn Off Power Before Moving A Switch?
Always switch off the circuit breaker to cut power. Use a voltage tester to ensure no electricity flows. Safety is crucial to avoid electric shocks while moving a light switch.
What Tools Are Needed To Move A Light Switch?
You need a screwdriver, wire stripper, voltage tester, electrical tape, and wire nuts. These tools help safely disconnect and reconnect the wiring during the move.
Can I Move A Light Switch Myself Or Hire A Pro?
Moving a light switch is doable for DIYers with basic electrical knowledge. However, hire a professional if unsure to ensure safety and code compliance.
How Do I Extend Wiring When Relocating A Switch?
Turn off power, then use wire connectors to join new wires. Ensure the wire gauge matches existing wiring for safe extension.
Conclusion
Moving a light switch can be simple if you follow the right steps. Always turn off the power before starting work. Use the right tools and take your time. Double-check your connections to avoid problems later. Safety should be your top priority throughout the process.
With some care, you can change a switch without calling a professional. Try it yourself and see how easy it can be. Small projects like this build your confidence and skills. Keep learning and improving one step at a time.