Are you ready to take full control of your lighting? Programming your Lutron light switch is easier than you think, and it can transform the way you experience your home.
Whether you want to set the perfect mood, save energy, or simplify your daily routine, learning how to program your switch puts the power in your hands. In this guide, you’ll discover simple steps that anyone can follow, even if you’re not tech-savvy.
Keep reading, and you’ll be amazed at how quickly you can customize your lighting to fit your lifestyle perfectly.
Lutron Light Switch Types
Lutron offers several types of light switches to control your home lighting. Each type has unique features and suits different needs. Understanding these switch types helps you choose the right one for your space.
Dimmer Switches
Dimmer switches adjust the brightness of your lights. They allow smooth changes from bright to dim. These switches save energy and create mood lighting. Most dimmers work with LED and incandescent bulbs. Programming dimmers is simple and adds comfort to your rooms.
Toggle Switches
Toggle switches are the classic on/off style switches. They offer basic control without dimming. These switches are easy to use and install. Lutron toggle switches often have smart features. You can program schedules or control them remotely.
Remote Controls
Remote controls let you operate lights from a distance. They work well with Lutron’s wireless systems. You can turn lights on or off and dim them using the remote. This adds convenience, especially in larger rooms. Remote controls are easy to program for personal use.
Tools And Materials Needed
Before programming your Lutron light switch, gather the right tools and materials. This step ensures a smooth setup and safe installation. Having everything ready saves time and avoids frustration during the process.
Screwdrivers And Voltage Tester
Use a flathead and Phillips screwdriver to remove the old switch and secure the new one. A voltage tester is essential to check that the power is off before starting. This tool keeps you safe from electrical shocks.
Smartphone Or Remote
You will need a smartphone or a Lutron remote control to program the switch. The smartphone helps you connect the switch to your home network. A remote offers quick control without using your phone.
Lutron App
Download the Lutron app to program and control your light switch easily. The app guides you step-by-step through the setup. It also helps you customize settings and create schedules.
Safety Precautions
Safety is the first step when programming a Lutron light switch. It protects you and your home from harm. Taking simple precautions can prevent accidents and damage.
Power Shutdown
Turn off the main power before starting any work. This stops electricity flow to the switch. Use a circuit tester to confirm power is off. Never skip this step to avoid electric shock.
Proper Handling
Hold the switch carefully during installation. Avoid touching the metal parts directly. Use insulated tools to keep safe. Keep the area dry to prevent slips or shocks.
Checking Wiring
Examine all wires for damage before connecting. Look for frayed or exposed wires. Replace damaged wires to avoid shorts or fires. Match the wires correctly to the switch terminals.

Credit: support.lutron.com
Wiring The Switch
Wiring the Lutron light switch is a key step in its setup. It ensures the switch works safely and correctly. This process involves finding the right wires, connecting them, and fixing the switch firmly in place. Follow the steps carefully to avoid common mistakes.
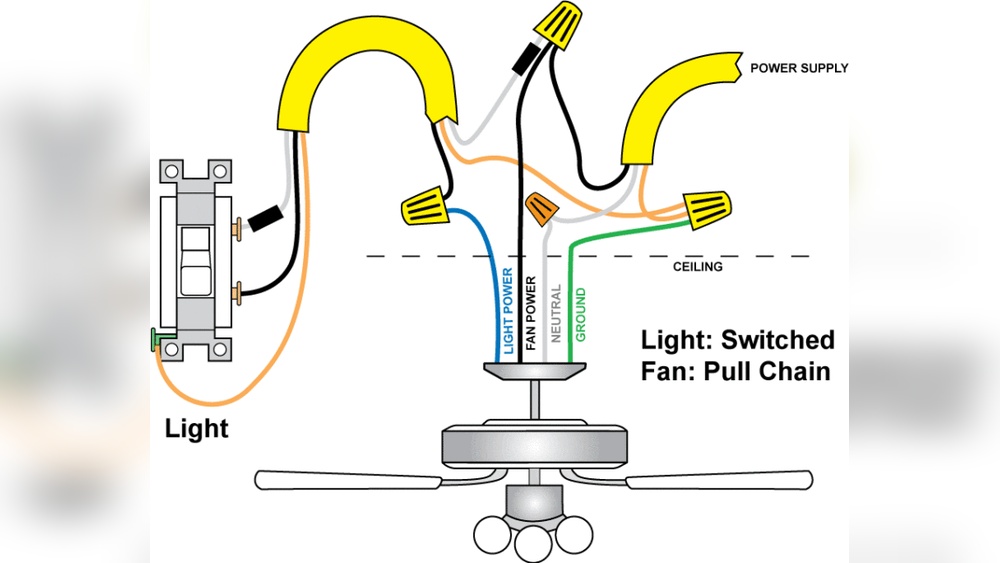
Identifying Wires
First, turn off the power at the breaker. This keeps you safe from electric shock. Look inside the switch box. You will see several wires. Usually, black wires are hot, white are neutral, and green or bare copper are ground. Use a voltage tester to confirm which wire is live. Label the wires to remember their roles. This step is very important.
Connecting Wires
Match the wires from the Lutron switch with the wires in the box. Connect black to black (hot), white to white (neutral), and green to ground wire. Use wire nuts to join wires tightly. Twist the wires together before placing the wire nut. Make sure no copper is exposed outside the nut. This keeps the connection secure and safe.
Securing The Switch
Push the wires gently back into the box. Avoid sharp bends or pinching. Align the switch with the mounting holes. Use screws to fix the switch firmly to the wall box. Tighten screws but do not overdo it. Attach the wall plate to finish. Turn the power back on to test the switch.
Initial Setup Steps
Setting up your Lutron light switch starts with a few simple steps. These steps prepare the switch for programming and daily use. Follow each step carefully for the best results.
Restoring Power
Turn the power back on at the circuit breaker. This action wakes up the switch. Watch for any blinking lights on the switch. They show the switch is ready for setup.
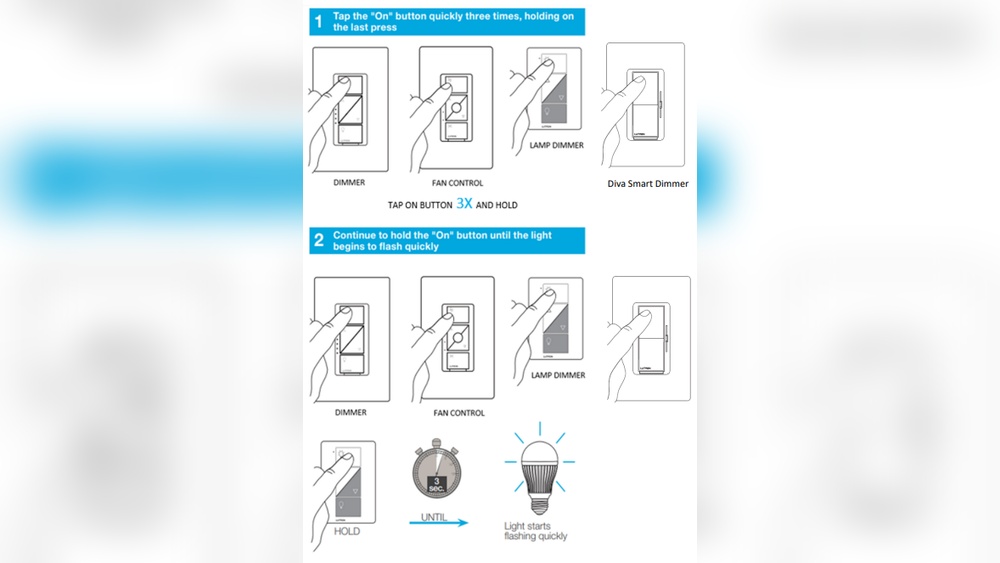
Switch Calibration
Press and hold the main button on the switch. Keep it held until the LED flashes twice. This process calibrates the switch for your lighting system. Calibration helps the switch learn the type of bulbs connected.
Testing Basic Functions
Press the switch to turn the light on and off. Check if the light responds quickly. Try dimming the light using the dimmer control. Make sure the light dims smoothly and evenly.
Programming With Lutron App
Programming your Lutron light switch using the Lutron app is simple and convenient. The app helps you control your lights from anywhere. It also lets you create custom settings for your home lighting.
With the app, you can set schedules and scenes that fit your daily routine. This makes your home more comfortable and energy-efficient. Let’s explore how to get started with the Lutron app.
Downloading The App
First, download the Lutron app from your device’s app store. It is available for both iOS and Android. Search for “Lutron” and find the official app. The app is free and quick to install. Open it after installation to begin setup.
Connecting To Switch
Turn on your Lutron light switch. Open the app and create an account or log in. Follow the app instructions to connect to your switch. You may need to enable Bluetooth or Wi-Fi. The app will find your switch automatically. Confirm the connection to start controlling the switch from your phone.
Setting Scenes And Schedules
The app allows you to create scenes that adjust multiple lights at once. Name your scenes for easy access. You can also set schedules for your lights. Choose times for lights to turn on or off automatically. This helps save energy and adds security. Adjust scenes and schedules anytime through the app.
Using Remote And Keypads
Using remote controls and keypads with your Lutron light switch makes managing your lights easy. These tools offer more control options beyond the switch itself. You can adjust brightness, turn lights on or off, and set scenes from across the room. Setting them up takes a few simple steps. This guide helps you program and customize your remote and keypads for smooth operation.
Pairing Devices
Start by pairing your remote or keypad with the Lutron switch. Press and hold the “Raise” and “Lower” buttons on the switch until the LED blinks. Then, press a button on the remote or keypad. The LED will stop blinking when pairing is complete. Repeat these steps for each device you want to connect. This process links the remote or keypad directly to the switch.
Customizing Controls
Customize your remote or keypad settings to fit your needs. Assign specific buttons to control different lights or scenes. Use the Lutron app or the device’s manual to change button functions. You can set dimming levels or create favorite light scenes. Personalizing controls makes your lighting system more convenient and enjoyable to use.
Troubleshooting
If your remote or keypad does not work, start by checking the batteries. Replace old batteries with new ones. Ensure the devices are within range of the Lutron switch. Re-pair the devices if they lose connection. Resetting the switch can also fix common issues. Follow these steps to keep your lighting controls working well.
Advanced Features
Lutron light switches offer more than just basic on and off functions. Their advanced features help create a smarter, more efficient home. These features make your daily routines easier and your home more comfortable. Explore how to use these options to get the most from your Lutron light switch.
Integrating With Smart Home Systems
Lutron switches work well with popular smart home systems. Connect them to platforms like Apple HomeKit, Google Assistant, or Amazon Alexa. This connection lets you control lights from one app. Set schedules or scenes to match your lifestyle. Integration creates a smooth experience across all devices.
Voice Control Options
Voice control adds convenience to lighting management. Speak commands to turn lights on or off. Adjust brightness levels without touching a switch. Use simple phrases through devices like Alexa or Google Home. Voice control is perfect for busy or hands-free moments.
Energy Saving Tips
Save energy with Lutron’s programmable features. Set timers to turn off lights automatically. Use dimming functions to reduce power use. Schedule lights to match daylight hours. These steps lower electricity bills and help the environment.
Common Issues And Fixes
Programming a Lutron light switch can sometimes lead to small problems. These issues can stop the switch from working right. Knowing common problems helps fix them quickly. This saves time and keeps your lights working smoothly.
Switch Not Responding
Sometimes, the switch does not react when pressed. This can happen due to a power issue or a loose connection. Check if the breaker is on and the switch has power. Make sure the wiring is tight and connected well.
Also, the switch might need to be reset. This clears minor errors and restarts the system. Try pressing the switch several times to see if it wakes up.
Connection Problems
Connection issues often cause the switch to lose control. The switch may lose connection with the hub or remote. Check the signal range and make sure there are no walls blocking it.
Try moving the hub closer to the switch. Also, check if other wireless devices cause interference. Fixing connection problems improves switch response and control.
Resetting The Switch
Resetting is a simple way to fix many issues. It returns the switch to factory settings. To reset, press and hold the top and bottom buttons for about 10 seconds.
The switch will blink to show it is resetting. After reset, you must reprogram the switch. This step often solves problems that do not go away easily.

Credit: www.youtube.com

Credit: www.youtube.com
Frequently Asked Questions
How Do I Program A Lutron Light Switch?
To program a Lutron light switch, press and hold the “Off” button until the LED blinks. Then, press the desired button to assign the function. Follow the specific model’s manual for detailed steps.
Can I Sync Multiple Lutron Switches Together?
Yes, you can sync multiple Lutron switches by linking them via the Lutron app or using the Pico remote. This allows simultaneous control of all connected switches.
What Tools Are Needed To Program Lutron Switches?
No special tools are required. You only need the Lutron app or remote control, depending on your switch model, and basic knowledge of your home Wi-Fi setup.
How Do I Reset A Lutron Light Switch?
To reset, press and hold the “Off” button for about 10 seconds until the LED flashes rapidly. This clears previous settings and allows reprogramming.
Conclusion
Programming your Lutron light switch is simple and quick. Follow each step with care for best results. You can control your lights easily and save energy. Enjoy the convenience of setting moods and schedules. Take your time and try different settings.
Soon, your home will feel smarter and more comfortable. Keep this guide handy for future reference. Happy lighting!