Are you tired of fumbling in the dark to control your ceiling fan light? Installing a ceiling fan light switch might seem tricky, but with the right steps, you can do it yourself quickly and safely.
Imagine having full control over your fan and light with just a simple flick of a switch—no more hassle or confusion. In this guide, you’ll discover easy-to-follow instructions that anyone can understand, even if you’re not an expert. Keep reading, and by the end, you’ll have the confidence to upgrade your room’s comfort and style all on your own.
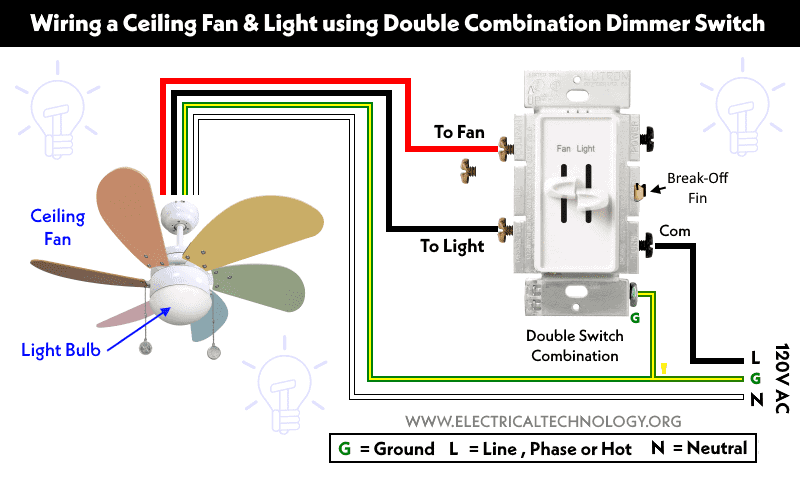
Credit: www.electricaltechnology.org
Tools And Materials Needed
Installing a ceiling fan light switch requires specific tools and materials. Having the right items makes the job easier and safer. This section lists everything needed for a smooth installation.
Essential Tools
Gather these tools before starting the project. A screwdriver set is crucial for removing and attaching screws. Wire strippers help prepare wires for connection. A voltage tester ensures the power is off, preventing shocks. Needle-nose pliers assist in bending and twisting wires. A drill may be needed for new holes or mounting.
Required Materials
Prepare the materials needed to replace or install the switch. A ceiling fan light switch compatible with your fan is necessary. Wire nuts secure wire connections safely. Electrical tape adds extra protection to wire joints. Wall plates cover the switch for a neat finish. Ensure all materials are rated for electrical use.

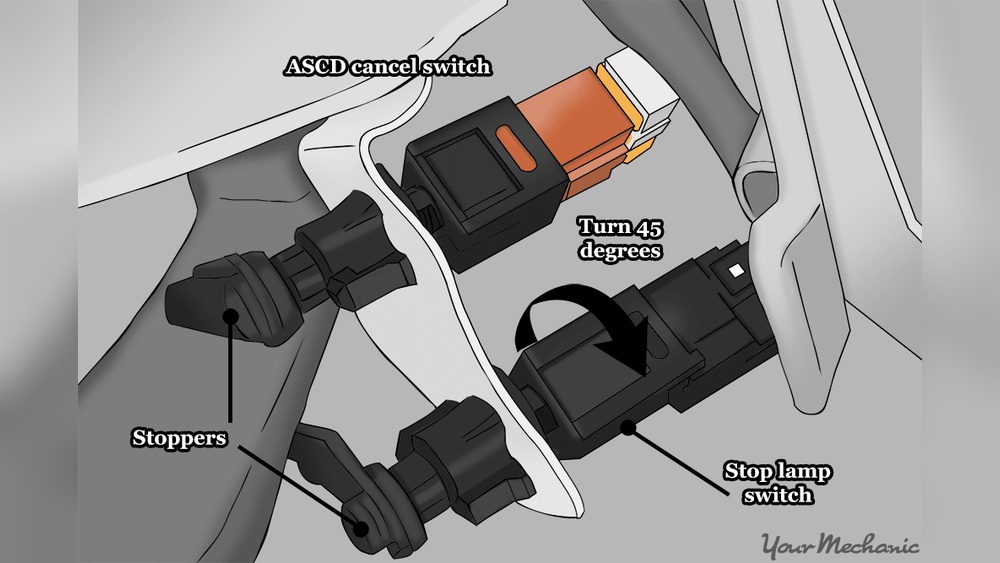
Credit: community.smartthings.com
Safety Precautions
Safety is the top priority when installing a ceiling fan light switch. Electrical work can be dangerous without the right precautions. Taking safety steps helps prevent shocks, injuries, or damage to your home.
Always prepare well before starting. Follow each safety rule carefully. This keeps the job safe and smooth.
Turn Off The Power
Locate the correct circuit breaker for the fan. Switch it off to cut power. Use a voltage tester to check the wires. Make sure no electricity flows before touching anything.
Use Proper Tools And Equipment
Choose insulated tools to protect against electric shocks. Avoid using damaged or worn-out tools. A good screwdriver, wire stripper, and voltage tester are essential. Keep everything clean and ready.
Wear Safety Gear
Put on rubber-soled shoes to prevent slipping. Use safety glasses to protect your eyes. Avoid loose clothing that might catch on wires or fan parts.
Work In A Well-lit Area
Good lighting helps you see wires and connections clearly. Use a flashlight or portable light if needed. Avoid working in dark or shadowy spaces.
Follow Wiring Instructions Carefully
Read the fan’s manual before starting. Match wire colors as shown in the guide. Double-check each connection for tightness and accuracy. Wrong wiring can cause shorts or fires.
Keep Children And Pets Away
Clear the workspace of distractions. Children and pets can cause accidents. A quiet, controlled area improves focus and safety.
Turn Off Power Supply
Turning off the power supply is the first and most important step before installing a ceiling fan light switch. This step keeps you safe from electric shocks. Never skip it. Always treat electricity with caution.
Even a small mistake can cause serious injury. So, take your time and follow the steps carefully. Safety first.
Locate The Circuit Breaker
Find your home’s main electrical panel. Look for the circuit breaker that controls the room where you will work. The breaker is usually labeled. If not, you may need to test to find the right one.
Switch Off The Correct Breaker
Flip the switch to the OFF position. This stops electricity from reaching the ceiling fan wiring. You should hear a click. This confirms the power is off to that circuit.
Double Check The Power Is Off
Use a voltage tester or a small light bulb tester. Touch the wires or terminals where you will work. If the tester shows no power, it is safe to continue. Never assume power is off without testing.
Remove Existing Switch
Start by turning off the power at the breaker to ensure safety. Carefully remove the cover plate and unscrew the old switch from the wall. Gently pull the switch out to access the wiring for the new ceiling fan light switch.
Turn Off Power At The Circuit Breaker
Safety is the first step. Switch off the power at the circuit breaker. This stops electricity from flowing to the switch. Use a voltage tester to confirm the power is off. Never skip this step. It protects you from electric shock.
Remove The Switch Cover Plate
Unscrew the cover plate with a screwdriver. Keep the screws safe for later use. Gently pull the plate away from the wall. This reveals the switch and wiring behind it. Handle the plate carefully to avoid damage.
Unscrew The Existing Switch
Loosen the screws holding the switch to the electrical box. Pull the switch out slowly. This gives clear access to the wires attached to it. Do not pull too hard to avoid wire damage.
Disconnect The Wires
Note the wire positions before removal. Use a screwdriver to loosen terminal screws. Carefully detach each wire from the switch. Keep wires separate to prevent confusion later. If wires are capped, remove the caps gently.
Identify Wiring Types
Before installing a ceiling fan light switch, identifying the wiring types is crucial. This step ensures a safe and correct connection. Different homes may have different wiring setups. Recognizing these will help avoid mistakes and electrical hazards.
Wiring colors and arrangements tell you what each wire does. Knowing these details helps connect the switch properly. Let’s explore the common wiring types found in ceiling fan installations.
Understanding Black, White, And Ground Wires
Black wires usually carry power to the switch or fan. White wires often act as neutral wires, completing the circuit. Ground wires, usually green or bare copper, provide safety by grounding the device.
Each wire has a specific role. Mixing them up can cause short circuits or shocks. Always check the wires carefully before connecting.
Identifying Single-pole Vs. Three-way Wiring
Single-pole wiring controls the light or fan from one switch. It uses two wires plus a ground. Three-way wiring lets you control the fan or light from two switches. It uses an additional traveler wire for communication.
Knowing which setup you have is important. It affects how you connect your new switch. Look for extra wires or multiple switch boxes.
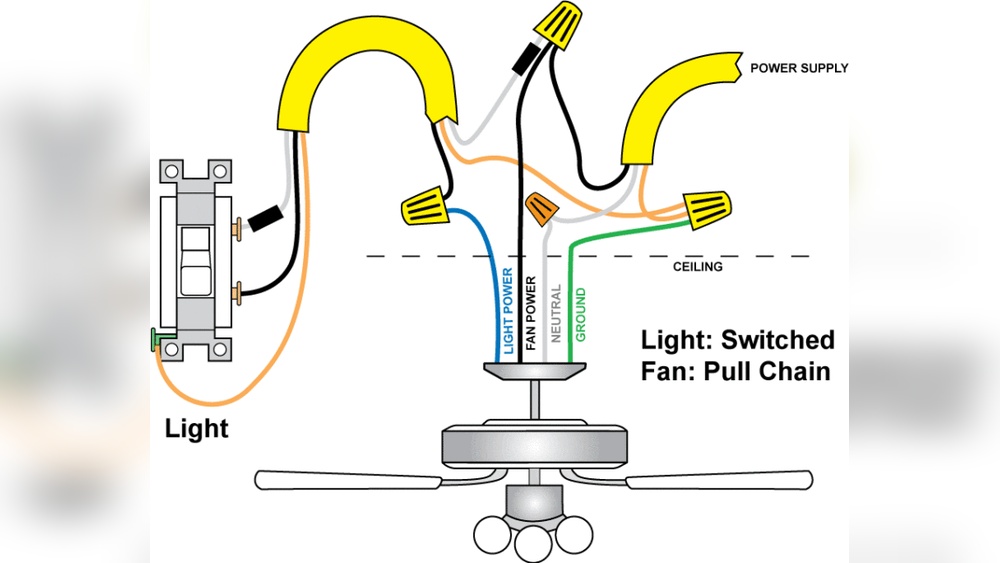
Recognizing Separate Fan And Light Wires
Some ceiling fans have separate wires for the fan and the light. This allows independent control of each. The fan wire is often black or blue, while the light wire is usually blue or red.
Check your fan’s manual or wiring colors. This prevents confusion during installation. Connecting the wrong wires can stop the light or fan from working.
Connect New Ceiling Fan Light Switch
Connecting a new ceiling fan light switch requires care and attention. This step ensures the fan and light work correctly. Proper connections keep the switch safe and functional. Follow these simple steps to connect the wires correctly and secure them.
Match Wire Colors
Identify the wires from the ceiling and the switch. Usually, black wires carry power. White wires are neutral. Green or bare wires are ground. Match the black wire from the switch to the black wire from the ceiling. Connect the white wire to the white wire. Join the green or bare wire to the grounding wire. Matching colors helps avoid mistakes and ensures safety.
Secure Wire Connections
Twist the matching wires together tightly. Use wire nuts to cover the connections. Make sure no bare wire shows outside the nut. Tug gently on each wire to check the connection. Loose wires can cause sparks or failures. Wrap electrical tape around the wire nuts for extra security. Properly secured wires keep the switch safe and working well.
Mount The Switch
Mounting the switch is the next step after wiring. This step secures the switch in place and makes it ready for use. Proper mounting ensures safety and a clean look. Follow these steps carefully to avoid problems later.
Prepare The Switch Box
Check the switch box for debris or old wires. Remove any dust or dirt to ensure a smooth installation. Make sure the box is firmly attached to the wall. Loose boxes can cause the switch to wobble or fall.
Align The Switch
Hold the switch against the box. Align the screw holes on the switch with those on the box. The switch should sit flush against the wall. This prevents gaps and makes the switch look neat.
Secure The Switch With Screws
Insert the screws into the holes. Use a screwdriver to tighten them. Do not overtighten; this can crack the switch or box. Tighten just enough to hold the switch firmly in place.
Attach The Switch Plate
Place the switch plate over the switch. Align it with the screw holes. Insert the screws and tighten them gently. The plate should sit flat against the wall without gaps.

Credit: diy.stackexchange.com
Restore Power And Test
Restoring power and testing your new ceiling fan light switch is the final step. This step ensures the switch works properly and the fan and light respond as expected. Safety remains important, so take your time and check each function carefully.
Turn On The Circuit Breaker
Go to your home’s electrical panel. Find the breaker that controls the ceiling fan. Flip the switch back to the ON position. This restores power to the fan and switch.
Wait a few seconds for the electricity to flow fully. This helps prevent any sudden surges that could harm the switch.
Test The Fan And Light Controls
Use the new switch to turn on the ceiling fan. Check if the fan blades start spinning smoothly. Next, turn on the light part of the fan using the switch.
Make sure the light bulbs illuminate without flickering or dimming. Test both functions multiple times to confirm consistent operation.
Observe For Any Issues
Listen for unusual noises coming from the fan motor. Watch for any sparks or smells near the switch or fan. These signs indicate a problem.
If you notice anything odd, turn off the breaker immediately. Double-check your wiring and connections before trying again.
Troubleshooting Tips
Troubleshooting a ceiling fan light switch can save time and frustration. Problems can arise from simple errors or small faults. Understanding common issues helps fix them quickly. Here are some useful tips to check and solve common problems.
Check The Power Supply
Ensure the circuit breaker is on. A tripped breaker stops power to the switch. Use a voltage tester to confirm power at the switch. No power means the switch will not work.
Inspect The Wiring Connections
Loose wires can cause the switch to fail. Turn off the power before checking. Tighten any loose wire nuts or screws. Make sure wires match the switch’s instructions.
Test The Switch Function
Sometimes the switch itself is faulty. Use a multimeter to test the switch. Replace it if the switch shows no continuity. A new switch can restore normal function.
Look For Damaged Components
Check the fan and light bulbs for damage. Burned-out bulbs will prevent light operation. Inspect the fan’s motor for unusual sounds or smells. Replace parts as needed.
Verify The Remote Control Settings
Some ceiling fans use remotes with separate controls. Ensure the remote has fresh batteries. Confirm the remote is set to control the light. Reset the remote if it is not responding.
Frequently Asked Questions
How Do I Install A Ceiling Fan Light Switch?
Turn off the power first. Remove the old switch carefully. Connect the new switch wires matching colors. Secure the switch and restore power. Test the switch for proper function.
What Tools Are Needed For Ceiling Fan Switch Installation?
You need a screwdriver, wire stripper, voltage tester, and electrical tape. These tools help safely remove and connect wires during installation.
Can I Replace A Ceiling Fan Switch Myself?
Yes, if you follow safety steps and instructions carefully. Turn off the power and use proper tools. If unsure, consult a professional electrician.
How Do I Identify Wires For Ceiling Fan Switch?
Look for black (hot), white (neutral), and green or bare (ground) wires. Use a voltage tester to confirm power is off before handling.
Conclusion
Installing a ceiling fan light switch can be simple and quick. Follow each step with care and use the right tools. Always turn off the power before starting the work. Double-check your connections to avoid any issues later. This small upgrade improves control over your fan and light.
Enjoy the comfort and convenience it brings to your room. Keep safety as your top priority throughout the process. With patience, anyone can complete this task successfully. Give your space a fresh and functional touch today.