Have you ever looked at your old light switch or outlet and thought it’s time for an upgrade? Changing a light switch outlet might seem tricky, but with the right steps, you can do it yourself safely and quickly.
Imagine the satisfaction of flipping a new switch that you installed yourself. In this guide, you’ll find simple instructions that anyone can follow, even if you’ve never done electrical work before. Keep reading, and by the end, you’ll have the confidence to replace your light switch outlet like a pro.
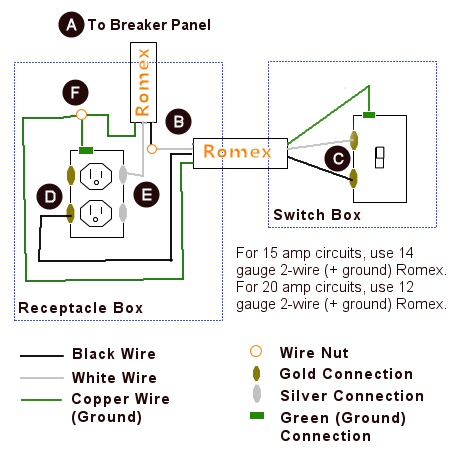
Credit: www.oneprojectcloser.com
Safety First
Changing a light switch or outlet can be simple. Safety must be your top priority. Electricity can cause serious harm. Take every step to protect yourself before starting.
Always prepare carefully. Small mistakes can lead to big problems. Follow safety rules closely to avoid accidents.
Turn Off Power
Start by switching off the power at the circuit breaker. Never rely on the wall switch to cut power. Test the switch or outlet with a voltage tester. Make sure no electricity flows to the device you will work on.
This step prevents shocks and injuries. Double-check to be certain the power is off. Safety depends on this simple action.
Gather Safety Gear
Wear safety gloves to protect your hands. Use insulated tools made for electrical work. Safety glasses can shield your eyes from sparks or debris.
Clear the work area of clutter. Good lighting helps you see clearly. Prepare everything before you start to avoid rushing.
Tools And Materials
Changing a light switch or outlet requires the right tools and materials. Having the correct items makes the job safer and easier. This section lists what you need before you start.
Essential Tools
Start with a screwdriver set. Both flathead and Phillips screwdrivers are useful. A voltage tester checks if the power is off. Wire strippers help remove insulation cleanly. Needle-nose pliers make bending wires simple. A flashlight is handy for dark spaces. Safety gloves protect your hands from shocks and cuts.
Choosing The Right Switch And Outlet
Select switches and outlets that match your home’s system. Check the voltage and amperage ratings. Standard switches usually handle 120 volts and 15 amps. Ground fault circuit interrupter (GFCI) outlets are needed in wet areas. Dimmer switches control light brightness but must be compatible with bulbs. Choose designs that fit your room’s style and size.
Prepare The Work Area
Preparing the work area is the first step in changing a light switch outlet. A tidy and safe space helps you work faster and avoid accidents. Follow simple steps to get ready before starting the job.
Clear The Space
Remove any furniture or objects near the switch. This gives you room to move and use tools easily. Clear the floor to avoid tripping or knocking things over. Keep a flashlight or lamp handy for better light.
Test For Power
Turn off the main power to the room. Use a voltage tester to check if the wires are live. Touch the tester to each wire carefully. No light or sound means no power. Double-check to be sure before touching wires.

Credit: bratcherelectric.com
Remove The Old Switch And Outlet
Removing the old switch and outlet is the first step in changing them safely. This process needs care and attention. You must turn off the power at the circuit breaker before starting. This keeps you safe from electric shock.
Start by taking off the cover plate. Then disconnect the wiring carefully. These steps prepare the switch and outlet for replacement.
Unscrew The Cover Plate
Use a screwdriver to remove the screws holding the cover plate. Keep the screws in a safe place for later use. Gently pull the cover plate away from the wall. This exposes the switch and outlet underneath.
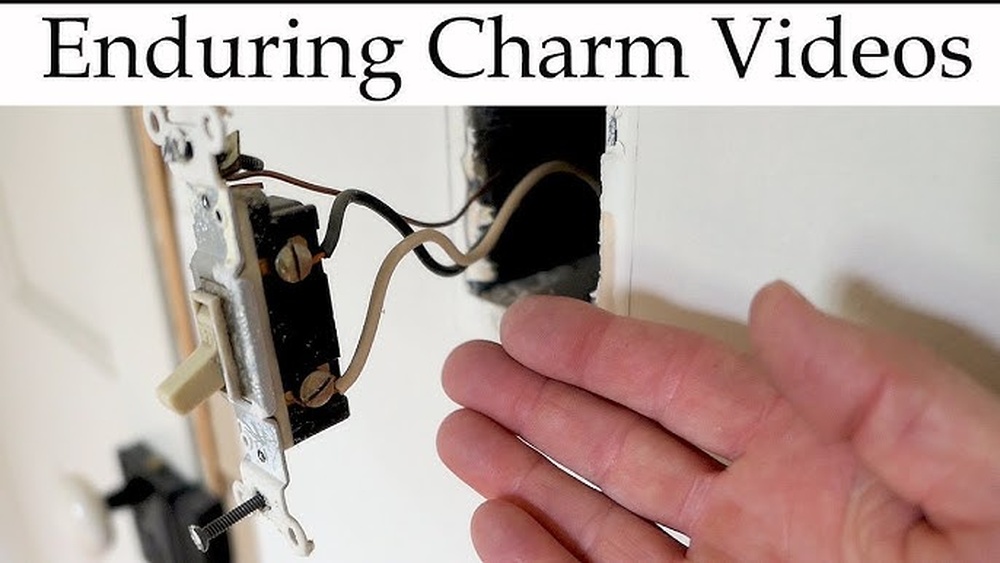
Disconnect Wiring
Check the wires connected to the switch and outlet. Note which wires connect to each terminal. Use a screwdriver to loosen the terminal screws. Carefully pull each wire free. Avoid damaging the wires during removal.
Install The New Switch And Outlet
Installing the new switch and outlet is the key step to finish your project. It involves connecting the wires correctly and securing the devices into the wall box. Careful handling is important to ensure safety and proper function. Follow each step with attention and patience.
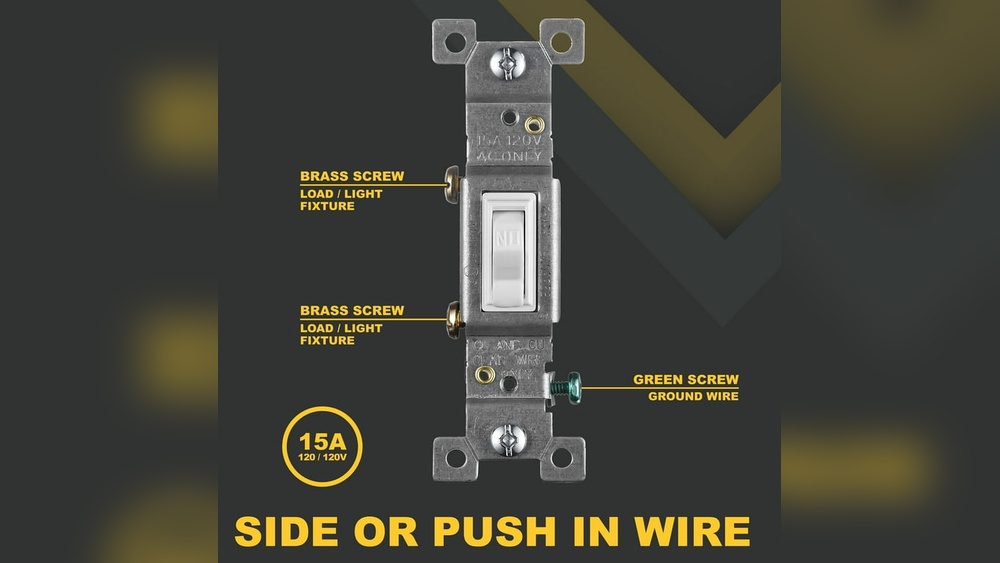
Connect The Wires
Start by matching each wire to the correct terminal on the switch and outlet. Usually, black or red wires connect to brass screws. White wires go to silver screws. Ground wires attach to the green screw. Tighten each screw firmly to hold the wire in place. Avoid loose connections to prevent sparks or shorts.
Secure The Devices
Push the switch and outlet gently back into the wall box. Align the screw holes with the box slots. Use the mounting screws to fasten the devices tightly. Do not overtighten, or you may crack the plastic. Finally, attach the faceplate and secure it with screws. Check everything feels solid and stable.

Credit: www.youtube.com
Test Your Work
Testing your work is a key step after changing a light switch outlet. It ensures the switch works safely and correctly. Skipping this step can lead to problems or even hazards. Follow these simple steps to check your work.
Restore Power
Turn the circuit breaker back on. This restores power to the switch and outlet. Make sure the power is fully on before testing. Use caution and stay alert to any unusual signs.
Check Functionality
Flip the switch to see if the light turns on and off. Plug a device into the outlet to test its power. Confirm both the switch and outlet operate smoothly. If they do not work, turn off the power again and recheck your connections.
Troubleshooting Tips
Troubleshooting is an important step when changing a light switch or outlet. It helps identify small problems before they get worse. Knowing what to check saves time and keeps you safe. Here are some key tips to guide you.
Common Issues
One common issue is the switch not turning the light on or off. This can happen if wires are loose or not connected correctly. Another problem is a buzzing sound from the switch. This often means a poor connection or a faulty switch. Sometimes, the outlet may not work at all due to a tripped circuit breaker or blown fuse. Check these first before digging deeper. Also, flickering lights may show a loose wire or a bad connection. Always turn off the power before inspecting wires.
When To Call A Professional
Call a professional if you see sparks or burning smells. These signs show serious electrical issues that need expert help. Avoid working if you do not understand wiring or feel unsure. Professionals have the right tools and knowledge to fix problems safely. Large electrical panels and complex wiring should always be handled by a licensed electrician. Safety is the top priority. Don’t risk injury or damage by trying beyond your skill level.
Frequently Asked Questions
How Do I Safely Turn Off Power Before Changing A Light Switch?
Always switch off the circuit breaker for the light switch. Use a voltage tester to confirm no electricity flows. This prevents shocks and ensures a safe working environment when replacing the switch.
What Tools Are Needed To Change A Light Switch Outlet?
You’ll need a screwdriver, voltage tester, wire stripper, and replacement switch. These tools help remove the old switch and safely install the new one with ease.
How Do I Identify The Wires Connected To A Light Switch?
Typically, black or red wires are live, white is neutral, and green or bare is ground. Properly identifying wires ensures correct and safe switch installation.
Can I Replace A Light Switch Outlet Without Electrical Experience?
Basic electrical knowledge is recommended. If unsure, consult a professional electrician to avoid hazards. Safety first when handling electrical components.
Conclusion
Changing a light switch outlet is a simple task anyone can do. Always turn off the power first for safety. Take your time and follow the steps carefully. Using the right tools makes the job easier. Double-check your work before restoring power.
A new switch outlet can improve your room’s look and function. Try it yourself and save money on repairs. Small fixes like this build your confidence. Keep learning and taking on small projects. You will feel proud of your handy skills.