Have you ever wondered how to connect a light switch safely and easily? Whether you’re fixing a broken switch or installing a new one, knowing the right steps can save you time and frustration.
Imagine flipping your switch and seeing your room light up instantly—that feeling of control is powerful. You’ll learn exactly what you need to do, step by step, so you can handle the job with confidence. Ready to take charge of your home’s lighting?
Let’s get started.

Credit: community.smartthings.com
Tools And Materials Needed
Connecting a light switch requires specific tools and materials. Having the right items makes the job easier and safer. Use quality tools to ensure a proper connection. Prepare all materials before starting the work.
Essential Tools
A screwdriver set is necessary for removing and securing screws. A wire stripper helps remove insulation from wires cleanly. Use a voltage tester to check if wires carry electricity. Pliers assist in bending and twisting wires. Electrical tape secures wire connections and prevents shorts.
Materials Needed
Choose the correct light switch for your needs, like single-pole or three-way. Use electrical wires rated for your home’s voltage and load. Wire nuts join wires safely and securely. A switch box holds the switch and wires inside the wall. Cover plates protect the switch and improve the look.
Safety Precautions
Working with electrical switches can be risky without proper safety steps. Following safety precautions protects you from shocks and injuries. Simple actions can keep your work safe and effective.
Turn Off The Power Supply
Always switch off the circuit breaker or fuse before starting. This stops electricity from flowing to the switch. Confirm the power is off using a voltage tester. Never rely on just the wall switch.
Use Insulated Tools
Choose tools with insulated handles to avoid electric shocks. Insulation blocks electricity from reaching your hands. Avoid metal tools without insulation while working on wires.
Wear Protective Gear
Wear rubber gloves to reduce shock risk. Safety glasses protect your eyes from sparks or debris. Proper gear adds a safety layer during wiring tasks.
Check For Damaged Wires
Inspect wires for cuts, burns, or wear before connecting. Damaged wires can cause short circuits or fires. Replace any faulty wires immediately for safety.
Work In Dry Conditions
Keep the work area dry to prevent shocks. Avoid wet hands or floors during electrical work. Water conducts electricity and increases danger.
Turn Off The Power
Turning off the power is the first step before connecting a light switch. It keeps you safe from electric shock. Always treat electricity with respect. Even a small mistake can cause serious injury.
Before touching any wires, make sure the power is completely off. This step protects both you and your home. Never skip it.
Locate The Circuit Breaker
Find the main circuit breaker panel in your home. It is usually in the basement or garage. Look for the switch labeled for the room or area you want to work on.
Switch Off The Correct Breaker
Flip the breaker switch to the off position. This stops electricity from flowing to the light switch. Double-check by trying to turn on the light. It should not work.
Use A Voltage Tester
Test the wires with a voltage tester to confirm no power is present. Touch the tester to each wire carefully. No light or sound means the power is off.
Inform Others In The House
Tell everyone in your home about the power shutdown. This prevents anyone from turning the breaker back on accidentally. Safety first.
Remove The Old Switch
Removing the old light switch is the first step in connecting a new one. It prepares the area for safe and easy installation. This process requires care and attention to avoid any electrical hazards. Follow the steps below to remove the old switch properly.
Start by switching off the power at the breaker box. This stops electricity from flowing to the switch. Use a voltage tester to check if the power is really off. Never touch wires without confirming no electricity is present.
Remove The Switch Cover Plate
Unscrew the cover plate over the switch. Keep the screws safe for reusing later. The plate exposes the switch and wiring inside the electrical box. Removing it gives clear access to the switch.
Unscrew The Old Switch
Use a screwdriver to remove the screws holding the switch. Pull the switch gently out from the electrical box. Avoid pulling on the wires to prevent damage. The switch will now be loose and ready to disconnect.
Disconnect The Wires
Note the wire positions before disconnecting. Loosen the terminal screws or release wires from push-in connectors. Carefully separate all wires from the old switch. Keep wires apart to avoid short circuits during work.
Identify The Wires
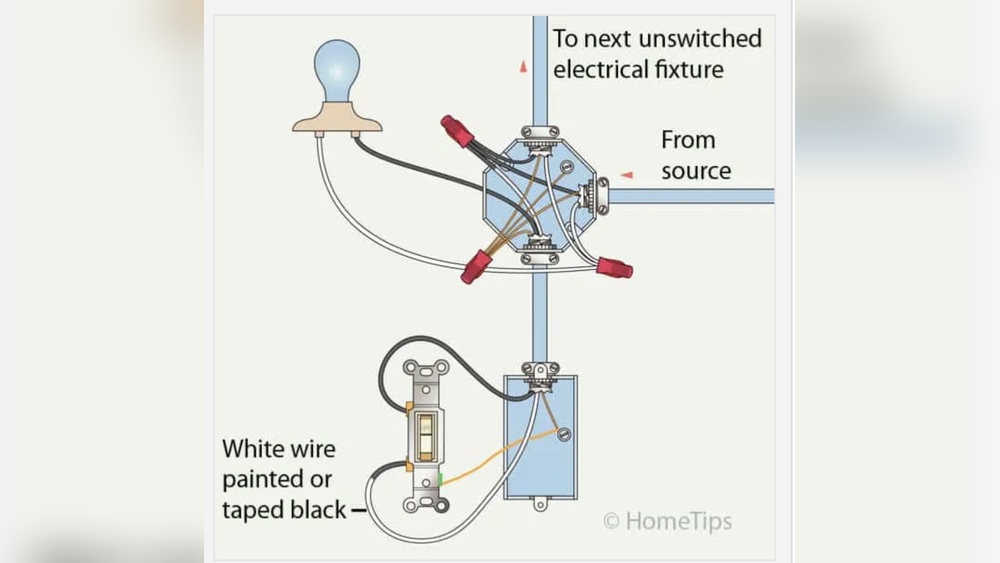
Before connecting a light switch, you must identify the wires. This step is very important for safety and proper function. Wires in your home have different roles. Knowing which wire is which helps avoid mistakes. It also prevents electric shocks and damage to the switch.
Each wire has a color code and a specific job. Let’s look at the main wires you will find: live, neutral, and ground. Understanding these makes wiring easier and safer.
Live Wire
The live wire carries electricity from the power source. It is often red or brown in color. This wire connects to the switch to turn the light on or off. Always handle the live wire with care. It can cause electric shock if touched directly.
Neutral Wire
The neutral wire completes the electrical circuit. It usually has a blue or white color. This wire carries electricity back to the power source. It helps balance the flow of electricity. The neutral wire does not connect directly to the switch.
Ground Wire
The ground wire is a safety wire. It is green or bare copper. This wire protects you from electric shock. It directs extra electricity safely into the ground. Always connect the ground wire to the switch or electrical box if available.

Credit: community.smartthings.com
Connect The New Switch
Connecting the new switch is a key step in replacing or installing a light switch. This process involves attaching the correct wires to the right terminals on the switch. Proper connections ensure the switch works safely and efficiently. Follow the steps carefully for a successful installation.
Attach The Live Wire
The live wire carries electricity from the power source. Find the live wire, usually black or red. Loosen the screw on the switch terminal. Wrap the live wire around the screw. Tighten the screw firmly to hold the wire in place.
Attach The Load Wire
The load wire goes to the light fixture. It is often black or red but different from the live wire. Loosen the screw on the load terminal. Connect the load wire by wrapping it around the screw. Tighten the screw to secure the wire tightly.
Connect The Ground Wire
The ground wire is important for safety. It is usually green or bare copper. Find the ground terminal on the switch. Attach the ground wire by wrapping it around the terminal screw. Tighten the screw to keep the wire secure and safe.
Secure The Switch And Cover Plate
Securing the switch and cover plate is the final step in connecting a light switch. It keeps everything safe and neat. This step also prevents wires from moving or touching each other. A properly secured switch ensures the light works well and avoids electrical problems.
Align The Switch In The Wall Box
Place the switch inside the wall box carefully. Make sure the switch is straight and fits snugly. The screw holes on the switch should line up with the holes in the box. Avoid forcing the switch, as it can bend or break parts.
Tighten The Mounting Screws
Use a screwdriver to tighten the screws that hold the switch in place. Tighten them just enough to keep the switch firm. Do not over-tighten, as this can crack the switch or strip the screws. Check that the switch does not move when pushed.
Attach The Cover Plate
Place the cover plate over the switch. The plate should fit flush against the wall. Insert the screws into the cover plate holes and tighten them carefully. The cover plate hides wires and gives a clean look to the switch area.
Check For Proper Fit And Safety
After securing, press the switch a few times. It should move smoothly without wobbling. Look for any gaps between the cover plate and the wall. If gaps exist, adjust the plate or screws. A tight fit improves safety and appearance.
Restore Power And Test
Restoring power and testing the light switch is the final step in your installation process. This step ensures the switch works correctly and the wiring is safe. Take your time to check everything carefully.
Restore Power To The Circuit
Go back to your circuit breaker panel. Flip the switch to the ON position to restore power. Make sure the breaker matches the one you turned off earlier. This step brings electricity back to the switch and the connected light.
Test The Light Switch
Press the switch to turn the light on. The light should turn on without flickering. Turn the switch off and check that the light goes off. If the light does not work, turn off the breaker again and check your wiring.
Check For Safety
Listen for any buzzing sounds or look for sparks. These signs mean something is wrong. If you see or hear anything unusual, switch off the power immediately. Call a professional electrician to inspect the wiring before using the switch again.
Troubleshooting Common Issues
Troubleshooting common issues helps solve problems with light switch connections. Many problems come from simple mistakes. Fixing these issues can save time and keep your home safe.
Some problems cause the light not to turn on. Others make the switch feel loose or not work smoothly. Finding the cause is the first step to fixing the switch.
Checking The Power Supply
Ensure the power is off before working on the switch. Use a voltage tester to check wires for electricity. If no power reaches the switch, check the breaker or fuse box. A tripped breaker often causes power loss to the switch.
Inspecting The Wiring Connections
Loose or wrong wiring can stop the switch from working. Make sure all wires are firmly connected to the right terminals. Look for damaged wires or corrosion. Replace any damaged wires and tighten loose connections carefully.
Testing The Light Bulb And Fixture
A bad bulb or fixture can seem like a switch problem. Test the bulb in another socket to see if it works. Check the fixture for signs of damage or wear. Replace bulbs and fix fixtures as needed.
Examining The Switch Itself
Switches wear out over time. A broken switch will not control the light properly. Remove the switch and test it with a multimeter. Replace the switch if it shows no continuity when flipped on.
Looking For Short Circuits Or Grounding Issues
Short circuits cause breakers to trip. Check for bare wires touching each other or metal boxes. Make sure grounding wires are connected correctly. Fix any short circuits to prevent hazards.

Credit: www.angi.com
Frequently Asked Questions
How Do You Safely Connect A Light Switch?
Turn off the power at the circuit breaker before starting. Use a voltage tester to confirm no power is present. Connect the live wire to the switch’s common terminal and the load wire to the other terminal. Secure all connections with wire nuts.
What Tools Do I Need To Connect A Light Switch?
You will need a screwdriver, wire stripper, voltage tester, and wire nuts. These tools help you safely strip, connect, and secure wires. Having these ready ensures a smooth and safe installation process.
Can I Connect A Light Switch Without Electrical Knowledge?
Basic electrical knowledge is recommended for safety. If unsure, consult a licensed electrician. Incorrect wiring can cause hazards like shocks or fires. Always prioritize safety and follow local electrical codes.
What Wires Connect To A Standard Light Switch?
Typically, a standard switch connects to a live (hot) wire and a load wire. The live wire brings power in, and the load wire sends power to the light fixture. Ground wires should also be connected for safety.
Conclusion
Connecting a light switch is simple when you follow the right steps. Always turn off the power before starting. Use the correct tools and wires for safety. Double-check your connections to avoid mistakes. Taking time and care leads to good results.
Now you can control your lights with ease. Enjoy the satisfaction of doing it yourself. Remember, safety comes first in every project.