Are you tired of fumbling in the dark or forgetting to turn off your lights? Installing a motion detector light switch can solve both problems easily.
Imagine walking into a room and having the lights turn on automatically—no switches, no hassle. In this guide, you’ll learn step-by-step how to install a motion detector light switch yourself, even if you have little experience with electrical work. By the end, you’ll enjoy added convenience, energy savings, and a smarter home.
Keep reading to discover how simple it is to upgrade your lighting today.

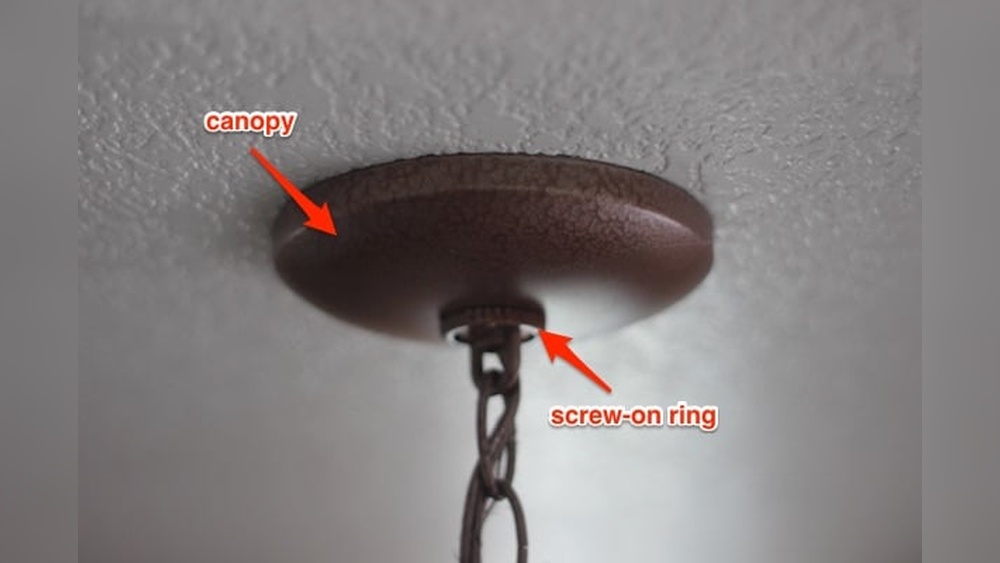
Credit: www.fourgenerationsoneroof.com
Tools And Materials Needed
Installing a motion detector light switch needs some basic tools and materials. Preparing these items before starting makes the job easier and safer. This section lists everything required for a smooth installation process.
Essential Tools
Gather these tools before you begin. A screwdriver is necessary for removing and installing switch covers. Wire strippers help in handling electrical wires safely. A voltage tester ensures the power is off to avoid shocks. Pliers provide a good grip on wires. A drill might be needed if new holes are required for mounting.
Required Materials
Choose the right motion detector light switch for your needs. You will also need wire connectors or wire nuts for safe wire connections. Electrical tape can secure wires and prevent short circuits. Sometimes, mounting screws come with the switch, but keep extra screws handy.
Safety Equipment
Safety comes first. Use insulated gloves to protect your hands. Safety glasses shield your eyes from dust or sparks. A flashlight or headlamp helps if the work area is dark. Always double-check power is off with your voltage tester before handling wires.
Safety Precautions
Safety is the top priority when installing a motion detector light switch. This device connects to your home’s electrical system, so careful steps are needed. Taking safety precautions reduces risks like shocks, short circuits, or damage. Follow clear guidelines to protect yourself and your property during the installation process.
Turn Off The Power
Always switch off the power at the circuit breaker. Do not rely on the wall switch alone. Use a voltage tester to confirm no electricity flows to the wires. This step prevents electric shocks while working on the switch.
Use Proper Tools
Choose insulated tools designed for electrical work. Avoid metal tools without insulation. This lowers the risk of accidental shocks or short circuits. Keep tools organized to avoid confusion during installation.
Read The Manufacturer’s Instructions
Carefully read the manual that comes with the motion detector switch. Follow all safety warnings and installation steps. The instructions help avoid mistakes and ensure the device works correctly.
Wear Safety Gear
Wear rubber-soled shoes to reduce shock risk. Use safety goggles to protect your eyes from dust or sparks. Avoid loose clothing that might catch on wires or tools.
Check For Damaged Wires
Inspect wires for cuts, cracks, or wear before installation. Replace damaged wires to prevent fire hazards. Handle wires gently to avoid breaking insulation or connectors.
Work In A Dry Area
Keep your hands and the workspace dry. Water conducts electricity and increases shock risk. Avoid installing the switch in wet or damp conditions.
Choosing The Right Motion Detector Switch
Choosing the right motion detector switch is the first step to successful installation. The right switch improves safety and saves energy. Different types suit different needs. Understanding these helps you pick a switch that fits your space perfectly.
Types Of Motion Detector Switches
There are several types of motion detector switches. Passive Infrared (PIR) switches detect body heat to turn on lights. Ultrasonic switches use sound waves to sense movement. Dual-technology switches combine PIR and ultrasonic for better accuracy. Each type works well in certain settings. PIR is common for homes. Ultrasonic works well in areas with obstacles. Dual-technology reduces false triggers.
Factors To Consider
Choose a switch based on room size and lighting needs. Consider the sensor’s range and angle. Check if it fits your wiring setup. Look at the switch’s delay timer options. Sensitivity adjustment helps avoid false triggers. Think about the light type it supports. Some switches work better with LED or fluorescent bulbs. Make sure the switch is easy to install and use.
Preparing The Installation Site
Preparing the installation site is the first step to install a motion detector light switch. It ensures safety and makes the process smooth. Take time to get everything ready before starting the installation. This section guides you through two important tasks: turning off power and removing the existing switch.
Turning Off Power
Safety is the top priority. Find your home’s main electrical panel. Switch off the breaker that controls the light switch you want to replace. Use a voltage tester to confirm the power is off. Never skip this step. It protects you from electric shocks and accidents.
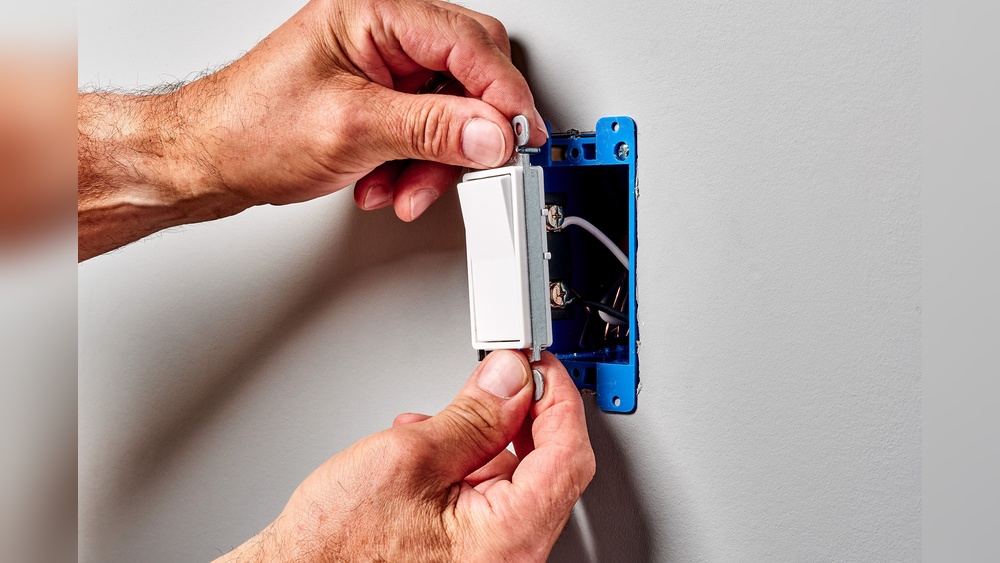
Removing Existing Switch
Remove the switch cover plate by unscrewing it. Carefully pull the switch out from the wall box. Take note of how wires are connected. Use a screwdriver to loosen the screws holding the wires. Gently disconnect the wires from the old switch. Keep the wires separated to avoid touching each other. This makes the next step easier and safer.
Wiring The Motion Detector Switch
Wiring the motion detector switch is a key step in the installation process. It controls when the light turns on and off based on movement. Correct wiring ensures the switch works safely and efficiently. Understanding the wires and how to connect them avoids damage and electrical hazards.
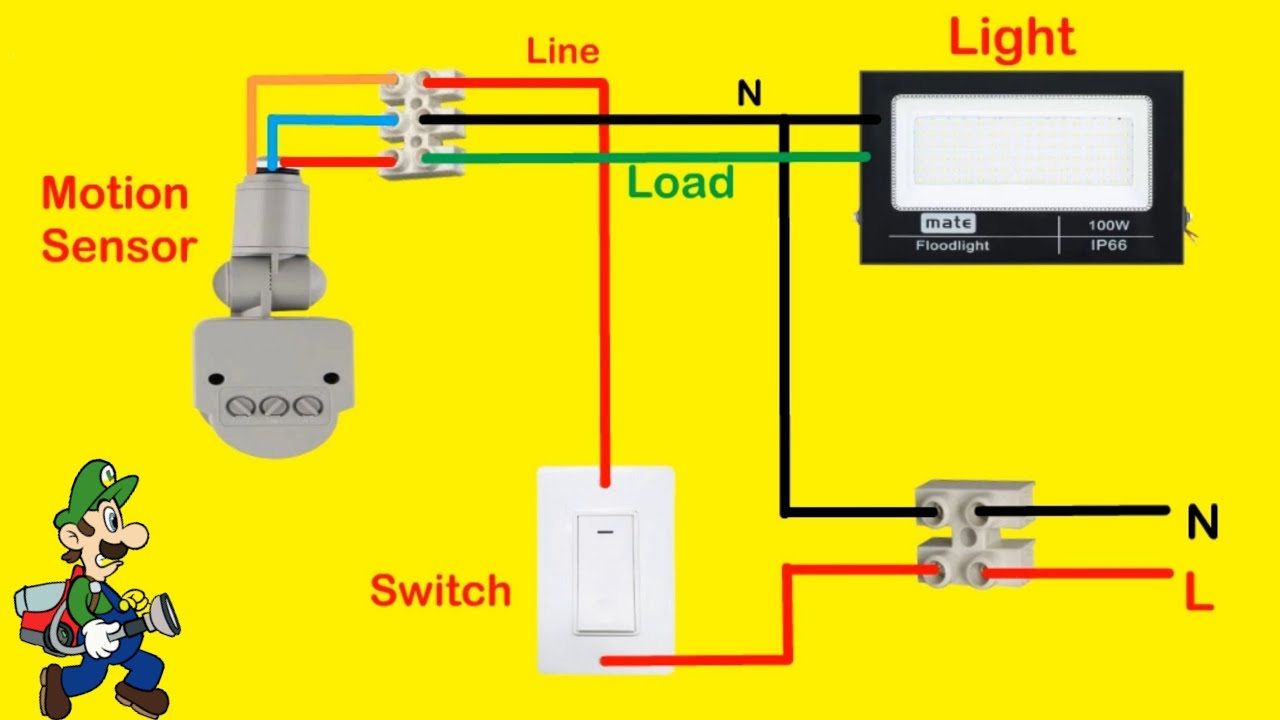
Identifying Wires
Start by turning off the power at the circuit breaker. Remove the old switch carefully to see the wires. Typically, you will find three types of wires: live (hot), neutral, and ground. The live wire carries electricity to the switch. The neutral wire completes the circuit. The ground wire protects against electrical faults. Use a voltage tester to confirm the live wire. Label each wire to avoid confusion later.
Connecting Wires Correctly
Match the wires from the wall to the motion detector switch wires by color and function. Connect the live wire from the wall to the switch’s live terminal. Attach the neutral wire to the switch’s neutral terminal. Connect the ground wire to the green or bare copper wire on the switch. Use wire nuts to secure all connections tightly. Wrap connections with electrical tape for safety. Double-check each connection before restoring power. Proper wiring ensures the motion detector switch operates without issues.

Credit: www.beeslighting.com
Mounting The Switch And Testing
Mounting the motion detector light switch and testing it are crucial steps. These ensure the switch works correctly and stays safe to use. Follow the instructions carefully for a proper installation. A well-mounted switch looks neat and performs well.
Securing The Switch
First, place the switch into the wall box gently. Align it with the screw holes. Use a screwdriver to tighten the screws. Do not overtighten to avoid cracking the switch or wall. Make sure the switch fits snugly and sits flush against the wall.
Check that wires do not get pinched or bent. Proper wire placement prevents damage or shorts. Secure the switch firmly so it does not move when pressed. A stable switch enhances durability and user experience.
Restoring Power And Testing
Turn the power back on at the breaker panel. Test the switch by moving your hand near the sensor. The light should turn on automatically. Wait for the set time to see if the light turns off.
Test from different angles and distances. Adjust the sensor’s sensitivity if needed. Confirm the switch works as expected before finishing. Proper testing avoids future issues and saves time.
Adjusting Sensitivity And Settings
Adjusting the sensitivity and settings of your motion detector light switch is important. It helps the switch work well for your space. You can control how far it senses movement and how long the light stays on. Proper adjustments save energy and avoid false triggers.
Each model may have different controls. Most have small dials or buttons to change settings. Take time to test and tweak the sensitivity to suit your needs.
Sensitivity Adjustment
Sensitivity controls how close or far the motion sensor detects movement. Turn the dial to increase or decrease this range. High sensitivity may detect motion from far away. Low sensitivity focuses on closer movements only.
Set sensitivity so the light turns on for people but not animals or passing cars. Test by walking around the sensor at different distances. Make small changes and check results.
Time Delay Settings
Time delay means how long the light stays on after no motion is detected. You can set it from a few seconds to several minutes. Short delay saves energy but may turn off too fast.
Long delay keeps the light on longer for safety or convenience. Adjust this setting based on how you use the space. Test different times to find the best option.
Light Level Adjustment
Some motion detector switches include a light sensor. This sensor stops the light from turning on during the day. You can set the level of darkness needed for activation.
Adjust this to prevent the light from wasting power in bright conditions. Turn the dial to select how dark it must be before the light turns on. Test during different times of the day.
Troubleshooting Common Issues
Troubleshooting common issues with a motion detector light switch helps keep it working well. Small problems can stop the switch from sensing motion or turning on the light. Fixing these issues saves time and avoids frustration.
Check some simple steps first. Most problems come from wiring errors or sensor settings. Knowing what to look for makes repairs easier.
Checking The Power Supply
Ensure the switch has power. A loose wire or tripped breaker can cut power. Use a tester to confirm electricity reaches the switch.
Adjusting The Sensor Range
Set the sensor range correctly. Too high or low can cause false triggers or no response. Follow the manual to set the right distance.
Cleaning The Sensor Lens
Dirt or dust on the sensor lens blocks motion detection. Clean it gently with a soft cloth. Avoid harsh chemicals that may damage the sensor.
Resetting The Switch
Reset the switch to fix glitches. Turn off power, wait 30 seconds, then turn it back on. This simple step often restores normal function.
Checking For Interference
Other devices or bright lights can confuse the sensor. Move nearby lights or appliances away. Test the switch again for better performance.
Credit: www.youtube.com
Frequently Asked Questions
What Tools Are Needed To Install A Motion Detector Light Switch?
You need a screwdriver, voltage tester, wire strippers, electrical tape, and a motion detector light switch. These tools ensure safe and proper installation. Always turn off the power before starting.
How Do I Safely Wire A Motion Detector Light Switch?
Turn off the circuit breaker first. Connect the live, neutral, and ground wires to the switch terminals as per instructions. Use wire connectors and electrical tape to secure connections.
Can I Install A Motion Detector Switch Myself?
Yes, if you understand basic electrical wiring and safety. Follow the manufacturer’s guide carefully. If unsure, consult a professional electrician to avoid hazards.
How Do I Test A Motion Detector Light Switch After Installation?
Turn the power back on. Walk in front of the sensor to check if the light activates. Adjust sensitivity and timer settings as needed for optimal performance.
Conclusion
Installing a motion detector light switch is simple and useful. It saves energy by turning lights on only when needed. Follow the steps carefully and use the right tools. Double-check the connections to avoid problems. This switch adds safety and convenience to your home.
Enjoy hands-free lighting that works automatically. With some patience, anyone can do this job. Brighten your space with smart, easy upgrades today.