Have you ever struggled with removing metal wall anchors without damaging your walls? If you’re facing this tricky task, you’re not alone.
Metal wall anchors are great for holding heavy items, but getting them out can feel frustrating and confusing. In this guide, you’ll discover simple, effective methods to remove these anchors safely and easily. Keep reading, and you’ll soon have the confidence to tackle this project like a pro—no more guessing or worrying about ruining your walls.

Credit: www.youtube.com
Types Of Metal Wall Anchors
Metal wall anchors come in different types. Each type works best for certain walls and weights. Knowing these types helps you remove anchors safely and correctly. This section explains the common metal wall anchors you will meet.
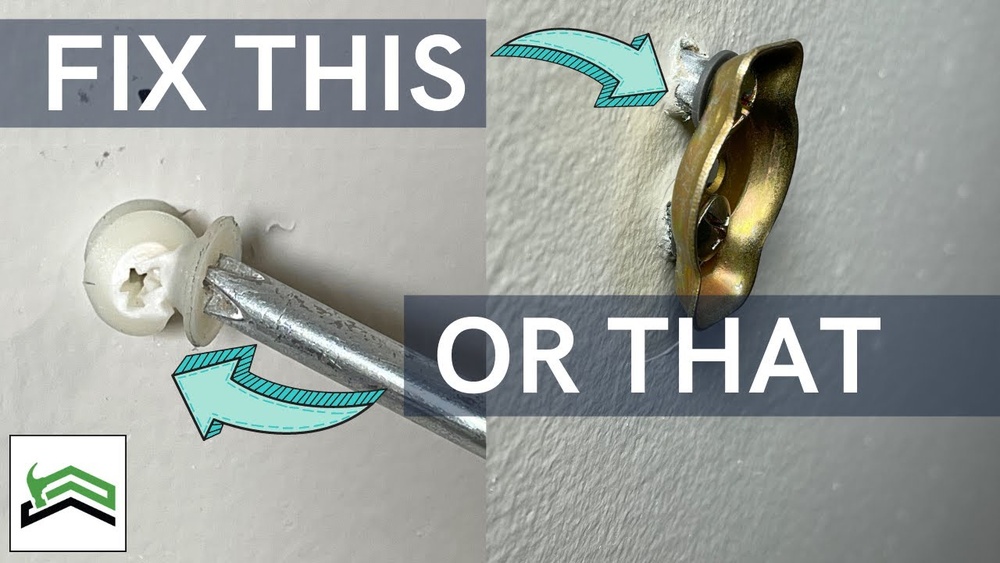
Expansion Anchors
Expansion anchors are metal sleeves that expand inside the wall. They create a tight hold by pressing against the wall’s inside. These anchors are strong and used for medium to heavy loads. Removing them can be tricky because of the expanded metal gripping the wall.
Toggle Bolts
Toggle bolts have wings that open behind the wall. The wings spread wide and hold the anchor firmly. These anchors are great for hollow walls like drywall. To remove toggle bolts, you must collapse the wings carefully without damaging the wall.
Molly Bolts
Molly bolts are metal anchors with a sleeve and a screw. The sleeve expands as you tighten the screw, locking the bolt inside the wall. They hold heavy objects on drywall or plaster. Removing molly bolts requires pulling or unscrewing the bolt gently to avoid wall damage.

Credit: stonedesignbysantos.com
Tools Needed For Removal
Removing metal wall anchors requires the right tools. These tools make the job easier and safer. Using the correct equipment helps avoid damage to your walls and saves time. Below are some common tools you need for anchor removal.
Screwdriver Options
A screwdriver is essential for removing anchors. Choose one that fits the anchor’s screw head. Flathead and Phillips screwdrivers are the most common. A good fit prevents stripping the screw. Use a manual screwdriver for better control.
Pliers And Wrenches
Pliers help grip and pull out anchors. Needle-nose pliers work well for tight spaces. Locking pliers can hold the anchor firmly. Adjustable wrenches provide extra grip on stubborn anchors. These tools offer leverage to ease removal.
Drill And Bits
A drill speeds up the removal process. Use a drill bit slightly smaller than the anchor. This helps loosen the anchor without harming the wall. A power drill with variable speed is best. Take care to drill slowly for control.
Removing Expansion Anchors
Removing expansion anchors from a wall can seem tricky. These anchors expand inside the wall to hold firmly. Knowing the right method saves time and protects your wall. Here are simple steps to remove them safely.
Unscrewing The Anchor
Start by turning the screw counterclockwise. This can loosen the anchor inside the wall. Use a screwdriver that fits the screw head well. If the anchor spins freely, try other methods below.
Pulling Out With Pliers
Grip the anchor’s head firmly with pliers. Pull straight out with steady force. Wiggle the anchor gently to loosen it. Avoid twisting too hard to prevent wall damage. This method works best for anchors that are partially out.
Using A Drill For Stubborn Anchors
Drill out the center of the anchor carefully. Use a drill bit slightly smaller than the anchor. This breaks the anchor’s grip inside the wall. Remove the remaining pieces with pliers. Clean the hole for new anchors or plugs.
Removing Toggle Bolts
Removing toggle bolts can be tricky. These anchors hold firmly behind the wall. They have wings that open wide to grip the inside. This makes them strong but hard to take out. Knowing the right steps helps avoid wall damage and makes removal easier.
Locating The Bolt Head
First, find the bolt head on the wall surface. It looks like a regular screw head. Use a flashlight for better visibility. Clean any paint or dust covering the head. This helps you see it clearly for the next step.
Compressing And Pulling The Toggle
Next, try to compress the toggle wings inside the wall. Push the bolt inward gently. This may fold the wings flat. Then, pull the bolt straight out slowly. If the wings fold, the bolt will slide out easier.
Cutting The Bolt If Necessary
Sometimes the bolt won’t come out by pulling. Use a hacksaw or rotary tool to cut the bolt near the wall. Be careful not to damage the wall surface. After cutting, push the toggle wings inside the wall. Patch the hole afterward for a clean finish.
Removing Molly Bolts
Removing molly bolts can seem tricky but is doable with the right steps. Molly bolts are metal wall anchors with a sleeve that expands behind the wall. This expansion holds the bolt tightly in place. To remove them, you need to undo this expansion safely.
Follow the steps below to get molly bolts out without damaging your wall.
Unscrewing The Center Screw
Start by turning the center screw counterclockwise. Use a screwdriver that fits well to avoid stripping the screw head. Unscrew it carefully until it comes out completely. This releases the tension on the anchor sleeve. Do not force the screw out if it feels stuck. Try applying a little lubricant to loosen it.
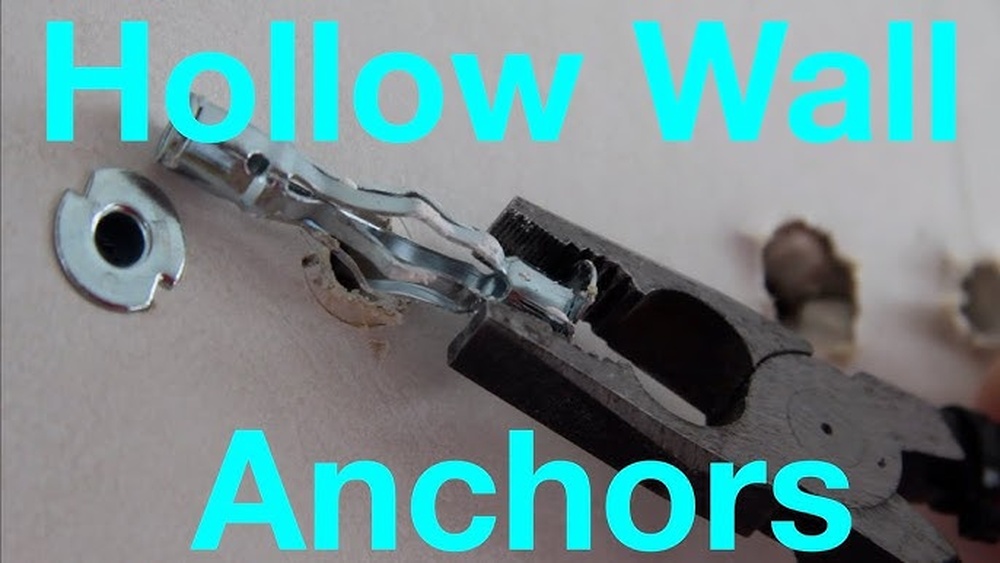
Collapsing The Sleeve
After removing the screw, the metal sleeve stays inside the wall. The sleeve is spread out and holds the anchor in place. Use pliers to gently squeeze the sleeve. This will collapse the metal wings inward. Be patient and avoid bending the sleeve too hard. Collapsing the sleeve makes it easier to pull out.
Prying Out The Anchor
Once the sleeve is collapsed, use a flathead screwdriver or pry bar. Insert it between the wall and the anchor. Gently pry the anchor out by rocking it back and forth. Pull the anchor carefully to avoid wall damage. If the anchor resists, collapse the sleeve more before prying. Clean the hole after removing the anchor for repairs or new anchors.
Repairing Wall After Removal
Removing metal wall anchors often leaves holes or damage on the wall surface. Repairing the wall properly restores a smooth, clean look. The process involves filling holes, sanding the area, and repainting. This helps the wall look new and ready for new decorations.
Filling Holes
Start by cleaning the holes from dust and loose debris. Use a putty knife to apply wall filler or spackle into each hole. Press the filler firmly to fill the entire space. Overfill slightly to allow for shrinkage as it dries. Let the filler dry completely, following the product instructions.
Sanding And Smoothing
After the filler dries, use fine-grit sandpaper to smooth the surface. Sand gently in circular motions until the patch is flush with the wall. Remove dust with a soft cloth or brush. This step is key for a seamless finish and prevents paint from peeling later.
Repainting Tips
Choose paint that matches your wall color for the best result. Use a small brush or roller to apply paint over the repaired area. Apply thin, even coats and let each dry before adding more. Blending edges with the existing paint helps hide the repair. Repeat as needed for full coverage.
Preventing Damage During Removal
Removing metal wall anchors can be tricky. The main goal is to take them out without harming your wall. Damaging the wall means extra work fixing holes or scratches. Careful methods help keep your wall smooth and ready for new anchors or paint. Use the right tools and gentle techniques to protect your surface.
Gentle Techniques
Start by tapping the anchor lightly with a hammer. This loosens it without pushing it deeper. Use pliers to pull the anchor slowly. Avoid sudden jerks that can tear drywall. If the anchor resists, try twisting it gently. This can help release it without damage.
Proper Tool Use
Choose tools made for wall repair. Needle-nose pliers are best for gripping small anchors. A screwdriver can help pry anchors out carefully. Avoid using large tools that can break the wall. Use a putty knife to push around the anchor if stuck. This reduces pressure on the wall surface.
When To Call A Professional
Some anchors are very tough to remove. If the wall starts cracking or breaking, stop. Call a professional to avoid costly damage. Experts have special tools and skills. They remove anchors safely and repair walls quickly. This saves time and money in the long run.

Credit: www.youtube.com
Frequently Asked Questions
How Do You Remove Metal Wall Anchors Safely?
To remove metal wall anchors safely, use pliers to grip the anchor’s rim firmly. Twist and pull gently to avoid wall damage. If stuck, drill around the anchor to loosen it before pulling out.
What Tools Help Remove Metal Wall Anchors Easily?
Common tools include needle-nose pliers, a screwdriver, and a drill. Pliers grip and pull the anchor, while a drill loosens it if stuck. These tools ensure a smooth, damage-free removal process.
Can Metal Wall Anchors Damage Drywall During Removal?
Yes, metal wall anchors can damage drywall if pulled forcefully. To prevent damage, twist anchors gently and use tools like pliers or a drill. Repair any minor holes with spackle for a clean finish.
Is It Possible To Reuse Metal Wall Anchors After Removal?
Reusing metal wall anchors is not recommended. Removal often bends or weakens them. For secure holding, always use new anchors when rehanging items on walls.
Conclusion
Removing metal wall anchors takes patience and the right tools. Start slowly to avoid wall damage. Use pliers or a drill for better grip and control. Clean the hole after removal for a smooth finish. Repair any marks with filler or paint.
With care, your wall will look as good as new. Practice these steps and feel confident handling anchors yourself. Simple methods save time and money in home repairs.