Are you ready to upgrade your home security with a Lockly Deadbolt? Installing this smart lock might seem tricky at first, but with the right steps, you can do it yourself quickly and easily.
Imagine having full control over who enters your home, all from your smartphone. In this guide, you’ll find simple instructions that anyone can follow, even if you’re not a DIY expert. By the end, you’ll have a secure, high-tech deadbolt installed and ready to protect what matters most to you.
Keep reading to discover how effortless it can be!
Choosing The Right Lockly Deadbolt
Choosing the right Lockly Deadbolt is key to securing your home effectively. The right model fits your door type and meets your security needs. This section helps you pick the best Lockly Deadbolt for your door. Understanding models, compatibility, and tools simplifies installation and use.
Models And Features
Lockly offers several deadbolt models with unique features. Some have fingerprint scanners for quick access. Others use PIN codes or smartphone control. Choose a model with features that suit your lifestyle. Consider battery life and backup options. Look for easy programming and strong security standards.
Compatibility With Doors
Check if the Lockly deadbolt fits your door’s thickness and style. Most models work with standard doors from 1 3/8 to 2 inches thick. Verify if your door has a standard bore hole size. Some models support single or double doors. Measure carefully to avoid installation problems.
Tools Needed For Installation
Gather basic tools before starting the installation. You will need a screwdriver, tape measure, and pencil. A drill helps if new holes are required. Some kits include a template for drilling. Prepare everything to make installation smooth and fast.
Preparing Your Door
Preparing your door is the first step before installing the Lockly deadbolt. This step ensures the lock fits well and works smoothly. It also helps avoid mistakes that can cause damage or poor security. Take your time and follow these simple steps to get your door ready.
Measuring Door Thickness
Check the thickness of your door. Use a tape measure to get the exact size. Lockly deadbolts fit doors between 1 3/8 inches and 2 inches thick. If your door is thinner or thicker, the lock may not fit correctly. Write down the measurement for later use.
Marking Drill Points
Mark where you will drill holes for the lock. Use a pencil and the template from the Lockly package. Hold the template on the door edge and face. Mark the holes for the latch and lock body. Accurate marks make drilling easier and prevent mistakes.
Removing Old Locks
Take out any old locks before installing the new one. Use a screwdriver to remove screws on the inside and outside. Pull the lock parts gently from the door. Clean the area to remove dirt or debris. This prepares the surface for the new deadbolt.
Installing The Deadbolt Hardware
Installing the deadbolt hardware is a key step to secure your door with the Lockly Deadbolt. It requires careful drilling, fitting, and fixing the parts correctly. Follow each step closely to ensure the lock works smoothly.
Drilling And Aligning
Start by marking the drill points on your door. Use the template that comes with the Lockly Deadbolt. Make sure the marks are level and centered. Drill holes for the deadbolt and the keypad or thumb turn. Keep the drill steady to avoid uneven holes. Proper alignment helps the deadbolt fit perfectly and work without sticking.
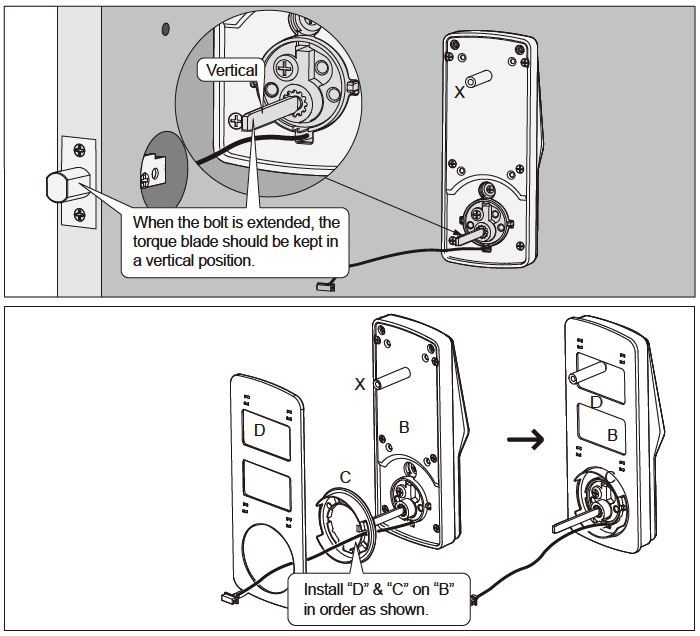
Attaching The Deadbolt Mechanism
Insert the deadbolt into the hole on the door edge. Align it with the drilled holes for screws. Use the screws provided to fix the deadbolt in place. Attach the exterior keypad or touchpad on one side. Fix the interior thumb turn on the other side. Check that the deadbolt slides smoothly when turning the thumb turn.
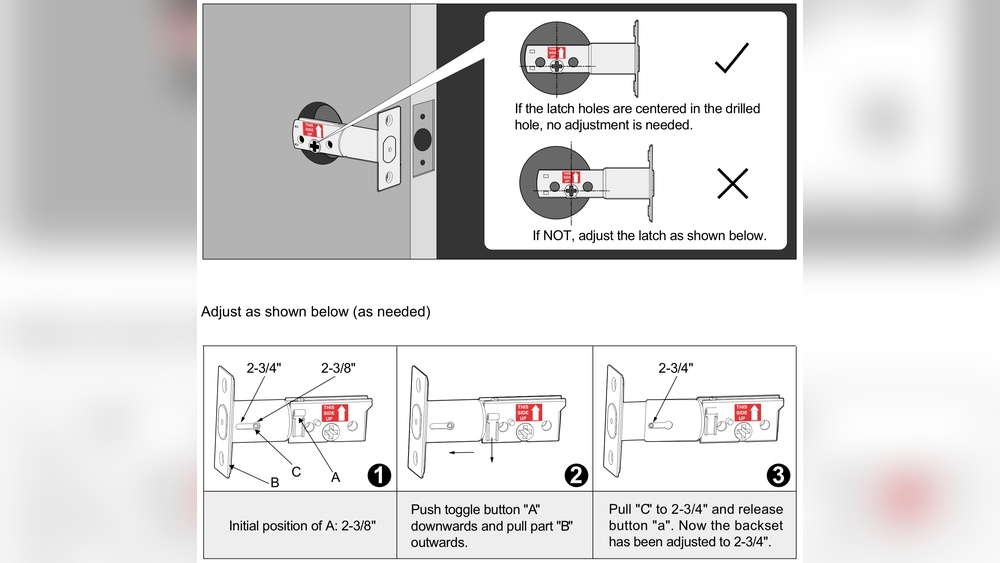
Securing The Strike Plate
Position the strike plate on the door frame where the deadbolt extends. Use the template to mark screw holes. Drill pilot holes to prevent wood splitting. Screw the strike plate firmly to the frame. A secure strike plate stops the door from moving when locked. Test the deadbolt by closing the door and locking it several times.
Credit: lockly.com
Setting Up The Electronic Components
Setting up the electronic components of your Lockly Deadbolt is a simple and crucial step. It ensures your lock works smoothly and responds to your commands. Follow each step carefully to enjoy full functionality.
This part includes installing batteries, connecting the keypad, and syncing with the mobile app. Each task is straightforward and designed for easy handling.
Installing Batteries
Start by opening the battery compartment on the inside part of the lock. Insert the batteries in the correct direction. Use the batteries that come with the package for best results. Close the compartment securely. The lock will power on, showing you it is ready for use.
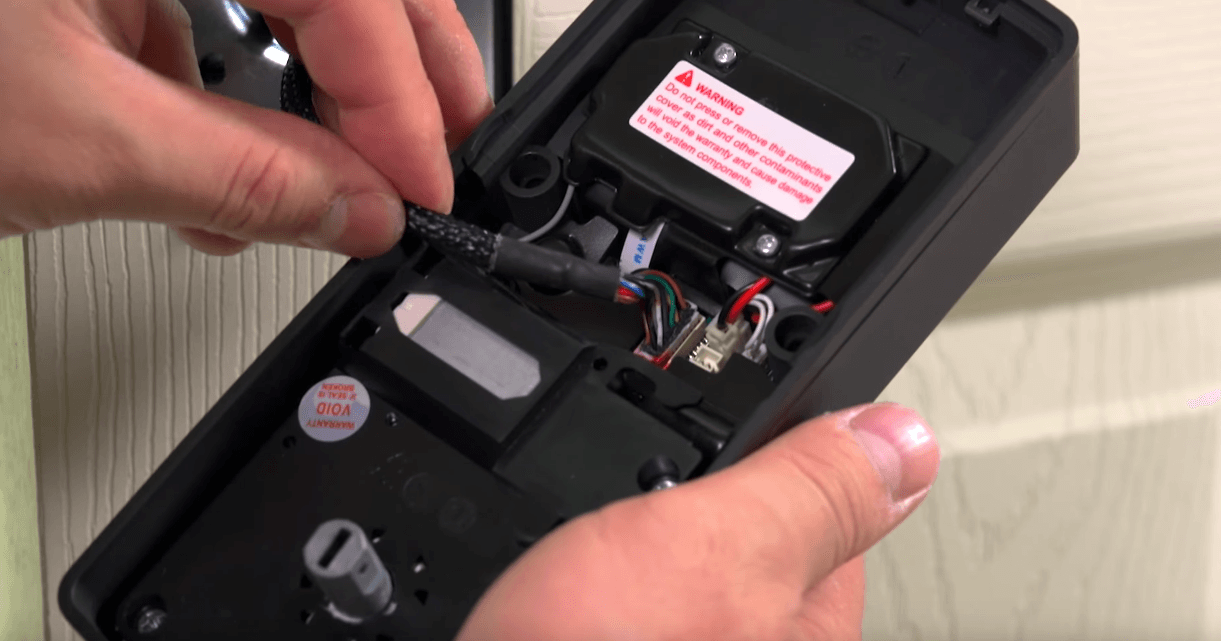
Connecting The Keypad
Attach the keypad to the front side of the door. Align it with the mounting plate and press firmly. Connect the keypad cable to the main lock unit. This connection allows the lock to receive your code entries. Test the keypad by pressing a few buttons. The lock should respond with lights or sounds.
Syncing With Mobile App
Download the Lockly app from your phone’s app store. Open the app and create an account. Follow the on-screen instructions to add a new lock. Use Bluetooth to connect your phone to the lock. The app will guide you to complete the setup. Once synced, control your lock from anywhere using the app.
Testing The Lockly Deadbolt
Testing the Lockly Deadbolt is a key step after installation. It ensures the lock works properly and keeps your home safe. This process helps confirm all functions respond as expected. Let’s explore how to test your new Lockly Deadbolt effectively.
Manual Lock And Unlock
Start by testing the lock manually. Turn the thumb turn inside the door to lock it. Check if the deadbolt fully extends into the door frame. Next, turn it back to unlock and ensure smooth retraction. Make sure the lock operates without sticking or resistance. This basic test confirms the physical installation is correct.
Remote Access Verification
Use the Lockly app or remote device to test access. Send a lock command and watch if the deadbolt moves accordingly. Then, send an unlock command and confirm the same action. Test this several times to ensure consistent response. Reliable remote control adds convenience and security to your home.
Troubleshooting Common Issues
If the lock does not work as expected, check the batteries first. Weak batteries often cause poor performance. Ensure the lock is properly aligned with the door frame. Misalignment can prevent the deadbolt from extending fully. Reset the lock through the app if it freezes or fails to respond. Review the user manual for specific error codes or signals. These steps fix most common problems quickly.

Credit: www.amazon.com
Maintaining Your Lockly Deadbolt
Maintaining your Lockly deadbolt ensures it works smoothly and lasts longer. Regular care prevents problems and keeps your home secure. Small steps can make a big difference.
Battery Replacement Tips
Check the battery level often. Low batteries can cause the lock to stop working. Use the recommended battery type for best results. Replace batteries before they run out completely. This avoids lockouts and errors.
Firmware Updates
Keep your lock’s software up to date. Updates fix bugs and improve security. Use the Lockly app to check for new firmware. Install updates as soon as they are available. This keeps your lock running smoothly and safely.
Regular Cleaning
Clean the lock surface gently with a soft cloth. Avoid harsh chemicals that can damage the finish. Remove dust and dirt from the keypad and keyhole. Regular cleaning helps the lock respond better to touch. It also keeps the lock looking new.
Credit: www.support.lockly.com
Frequently Asked Questions
How Do I Install A Lockly Deadbolt Step-by-step?
First, remove your old deadbolt and clean the door surface. Align the Lockly template and drill holes as needed. Insert the lock mechanism, attach the keypad and interior assembly, then secure screws tightly. Finally, program your lock following the instructions in the user manual.
What Tools Are Needed For Lockly Deadbolt Installation?
You will need a Phillips screwdriver, drill, drill bits, measuring tape, and pencil. A chisel may be required to adjust the door frame. Ensure you have these tools ready before starting to make the installation process smooth and efficient.
Can I Install Lockly Deadbolt On Any Door Type?
Lockly deadbolts fit most standard wooden and metal doors with thickness between 1-3/8 and 2 inches. Check your door’s measurements before installation. Specialized doors like glass or unusually thick doors may require additional modifications or professional help.
How Long Does It Take To Install A Lockly Deadbolt?
Installation typically takes 20 to 40 minutes for an average DIYer. It depends on your experience and door condition. Carefully following the instructions can reduce installation time and ensure proper lock functionality.
Conclusion
Installing the Lockly deadbolt adds strong security to your home. Follow each step carefully for the best results. Take your time and double-check your work. The process is simple and does not need special tools. Enjoy the peace of mind from a safer door lock.
Keep your instructions handy for future reference. Your home feels safer with this easy upgrade.