Are you ready to add a deadbolt lock to your door but unsure where to start? Cutting the perfect hole for a deadbolt can feel tricky if you’ve never done it before.
But don’t worry—you can do it yourself with the right steps and tools. In this guide, you’ll discover simple, clear instructions that make the process easy and stress-free. By the end, you’ll have the confidence to secure your door like a pro.
Keep reading to learn exactly how to cut a deadbolt hole in your door the right way.
Tools Needed
Before cutting a deadbolt hole in your door, gather the right tools. Using proper tools ensures a clean, accurate cut. It also makes the task easier and safer. Each tool plays a specific role in the process.
Measuring Tape And Pencil
Measure the door carefully to mark the hole position. Use a pencil to draw precise guide lines. Accurate marking helps avoid mistakes. Mark the door’s edge and face for hole alignment.
Drill And Hole Saw
A drill powers the hole saw for cutting. Choose a hole saw sized for your deadbolt. The hole saw creates a clean, round hole quickly. Ensure the drill has enough battery or power supply.
Chisel And Hammer
Use a chisel to clean up the hole edges. The hammer helps tap the chisel gently. This step smooths rough spots and fits the lock better. Work slowly to avoid damaging the door.
Safety Gear
Wear safety glasses to protect your eyes from debris. Use gloves to keep your hands safe. A dust mask prevents inhaling sawdust. Safety gear reduces injury risks during cutting.

Credit: www.youtube.com
Choosing The Right Door
Choosing the right door is the first step to cutting a deadbolt hole successfully. The door affects the lock’s security and fit. Not every door works well with a deadbolt. Consider a few key points before starting your project.
Material Considerations
Doors come in wood, metal, fiberglass, and composite materials. Wood doors are easier to drill but may split if not careful. Metal doors need special drill bits and more effort. Fiberglass doors can crack without proper tools. Choose a door material that matches your skill and tools.
Door Thickness
Deadbolts need a certain door thickness to fit properly. Most deadbolts require doors between 1 3/8 inches and 1 3/4 inches thick. Thinner doors may not hold the lock securely. Thicker doors might need adjustments to the deadbolt size. Measure your door thickness before cutting.
Pre-existing Damage Check
Inspect the door for cracks, dents, or rotted wood. Damage weakens the door’s strength and security. Avoid cutting into damaged areas. Fix any problems or choose a different door. A strong, intact door ensures a long-lasting deadbolt installation.
Marking The Door
Marking the door correctly is the first step to install a deadbolt. Precise marks ensure the holes align perfectly. This helps the deadbolt work smoothly and fit securely.
Take your time to measure and mark. Rushing leads to mistakes and wasted materials. Use a pencil and ruler for clear, visible lines.
Locating The Deadbolt Height
Most deadbolts sit about 6 to 12 inches above the doorknob. Measure from the floor or doorknob to find the right spot. Mark this height clearly on the door edge and face. This mark guides the hole placement for the deadbolt.
Marking The Edge For Bore Hole
Place the deadbolt template or the lock itself on the door edge. Align it with the height mark you made. Draw a circle where the bore hole will go. This hole should fit the lock cylinder snugly.
Marking The Face For Latch Plate
Open the door and look at the edge mark. Use a square to extend the mark onto the door face. This shows where the latch plate will fit. Draw the rectangle shape of the latch plate clearly. It will guide chiseling later.
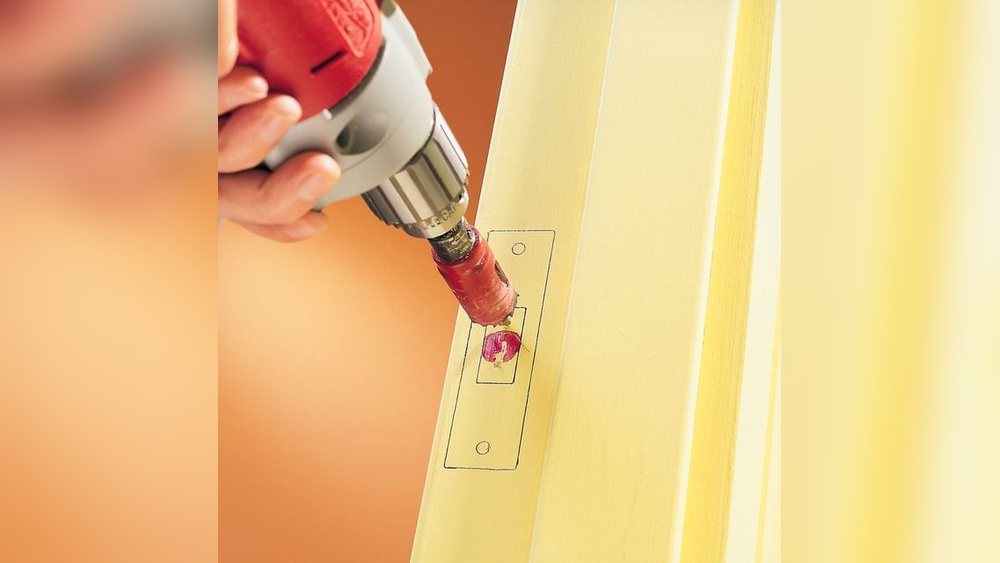
Drilling The Bore Hole
Drilling the bore hole is a key step in installing a deadbolt lock. It creates the round hole for the lock body. This process must be done carefully for a perfect fit. The hole size and position affect how well the deadbolt works. Use the right tools and follow precise steps. Safety and accuracy are important here.
Setting Up The Drill
Choose a drill with a hole saw bit that matches the deadbolt size. Usually, a 2-1/8 inch bit is needed. Mark the door with a pencil where the hole will go. Use a template if your lock kit provides one. Secure the door or work on a stable surface. Wear safety glasses to protect your eyes.
Drilling Through The Door Face
Start drilling slowly from the door’s face side. Keep the drill straight and steady. Stop when you reach about halfway through the door. This prevents splintering the wood on the other side. Do not force the drill. Let the bit cut smoothly through the wood.
Drilling From Both Sides
Turn the door over and align the drill on the mark. Drill from the opposite side to meet the first hole. This method reduces tear-out and creates a clean hole. Check that both holes line up perfectly. Clean out any sawdust inside the hole before fitting the lock.
Cutting The Latch Hole
Cutting the latch hole is a key step when installing a deadbolt. This hole holds the latch that secures the door. Accurate cutting ensures the deadbolt works smoothly and fits well. Taking time to drill and chisel carefully helps avoid damage to the door. Follow these steps for a clean, precise latch hole.
Drilling The Latch Hole
Mark the latch hole location on the door edge. Use a hole saw drill bit that matches the latch size. Drill slowly and steady to avoid splintering the wood. Drill halfway through from one side. Then, drill from the other side to meet the first hole. This method prevents tear-out on the door face.
Chiseling For The Latch Plate
Place the latch into the drilled hole. Trace the latch plate outline on the door edge. Use a sharp chisel to carve out this outline. Chisel carefully to create a shallow recess. The latch plate should sit flush with the door edge. Take small, controlled cuts for best results.
Ensuring A Flush Fit
Check the latch plate fit by pressing it into the recess. It should not stick out or sit too deep. Sand any rough edges around the hole and recess. Test the latch by moving it in and out. Adjust the chiseling if the latch feels tight or loose. A flush fit ensures smooth deadbolt operation.

Credit: www.youtube.com
Installing The Deadbolt
Installing the deadbolt is the key step after cutting the hole in your door. This process ensures your lock works smoothly and keeps your home secure. Take your time with each part to avoid mistakes and ensure a perfect fit.
Fitting The Deadbolt Mechanism
Place the deadbolt mechanism into the hole on the edge of the door. Make sure the bolt slides out smoothly. Align the mechanism so the screw holes match the pre-drilled holes. Use a screwdriver to secure the screws tightly. Avoid overtightening to prevent damage.
Securing The Latch Plate
Position the latch plate over the bolt on the door edge. The plate must sit flush with the door surface. Mark the screw holes, then drill pilot holes if needed. Fasten the latch plate with screws to hold it firmly. This step prevents the deadbolt from moving out of place.
Testing The Lock Operation
Turn the key or thumb turn to test the deadbolt. The bolt should move smoothly in and out. Check for any sticking or resistance. Adjust the mechanism or latch plate if the lock feels tight. Test several times to confirm proper function before finishing.
Troubleshooting Fit Issues
Sometimes the deadbolt hole does not fit perfectly. This can cause problems with installing the lock. Troubleshooting these fit issues is important. It helps ensure the deadbolt works smoothly and securely.
Small mistakes in measuring or drilling can cause problems. Fixing these issues saves time and effort. The door will look better and function well.
Adjusting Hole Size
If the hole is too small, it will block the lock parts. Use a drill or file to enlarge the hole carefully. Remove small amounts at a time. Check the fit often to avoid making the hole too big.
If the hole is too large, the lock may not sit tight. Use wood filler or a thin piece of wood to fill gaps. Sand the surface smooth before installing the lock again.
Fixing Misaligned Holes
Misaligned holes can stop the deadbolt from working. Mark the correct position clearly. Use a drill guide or template to keep holes straight. Re-drill if needed, keeping the drill steady.
Fill old holes with wood filler. Let it dry, then sand smooth. This strengthens the door and improves the look.
Sealing And Finishing
Sealing the hole protects the door from moisture. Use a wood sealant or paint inside the hole. This prevents swelling or damage over time.
Finish the door surface to match the rest. Sand, paint, or stain around the hole. This helps the door look clean and new.

Credit: diy.stackexchange.com
Frequently Asked Questions
How Do I Measure For A Deadbolt Hole?
Measure the door thickness and mark the height for the deadbolt. Use a template to mark the hole diameter on the door face and edge. Accurate measurements ensure proper alignment and a secure fit for your deadbolt lock.
What Tools Are Needed To Cut A Deadbolt Hole?
You need a power drill, hole saw bit, spade bit, chisel, tape measure, pencil, and safety goggles. These tools help you drill precise holes and create a clean mortise for the deadbolt installation.
Can I Cut A Deadbolt Hole Without A Template?
Using a template is highly recommended to ensure accuracy. Without it, measurements may be off, causing misalignment. Templates simplify marking the correct hole size and placement, reducing errors during installation.
How Thick Should The Door Be For A Deadbolt?
Standard door thickness for deadbolts is usually 1 3/4 inches. Doors thinner than this may not support a secure deadbolt installation. Always check your lock’s specifications before drilling to ensure compatibility.
Conclusion
Cutting a deadbolt hole in a door is easier than it seems. Take your time and measure carefully before starting. Use the right tools for clean, precise cuts. Practice on scrap wood if possible. Safety matters—wear protective gear during the process.
A well-cut hole helps your deadbolt work smoothly. You can improve your door’s security with this simple step. Keep your instructions handy for future reference. With patience and care, you will succeed. Ready to make your door safer? This skill is useful for many home projects.