Have you ever wished you could unlock all your doors with just one key? Master keying a Kwikset deadbolt can save you time, reduce the number of keys you carry, and make your life simpler.
But how do you get started? This guide will walk you through the easy steps to master key your Kwikset deadbolt, even if you’ve never done it before. By the end, you’ll have the confidence to customize your locks and enjoy seamless access throughout your home or office.
Keep reading—you’re about to unlock a smarter way to secure your space.
Choosing The Right Tools
Choosing the right tools is the first step in keying a Kwikset deadbolt. Having proper tools makes the job easier and faster. It also helps avoid mistakes. Using the wrong tools may damage the lock or the key. Below are the tools you need for this task.
Essential Tools For Keying
Start with basic tools designed for keying deadbolts. A key gauge is vital. It measures the key cuts accurately. A key decoder helps read the current key codes. A key blank fits the Kwikset deadbolt type. A key cutting machine or a hand file shapes the blank key. A tension wrench and a pick set may help if you need to disassemble the lock. These tools ensure precise and clean key cutting.
Optional Accessories To Simplify The Process
Some tools make the process smoother but are not necessary. A key code book or chart shows standard cut depths. A magnifying glass helps see small details on the key or lock. A lubricant spray keeps the lock parts moving freely. A work mat organizes small parts and tools. These accessories save time and reduce frustration. They help keep your workspace neat and focused.
Preparing The Kwikset Deadbolt
Preparing the Kwikset deadbolt is the first step in the keying process. It helps ensure smooth operation and proper fit. Taking time to prepare the lock saves effort later.
Start by checking the lock’s current condition. Clean parts work better and last longer. A well-prepared deadbolt makes keying easier and more accurate.
Removing The Existing Cylinder
Begin by opening the door and locating the screws on the lock’s interior side. Use a screwdriver to remove these screws carefully. Pull the interior knob or lever away from the door. The cylinder should slide out smoothly from the exterior side.
Keep the screws and parts safe for reassembly. Avoid forcing the cylinder out. Gentle pressure prevents damage to the lock mechanism. The removed cylinder reveals the key pins and plug inside.
Inspecting Components For Wear
Examine the cylinder and plug for signs of damage. Look for scratches, dents, or worn edges. Check the pins inside the cylinder for dirt or corrosion. Dirty pins can cause the lock to stick or fail.
Replace any parts that look damaged or worn. Clean the pins and plug with a soft cloth. Lubricate the cylinder lightly with graphite powder. This helps the pins move freely during keying.
Decoding The Lock Mechanism
Understanding the lock mechanism is the first step in working with a Kwikset deadbolt. The lock uses pins inside the cylinder to keep it secure. Each pin must match the key’s cuts perfectly to allow the lock to turn. Learning how these parts fit together helps in adjusting or creating keys that work smoothly.
By decoding the lock, you can see how each pin interacts with the key. This knowledge makes it easier to change the lock settings or fix issues. Let’s explore the key parts of the mechanism and how to read the key’s design.
Identifying Pin Configurations
Inside the Kwikset deadbolt, small pins sit in a row. These pins vary in length and shape. The combination of these pins creates the lock’s unique code. Each pin matches a specific depth on the key.
Look closely at the pins to see their order and size. The correct pin setup lifts the cylinder just right. Too high or too low, and the lock won’t turn. Knowing pin positions helps in rekeying or making duplicate keys.
Reading Key Cuts And Depths
Keys have a series of cuts along their edge. Each cut has a depth that lines up with a pin inside the lock. The deeper the cut, the shorter the pin needed. Shallow cuts need longer pins.
Use a key gauge or ruler to measure these cuts. Notice how the pattern repeats for each pin. Reading this pattern lets you understand which pins to change. It also helps in making new keys that fit perfectly.

Credit: www.youtube.com
Cutting New Keys
Cutting new keys for a Kwikset deadbolt requires precision and the right tools. It is important to follow each step carefully. This ensures the key works smoothly and fits the lock perfectly. Proper cutting prevents damage to the lock and provides easy access.
Selecting The Correct Key Blanks
Choose key blanks that match your Kwikset deadbolt model. Look for blanks labeled for Kwikset or similar brands. Using the wrong blank can cause the key to fail or damage the lock. Check the shape and size of the blank before buying. Quality blanks help create a durable and reliable key.
Step-by-step Cutting Process
Start by securing the key blank in a key cutting machine. Align it carefully with the original key or code. Follow the machine’s guide to cut the new key. Cut slowly and steadily to avoid mistakes. After cutting, smooth the edges with a file. Test the new key in the lock. It should turn easily without sticking.
Rekeying The Deadbolt Cylinder
Rekeying a Kwikset deadbolt cylinder changes the lock to work with a new key. This process helps improve security without buying a new lock. It involves taking apart the cylinder, swapping pins and springs, and putting it back together. Each step needs care to avoid damage.
Disassembling The Cylinder
Start by removing the deadbolt from the door. Take out the screws holding the cylinder in place. Pull the cylinder out gently. Use a follower tool to push the plug out. Be careful not to lose small parts inside. The plug holds pins that match the key.
Replacing Pins And Springs
Remove the old pins from the plug. Check the new key to find the correct pin sizes. Match each pin to the key cuts. Insert new pins into the plug slots. Make sure pins sit flush with the plug surface. Springs stay in the cylinder housing. Replace any broken springs for smooth function.
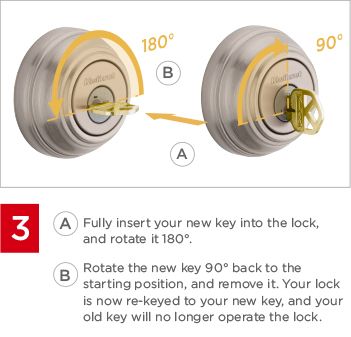
Reassembling And Testing
Slide the plug back into the cylinder using the follower tool. Tighten screws to secure the cylinder in the lock. Test the new key to turn the deadbolt smoothly. Check the lock works from both sides of the door. Adjust pins if the key does not turn easily. Proper reassembly ensures the lock is secure and functional.
Troubleshooting Common Issues
Troubleshooting common issues with your Kwikset deadbolt saves time and stress. Small problems often have simple fixes. Understanding these problems helps you keep your lock working well. Follow these tips to solve frequent difficulties quickly.
Key Not Turning Smoothly
One cause is dirt or debris inside the lock. Clean the key and lock with a soft cloth. Use a graphite powder lubricant to ease the key’s movement. Avoid oil-based lubricants; they attract dust. Check if the key is bent or worn. A damaged key may need replacement. Make sure the lock is aligned correctly with the door. Misalignment can stop the key from turning smoothly.
Lock Jamming Or Sticking
Jamming often happens because of rust or dirt buildup. Spray a small amount of graphite powder into the keyhole. Turn the key gently to spread the lubricant inside. Cold weather can cause the lock to freeze. Warm the lock with a cloth or hairdryer before use. Check the door’s fit; swelling wood can pinch the lock. Tighten any loose screws around the lock to prevent sticking.
Maintenance Tips For Longevity
Maintaining your Kwikset deadbolt ensures it works smoothly for years. Regular care prevents problems and keeps your lock secure. Simple steps can extend its life and save money on repairs.
Lubrication Best Practices
Use graphite powder or silicone spray to lubricate the lock. Avoid oil-based products as they attract dirt and dust. Apply a small amount inside the keyhole and turn the key several times. Wipe away any excess lubricant to prevent buildup. Repeat lubrication every six months for best results.
Regular Inspection Routines
Check your deadbolt for signs of wear or damage regularly. Look for loose screws or parts that do not move smoothly. Test the key and lock operation to spot any sticking or resistance. Tighten screws gently if needed. Early detection of issues helps avoid costly repairs later.
Credit: www.homedepot.com
When To Call A Professional
Knowing when to call a professional for rekeying a Kwikset deadbolt is important. Some situations need expert help to avoid mistakes and ensure security. Understanding these moments can save time and protect your home.
Complex Rekeying Scenarios
Some rekeying jobs are not simple. If the lock is old or damaged, a professional is best. They have the tools and skills to handle tricky locks. Complex setups, like master key systems, need special knowledge. Trying these at home can cause more problems.
Security Concerns And Upgrades
Security is the main reason to rekey locks. Professionals can suggest better options for your Kwikset deadbolt. They know how to improve lock strength and pick resistance. When upgrading, experts make sure the new keys work right. They also check for other weak spots in your security.
Credit: www.kwikset.com
Frequently Asked Questions
How Do I Start Mastering Keying A Kwikset Deadbolt?
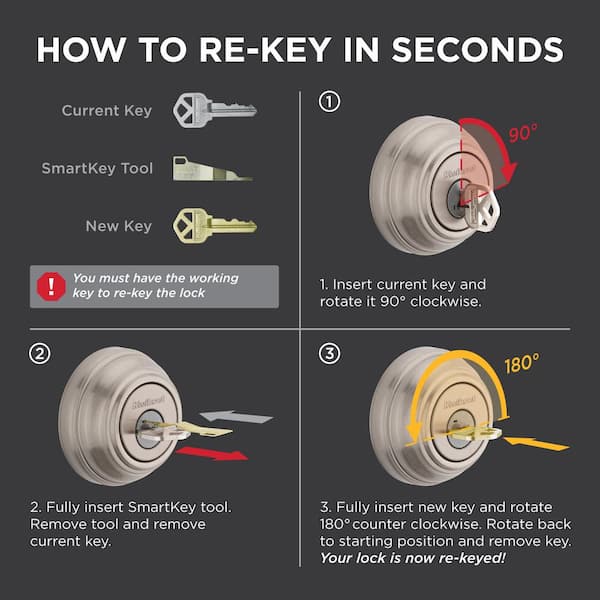
Begin by understanding the lock’s pin tumbler system. Use proper tools like a key gauge and pinning kit. Follow step-by-step guides for disassembling and rekeying Kwikset deadbolts carefully.
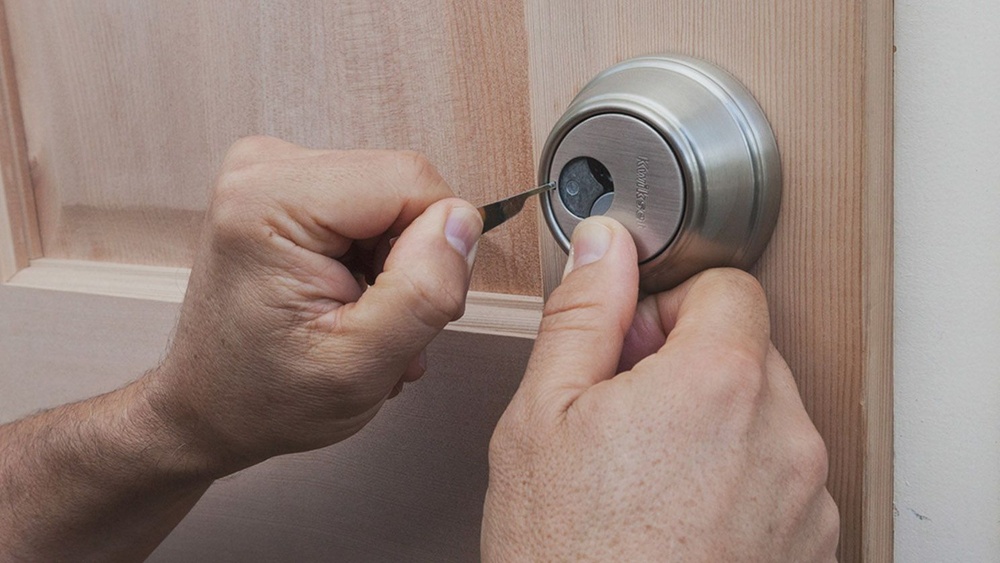
Can I Rekey A Kwikset Deadbolt Without Removing It?
Yes, some Kwikset models allow rekeying without removal. Use a Kwikset rekeying tool and follow manufacturer instructions precisely for safe, effective rekeying.
What Tools Are Essential For Kwikset Deadbolt Rekeying?
You need a key gauge, pinning kit, tweezers, plug follower, and a screwdriver. These tools help you remove pins and reset the lock accurately.
How Long Does It Take To Rekey A Kwikset Deadbolt?
Rekeying usually takes 15 to 30 minutes. Time depends on your experience and the lock’s complexity. Practice speeds up the process.
Conclusion
Mastering keying a Kwikset deadbolt takes patience and practice. Follow the steps carefully and take your time. Always use the right tools to avoid damage. Keep your workspace organized and clean for better results. Remember, safety is important—work in a well-lit area.
With steady hands and attention, you can do it yourself. This skill saves time and money on locksmith visits. Try it once, and you will feel more confident next time. Small efforts lead to big improvements in home security. Keep learning, and don’t rush the process.