Are you tired of struggling with loose screws and unstable wall fixtures? Using a wall anchor tool can make your life so much easier.
Imagine hanging your shelves, pictures, or hooks with confidence, knowing they’ll stay put. In this guide, you’ll learn exactly how to use a wall anchor tool step by step—no guesswork, no frustration. Keep reading, and you’ll soon master a simple trick that turns any wall into a strong, reliable support for your favorite things.
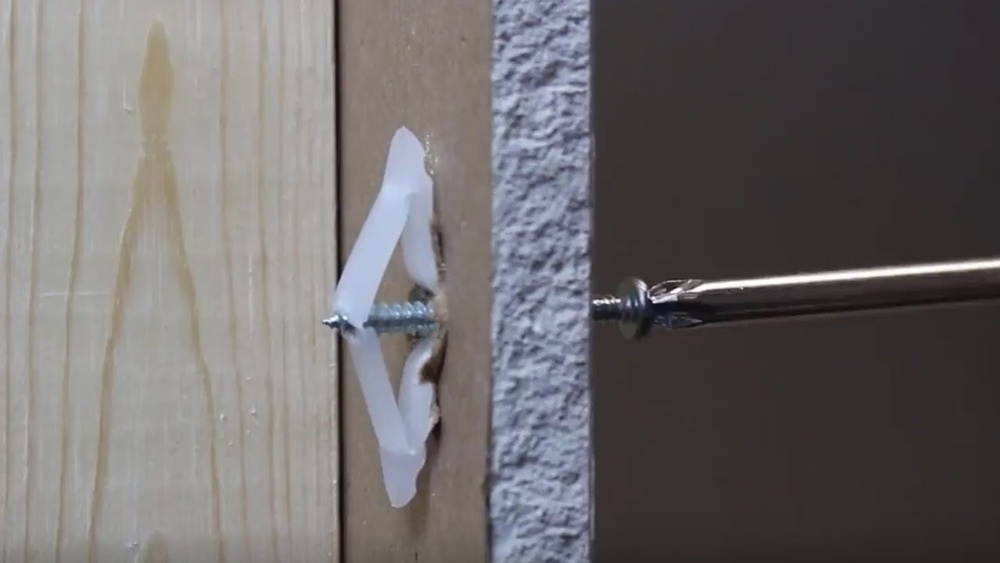
Credit: www.rowleycompany.com
Types Of Wall Anchors
Wall anchors provide strong support for hanging items on walls. They keep screws secure in drywall, plaster, or hollow walls. Different anchors fit different wall types and weights. Choosing the right anchor makes your project safe and sturdy.
Plastic Expansion Anchors
Plastic expansion anchors are common and easy to use. Insert them into a drilled hole. As the screw goes in, the anchor expands. This creates a tight grip inside the wall. Best for light to medium loads like picture frames.
Toggle Bolts
Toggle bolts have metal wings that open behind the wall. These wings spread the load over a larger area. They hold heavy objects on hollow walls. Use them for shelves, mirrors, or heavy decorations.
Molly Bolts
Molly bolts are metal anchors that expand inside the wall. Tightening the screw pulls the sleeve outward. This locks the anchor in place. Suitable for medium to heavy loads and hollow walls.
Self-drilling Anchors
Self-drilling anchors do not need pre-drilling. Screw them directly into drywall. They create their own hole and grip. Ideal for quick installation and light to medium weight items.
Tools Needed For Installation
To install a wall anchor correctly, having the right tools is important. Each tool plays a specific role in making the process smooth and safe. Preparing these tools before starting saves time and effort.
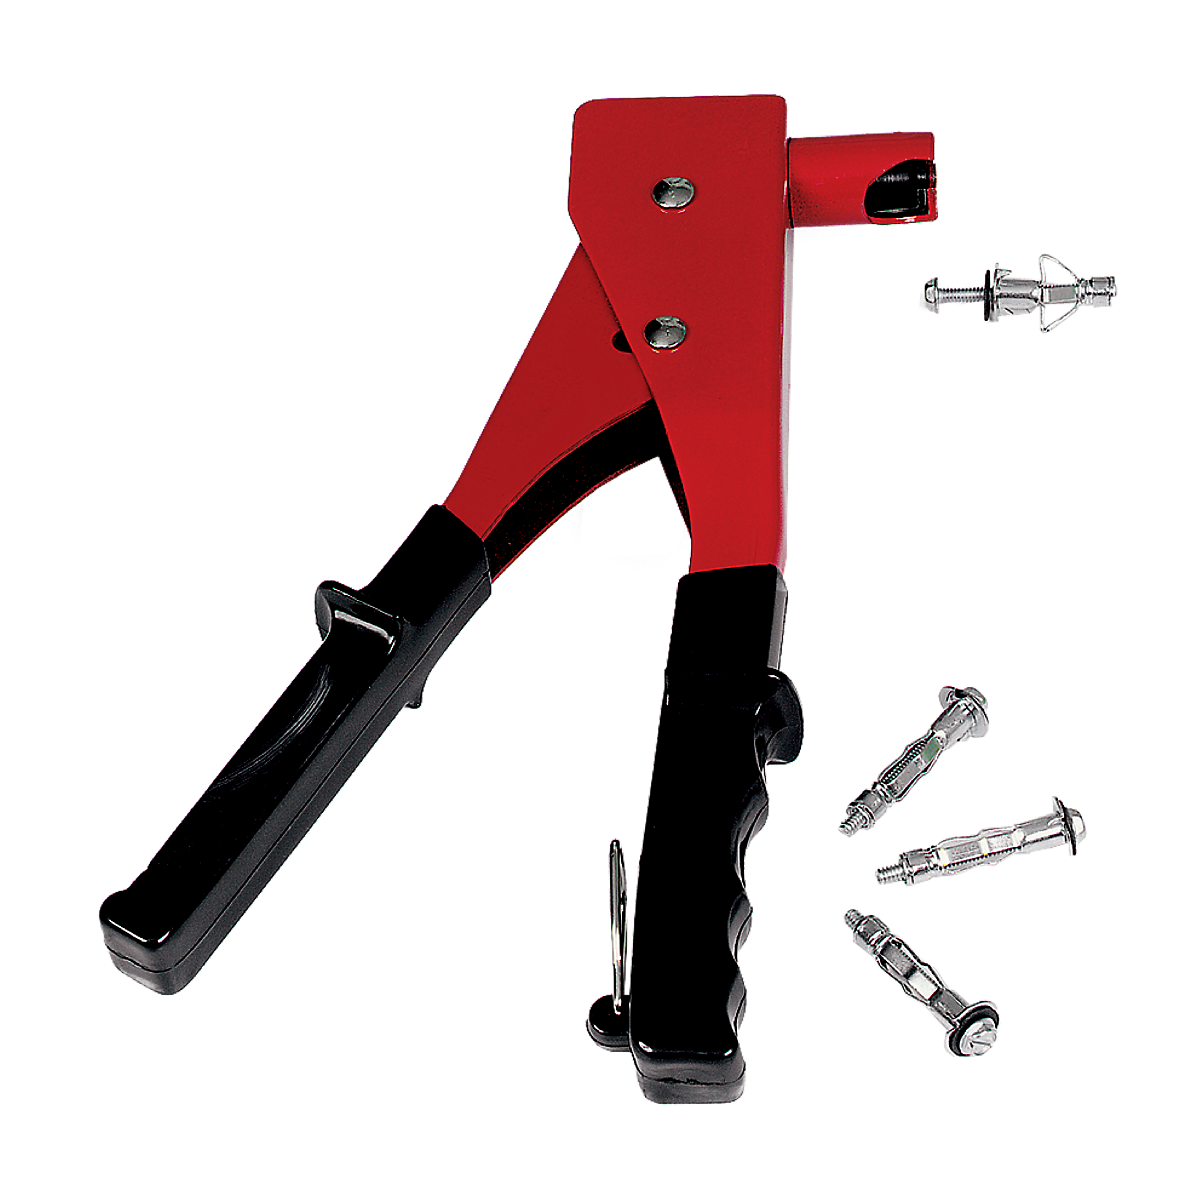
Wall Anchor Tool
The wall anchor tool helps insert the anchor into the wall. It ensures the anchor fits tightly and holds well. Using this tool reduces damage to the wall and keeps the anchor steady.
Drill And Drill Bits
A drill creates the hole for the anchor in the wall. Choose drill bits that match the anchor size. The right drill bit size prevents the hole from being too big or small.
Screwdriver
A screwdriver tightens the screw into the wall anchor. Use the correct screwdriver type for the screw head. This tool helps secure the item firmly to the wall.
Measuring Tape And Pencil
Measuring tape measures the exact spot for the anchor. Mark the spot with a pencil for precise drilling. Accurate marks help avoid mistakes and ensure a straight installation.
Choosing The Right Anchor
Choosing the right anchor is essential for a strong and safe hold. Different walls need different anchors. Picking the correct one prevents damage and keeps items secure. This guide helps you choose anchors that fit your wall and load.
Assessing Wall Material
Start by checking your wall type. Drywall, concrete, brick, and plaster each need special anchors. Drywall anchors work well in hollow walls. Concrete and brick require heavy-duty anchors. Knowing your wall material guides your anchor choice.
Weight Capacity Considerations
Think about the item’s weight before picking an anchor. Light items need small anchors. Heavy items need anchors that hold more weight. Always choose anchors that support more than the item’s weight. This keeps your installation safe and steady.
Anchor Size Selection
Anchor size matters for a secure fit. Small anchors suit lightweight objects and thin walls. Large anchors work best for heavy items and thick walls. Match anchor size with the screw and wall thickness. Proper size prevents anchors from slipping or breaking.

Credit: www.clickair.ma
Preparing The Wall
Preparing the wall is an important step before using a wall anchor tool. This step ensures the anchor fits well and holds firmly. A well-prepared wall prevents damage and keeps your item secure.
Marking The Spot
Start by choosing the exact spot for the wall anchor. Use a pencil to mark the point clearly. Double-check the height and position before marking. This helps avoid mistakes and keeps the installation accurate.
Drilling The Hole
Select the right drill bit size for your anchor. Drill straight into the marked spot carefully. Stop once you reach the required depth. A clean, precise hole makes it easier to insert the anchor.
Cleaning The Hole
Remove dust and debris from the drilled hole. Use a small brush or blow air inside. A clean hole helps the anchor grip better. It also prevents loose materials from weakening the hold.
Using The Wall Anchor Tool
Using a wall anchor tool makes hanging items on walls easier and stronger. This tool helps secure anchors in drywall or other surfaces. It ensures the anchor stays firmly in place.
Follow these simple steps to use the wall anchor tool properly. Each step builds on the last for a secure hold.
Inserting The Anchor
Start by choosing the right size anchor for your screw. Place the anchor at the hole in the wall. Push the wall anchor tool over the anchor carefully. Press gently to insert the anchor fully into the wall. Make sure the anchor sits flush with the wall surface.
Expanding The Anchor
Once the anchor is in place, use the tool to expand it. Turn or press as the tool instructs. The anchor will widen inside the wall for a tight fit. This expansion holds the anchor firmly and prevents it from slipping out. Check that the anchor feels secure before moving on.
Securing The Screw
After the anchor expands, insert the screw into the anchor. Use a screwdriver or drill to tighten the screw slowly. Do not overtighten; this can damage the anchor or wall. The screw should be tight and hold the item without wobbling. Your wall anchor is now ready to support weight safely.
Tips For Secure Mounting
Secure mounting is key to ensuring your wall anchors hold well. Proper technique helps prevent damage and keeps items safely in place. Follow these simple tips for the best results when using a wall anchor tool.
Avoiding Over-tightening
Do not tighten the anchor too much. Over-tightening can strip the anchor or damage the wall. Turn the tool slowly and stop as soon as the anchor feels firm. This keeps the anchor secure without causing harm.
Checking Anchor Stability
After installation, gently wiggle the anchor to test its hold. A stable anchor should not move or feel loose. If it does, remove it and try a new spot. A tight anchor ensures your item stays safe on the wall.
Using Multiple Anchors For Heavy Loads
Heavy items need extra support. Use two or more anchors spaced evenly to spread the weight. This prevents stress on one anchor and keeps your mount strong. Always check the weight limit of your anchors before use.
Common Mistakes To Avoid
A wall anchor tool helps secure items to walls safely. Using it correctly is important for strong support. Many people make simple mistakes that weaken the hold. Avoiding these errors keeps your items safe and your walls intact.
Wrong Anchor Type
Choosing the wrong anchor type causes poor support. Some anchors work only for drywall. Others suit concrete or brick walls. Match the anchor to your wall material for best results. Using the wrong anchor can cause it to fail.
Improper Hole Size
Drilling the wrong hole size leads to weak anchors. Too small a hole makes it hard to insert the anchor. Too big a hole lets the anchor slip or break. Measure carefully and follow the anchor’s instructions exactly.
Ignoring Wall Material
Different walls need different anchors and tools. Drywall, plaster, brick, and concrete all react differently. Using the same anchor on every wall can cause damage. Know your wall type before choosing your anchor and drill bit.

Credit: www.youtube.com
Maintenance And Removal
Proper maintenance and removal of wall anchors help keep your walls strong. Neglecting these steps can cause damage over time. Regular checks and careful removal ensure your walls stay intact and safe.
Inspecting Anchors Over Time
Check anchors regularly for signs of loosening or damage. Look for cracks around the anchor or movement when you touch it. Tighten loose anchors gently using the wall anchor tool. Replace anchors that show wear or no longer hold firmly.
Removing Anchors Safely
Use the right tool to avoid wall damage during removal. Gently pull or twist the anchor to loosen it from the wall. If the anchor is stuck, use pliers carefully to avoid tearing the wall. Remove all parts of the anchor to prevent future problems.
Repairing Wall Damage
Fill holes left by anchors with spackle or wall filler. Smooth the area with a putty knife for a clean finish. Let the filler dry completely before sanding it smooth. Paint over the repaired area to match the wall color. This keeps your wall looking neat and strong.
Frequently Asked Questions
What Is A Wall Anchor Tool Used For?
A wall anchor tool helps install anchors securely into walls. It ensures a tight fit for screws in drywall or masonry. This tool prevents anchors from spinning or damaging the wall during installation. It makes hanging heavy items safer and easier.
How Do You Use A Wall Anchor Tool Correctly?
First, drill a pilot hole in the wall. Insert the wall anchor into the hole. Use the wall anchor tool to expand or set the anchor. Ensure the anchor is flush with the wall surface. Then, insert the screw to secure your item.
Can I Use A Wall Anchor Tool On Any Wall Type?
Wall anchor tools work best on drywall and masonry walls. They are not suitable for plaster or hollow walls without reinforcement. Always check the anchor type and wall material before use. Using the right tool improves hold and prevents damage.
What Types Of Wall Anchors Require A Wall Anchor Tool?
Toggle bolts, molly bolts, and expansion anchors often need a wall anchor tool. These anchors expand or lock behind the wall when set. The tool helps apply the right pressure for a secure fit. Using it ensures strong support for heavy objects.
Conclusion
Using a wall anchor tool makes hanging items secure and safe. Choose the right anchor for your wall type. Drill a hole carefully and insert the anchor firmly. Tighten screws slowly to avoid damage. This simple tool helps hold shelves, pictures, and more.
Practice a few times to build confidence. Enjoy a neat, strong hold for your projects. Keep your walls safe and your items steady. Small steps lead to great results.