Are your Lutron automatic light switches not working exactly the way you want? Maybe the lights turn off too quickly or stay on longer than necessary.
Adjusting these switches can save you energy, improve your comfort, and make your home smarter. In this guide, you’ll discover simple steps to customize your Lutron automatic light switch settings without any hassle. Keep reading, and you’ll have full control over your lighting in no time.

Credit: www.youtube.com
Tools Needed
Adjusting a Lutron automatic light switch requires a few basic tools. These tools help you work safely and make the process easier. Having the right tools ready saves time and prevents damage to the switch or your wall.
Flathead Screwdriver
A flathead screwdriver is needed to remove the switch plate. It fits into the small screws holding the plate in place. Using the correct size avoids stripping the screws.
Phillips Screwdriver
The Phillips screwdriver removes the screws that hold the switch to the electrical box. It has a cross-shaped tip for a secure grip. This tool is essential for loosening and tightening screws safely.
Voltage Tester
A voltage tester checks if the power is off before you touch any wires. It protects you from electric shocks. Always test the wires to ensure the circuit is dead.
Wire Strippers
Wire strippers remove the insulation from wires if you need to adjust connections. They help create clean wire ends for a better electrical contact. This tool makes wiring safer and easier.
Needle-nose Pliers
Needle-nose pliers help bend or twist wires during installation. Their thin tips work well in tight spaces. They provide better control over small wires.

Credit: support.lutron.com
Safety Precautions
Adjusting a Lutron automatic light switch requires careful attention to safety. Electrical work can be dangerous without the right steps. Following safety rules protects you and your home from harm. Always prepare before starting any adjustments.
Turn Off The Power
Switch off the power at the circuit breaker. This stops electricity from flowing to the switch. Use a voltage tester to check the switch is not live. Never touch wires until you confirm power is off.
Use Proper Tools
Choose tools with insulated handles. This lowers the risk of electric shock. Avoid using damaged or worn tools. Keep your workspace tidy to prevent accidents.
Wear Safety Gear
Wear safety glasses to protect your eyes. Use gloves designed for electrical work. Avoid loose clothing or jewelry that might catch on wires. Stay focused and calm during the task.
Follow Manufacturer Instructions
Read the Lutron switch manual carefully before adjusting. Follow each step exactly as described. Do not guess or skip steps. Proper use ensures safety and correct operation.
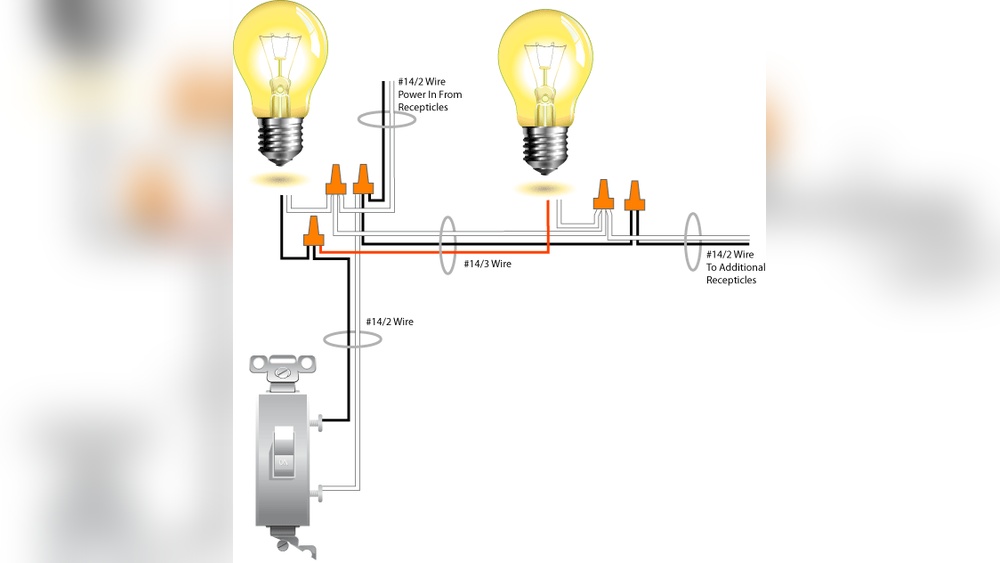
Locating The Switch
Finding the Lutron automatic light switch is the first step in adjusting it. Knowing its location helps you control your home lighting easily. The switch usually replaces a standard wall switch. It may look different from regular switches because it has extra buttons or sensors.
Sometimes, the switch is near the main entrance of a room. Other times, it could be close to a hallway or staircase. Checking these common spots saves time and effort.
Check Near Doorways
Most automatic light switches are installed near doors. This placement allows lights to turn on as you enter a room. Look on the wall beside the door frame at about waist height.
Look For Sensor Panels
Some Lutron switches include motion sensors or small panels. These sensors detect movement to activate the lights automatically. Spotting these panels helps you find the switch faster.
Identify The Control Buttons
The switch has buttons for manual control. They might be touch-sensitive or physical buttons. These buttons often differ from regular switches by size or color.
Credit: support.lutron.com
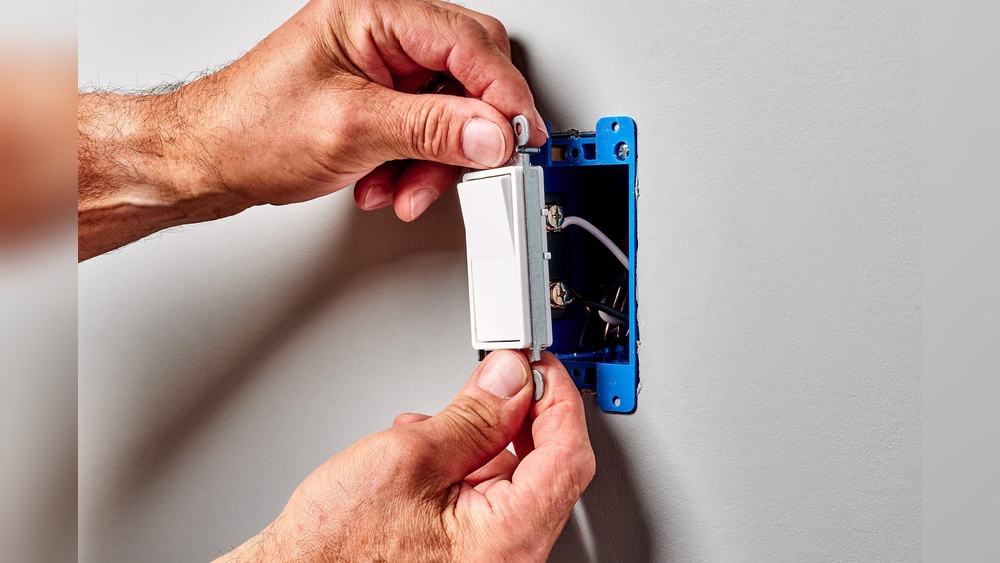
Removing The Cover Plate
Removing the cover plate is the first step to adjust your Lutron automatic light switch. This step gives access to the switch and wiring behind the plate. It is simple and requires just a few tools. Follow these easy instructions to remove the cover plate safely and quickly.
Gather The Necessary Tools
Before starting, prepare a small flathead or Phillips screwdriver. Some cover plates use screws, while others snap off. Having the right tool helps avoid damage. A flashlight can also be useful to see inside clearly.
Turn Off The Power
Safety is important. Turn off the power at the circuit breaker. This prevents any electric shock. Test the switch to confirm the power is off. Use a voltage tester if available.
Unscrew The Cover Plate
Locate the screws holding the cover plate in place. Usually, there are two screws—top and bottom. Use the screwdriver to turn them counterclockwise. Keep the screws safe for reassembly.
Remove The Cover Plate Gently
After removing screws, gently pull the cover plate away from the wall. Some plates snap on, so use gentle force to avoid cracking. If it feels stuck, check for hidden screws or clips.
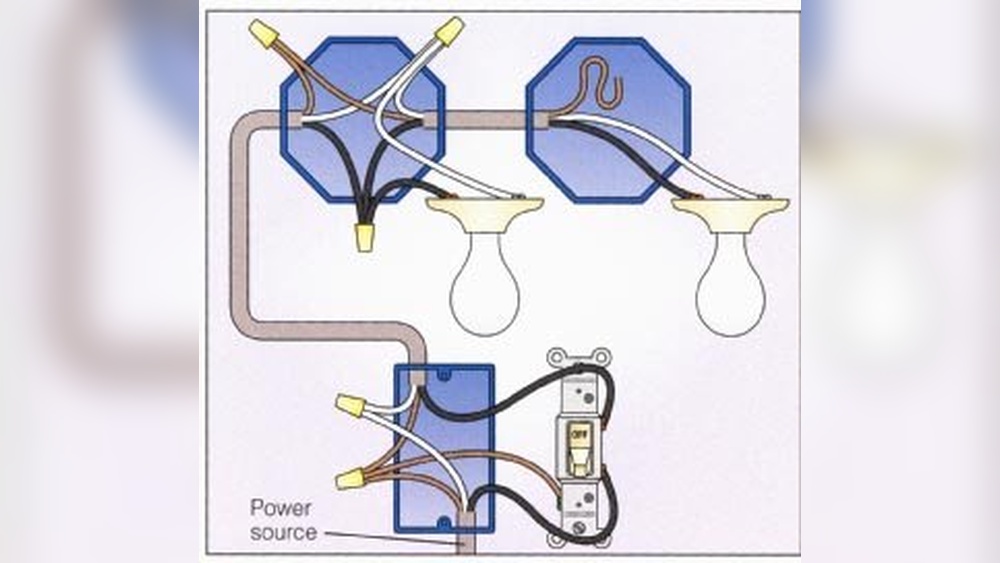
Inspect The Switch And Wiring
With the cover plate off, check the switch and wires. Look for any loose or damaged parts. This step helps prepare for proper adjustment of the switch.
Accessing The Adjustment Settings
Accessing the adjustment settings on your Lutron automatic light switch is the first step to customizing its functions. This process allows you to control how the switch reacts to motion, light levels, and timing. Adjusting these settings helps save energy and improves convenience.
Each model may have a slightly different method to enter the adjustment mode. Most models use simple button presses or a sequence on the switch itself. Knowing the correct steps prevents confusion and saves time.
Locating The Adjustment Buttons
Start by finding the small buttons on the switch face or side. These buttons usually have labels like “Raise,” “Lower,” or “Adjust.” In some models, the buttons are hidden behind a removable faceplate. Use a gentle touch to remove the plate without damage.
Entering Adjustment Mode
Press and hold the main button for about five seconds. The indicator light will blink or change color. This signals that you are in adjustment mode. Some models require pressing a combination of buttons. Check the switch manual for exact instructions.
Navigating The Settings Menu
Use the adjustment buttons to scroll through available settings. Common options include sensitivity, timeout duration, and ambient light level. Each press changes the value step-by-step. The indicator light may flash to confirm each change.
Adjusting Sensitivity
Adjusting the sensitivity of your Lutron automatic light switch helps control how it reacts to movement. Proper sensitivity ensures lights turn on only when needed. It prevents false triggers from small movements or pets. Setting sensitivity correctly saves energy and improves comfort.
Understanding Sensitivity Settings
Sensitivity controls how much motion the switch detects. Higher sensitivity means the switch reacts to small movements. Lower sensitivity requires bigger movements to trigger the light. Choose a setting that matches your room activity.
Locating The Sensitivity Adjustment
Most Lutron switches have a small dial or button for sensitivity. Check the user manual to find the exact spot. Sometimes the control is behind the switch cover. Use a small screwdriver if needed to access it.
Adjusting The Sensitivity Level
Turn the dial slowly to increase or decrease sensitivity. Test the light response after each change. Walk around the room to see if the switch reacts well. Stop adjusting when the lights respond only to desired movement.
Testing And Finalizing Settings
After adjustment, test the switch over several hours. Check if the light stays off when the room is empty. Make sure it turns on quickly when someone enters. Fine-tune the sensitivity if needed for best results.
Setting The Timer
Setting the timer on your Lutron automatic light switch controls how long the lights stay on. This feature helps save energy and adds convenience. You can choose the timer duration that fits your needs. Adjusting the timer is simple and quick.
Accessing The Timer Settings
First, locate the timer button on your Lutron switch. This button often has a clock icon. Press it once to enter the timer setup mode. The switch will show the current timer setting. Use this mode to change the timer length.
Adjusting The Timer Duration
Press the up or down arrow buttons to change the timer. Each press changes the time in small steps. The display updates to show the new setting. Choose a timer that suits your activity. For example, set a short time for quick tasks.
Saving Your Timer Choice
After selecting the desired time, press the timer button again. This saves your new setting. The lights will now turn off automatically after the set time. You can always repeat these steps to adjust the timer again.
Calibrating Light Levels
Calibrating light levels is key to making your Lutron automatic light switch work best. It helps set the right brightness for your room. This way, lights turn on and off just as you want.
Proper calibration saves energy and keeps your space comfortable. It also extends the life of your bulbs. Let’s explore simple steps to adjust light levels correctly.
Understanding The Light Sensor
The light sensor detects how bright your room is. It tells the switch when to turn lights on or off. Knowing how it works helps with calibration.
The sensor measures natural and artificial light. Too much light means the switch keeps lights off. Too little light turns them on.
Accessing Calibration Mode
Start by entering calibration mode on your Lutron switch. Usually, this involves holding down the main button for a few seconds. The light may blink to show it is ready.
Check your model’s manual for exact steps. Calibration mode lets you set the light threshold manually.
Setting Desired Light Level
Adjust the brightness level by moving the switch or using the app. Choose a brightness that feels right for the room.
Test during different times of day. This ensures the switch responds well to changing light.
Saving Your Settings
After setting the light level, save the changes. Usually, pressing the button again ends calibration mode.
The switch now uses your custom settings. It will work smoothly with your chosen light level.
Testing The Switch
Testing the Lutron automatic light switch is a key step after installation or adjustment. It confirms the switch works properly and matches your preferences. Simple tests help avoid issues and ensure smooth operation.
Testing also checks if the sensor detects motion correctly. You can adjust settings based on test results for better performance. Follow clear steps to test the switch effectively.
Checking The Motion Sensor
Stand within the sensor’s range. Move slowly to see if the light turns on. Walk away and wait to see if it turns off. This test shows if the sensor detects movement well.
Testing The Light Sensitivity
Cover the sensor with your hand. The light should not turn on in the dark if settings are correct. Remove your hand and move to reactivate the sensor. Adjust sensitivity if the light responds incorrectly.
Verifying Timer Settings
Turn the switch on and wait without moving. The light should turn off after the set time. Change the timer length if the light stays on too long or turns off too soon.
Confirming Manual Override
Press the manual button to switch the light on or off. This helps when automatic mode is not needed. Ensure the manual override works as expected during testing.
Replacing The Cover Plate
Replacing the cover plate on a Lutron automatic light switch is a simple task. It helps keep the switch protected and gives a clean look. This step comes after adjusting or installing the switch itself.
Cover plates come in many styles and colors. Choosing the right one can match your room’s decor. The process of replacing it requires only a few tools and careful handling.
Preparing To Replace The Cover Plate
Turn off the power at the breaker for safety. Use a screwdriver to remove the screws holding the old cover plate. Keep the screws safe for the new plate. Clean the switch area gently to remove dust or dirt.
Choosing The Right Cover Plate
Select a cover plate that fits your Lutron switch model. Check the size and shape before buying. Plastic or metal plates are common options. Pick a color that suits your wall and room style.
Installing The New Cover Plate
Place the new cover plate over the switch carefully. Align the screw holes with the switch box. Insert the screws and tighten them gently with a screwdriver. Avoid over-tightening to prevent cracking the plate.
Troubleshooting Common Issues
Troubleshooting common issues with your Lutron automatic light switch can save time and frustration. Simple problems often cause the switch to not work as expected. Identifying these issues quickly helps restore proper function. This section covers frequent problems and easy fixes.
Check Power Supply And Wiring
Ensure the switch is properly connected to power. Loose wires cause the switch to fail. Turn off power before inspecting wires. Tighten any loose connections carefully. Use a voltage tester to confirm power flow. Correct wiring is key to switch operation.
Reset The Switch
Sometimes, the switch needs a reset to clear errors. Locate the reset button on the device. Press and hold it for a few seconds. Release and wait for the switch to reboot. This action often solves unresponsive switch issues.
Adjust Sensitivity Settings
Incorrect sensitivity can cause the switch to turn on or off wrongly. Use the adjustment dial or app to set sensitivity. Lower sensitivity in bright rooms. Increase it in darker areas. Proper sensitivity helps the switch detect motion accurately.
Test Motion Sensor Function
Check if the motion sensor detects movement properly. Walk slowly in front of the sensor. Observe if the light responds quickly. Clean the sensor lens if dirty. Blocked sensors reduce detection range and cause delays.
Replace Batteries Or Backup Power
Some Lutron switches use batteries or backup power. Weak batteries cause malfunction or failure. Open the battery compartment carefully. Replace old batteries with fresh ones. Regular battery checks keep the switch reliable.
Frequently Asked Questions
How Do I Adjust The Sensitivity Of A Lutron Light Switch?
To adjust sensitivity, press and hold the “Adjust” button until the LED blinks. Use the “+” or “−” buttons to set your preferred sensitivity. Release the “Adjust” button to save settings. This helps customize motion detection to your room’s needs.
Can I Change The Light Timer On A Lutron Switch?
Yes, you can change the timer by pressing the “Timer” button. Use “+” or “−” to set how long the light stays on after activation. This allows you to control energy use and convenience.
What If My Lutron Switch Doesn’t Respond To Adjustments?
If your switch isn’t responding, reset it by turning off power for 30 seconds. Check the wiring and ensure the battery is functional if applicable. Refer to the manual for detailed troubleshooting.
Is It Possible To Adjust Lutron Switch Settings Remotely?
Some Lutron models support remote adjustments via the Lutron app. Ensure your switch is connected to a compatible system like Caséta. This feature allows easy control from your smartphone.
Conclusion
Adjusting your Lutron automatic light switch is quick and simple. Follow each step carefully for the best results. Small changes can make your lights work just right. Feel confident making adjustments yourself. Enjoy the convenience of smart lighting every day.
Keep your home bright and energy-efficient with ease. Regular checks help your switch stay in top shape. Experiment a little to find your perfect setting. Brightness and timing control is now in your hands.