Are you looking to add a ceiling fan to your room but don’t want to deal with complicated wiring? What if you could control your new fan right from the same switch that already handles your light?
This simple upgrade can save you time, money, and effort. In this guide, you’ll learn exactly how to add a ceiling fan to your existing light switch with clear, step-by-step instructions. By the end, you’ll have a cool, comfortable space without the hassle of rewiring your whole room.
Ready to make your home more comfortable and efficient? Let’s dive in!
Credit: www.protoolreviews.com
Tools And Materials Needed
Essential tools include a screwdriver, wire stripper, voltage tester, and electrical tape. Materials needed are a ceiling fan, wire connectors, and a new switch box. Safety gear like gloves and goggles helps protect during installation.
Essential Tools
Adding a ceiling fan to an existing light switch needs some basic tools. These tools help you work safely and correctly. Start with a screwdriver set. You will need both flathead and Phillips screwdrivers for different screws.
A voltage tester is very important. It checks if the power is off before you touch wires. Wire strippers help remove insulation from electrical wires without damage. Needle-nose pliers are useful for bending and twisting wires.
A drill with a drill bit can make holes for mounting the fan. Also, a ladder is needed to reach the ceiling safely. Finally, a tape measure helps to position the fan accurately.
Materials Checklist
Gather all materials before starting the installation. You need a ceiling fan that fits your room size and style. Make sure the fan comes with mounting hardware and instructions.
Get electrical wire that matches your home’s wiring. Usually, 14 or 12 gauge wire works for ceiling fans. Wire nuts secure wire connections safely. Use electrical tape to cover exposed wire ends.
Also, a new ceiling fan-rated electrical box is important. It supports the fan’s weight and fits into the ceiling. Switch plates and screws complete the setup. Having these materials ready saves time and reduces errors.

Credit: diy.stackexchange.com
Safety Precautions
Turn off the power at the circuit breaker before starting any work. Use a voltage tester to ensure no electricity flows. Wear safety gloves and follow all local electrical codes carefully.
Power Shutoff
Always turn off the power before starting any electrical work. Locate your home’s circuit breaker panel. Flip the switch that controls the room’s lighting or fan circuit. Use a lock or tape to keep the breaker off. This prevents anyone from turning it on by mistake. Double-check that the power is off to avoid shocks. Safety first. No exceptions.
Testing For Live Wires
Use a voltage tester or multimeter to check wires. Test all wires in the switch box, even if you think they are off. Hold the tester near each wire. If it signals power, the wire is live. Do not touch live wires. Mark the live wires clearly. Only proceed after confirming all wires are dead. This step protects you from electric shocks.
Preparing The Existing Switch
Preparing the existing switch is a key step before adding a ceiling fan. It helps ensure safety and proper installation. Start by carefully removing the switch cover. Then, inspect the wiring to check what you have inside the box. This preparation makes the next steps easier and safer.
Removing The Switch Cover
Turn off the power at the circuit breaker. This stops any chance of electric shock. Use a screwdriver to remove the screws holding the switch cover. Gently pull the cover away from the wall. Set it aside carefully. Now, you can see the switch and wires behind it.
Inspecting The Wiring
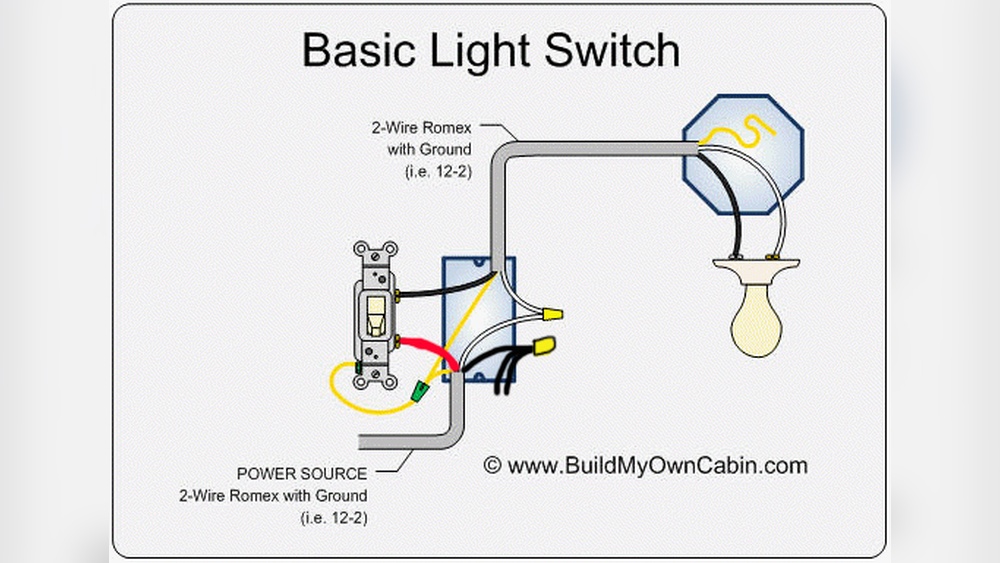
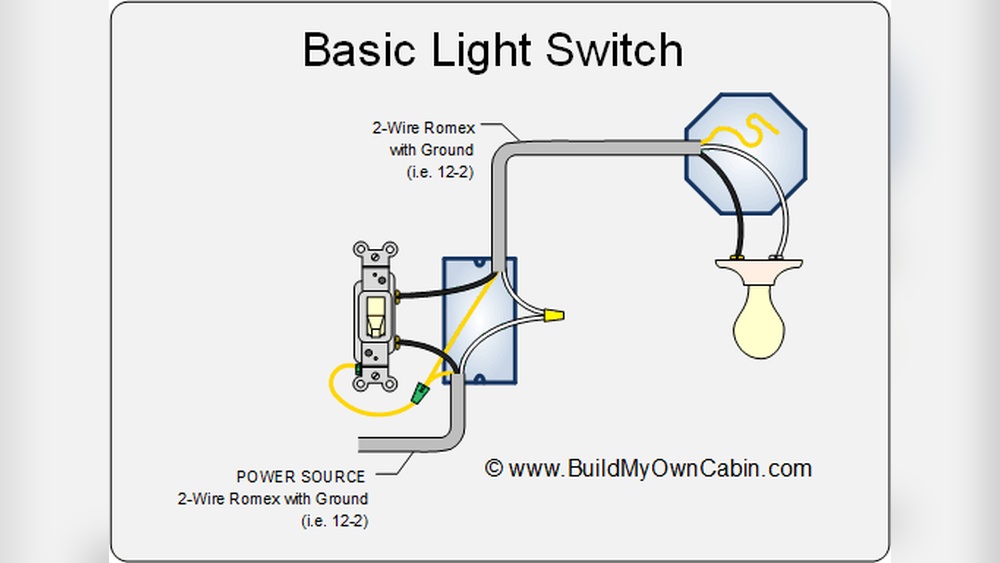
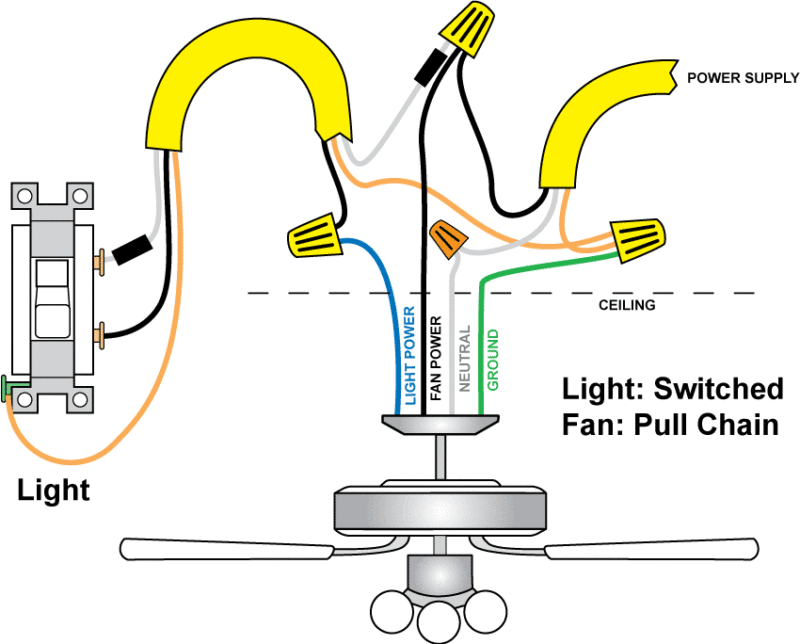
Look closely at the wires inside the switch box. Identify the black (hot), white (neutral), and green or bare copper (ground) wires. Check if the wires are connected tightly. Look for any signs of damage or wear. Make sure the wiring matches the ceiling fan’s requirements. This step helps avoid problems later.
Wiring The Ceiling Fan
Wiring a ceiling fan to an existing light switch requires careful attention. The process ensures your fan and light work safely and properly. Understanding the wires and how to connect them is key. This guide helps you with clear steps for wiring the ceiling fan.
Identifying Wire Types
First, identify the wires in your ceiling box. Usually, there are three main types: black, white, and green or bare copper. The black wire carries power. The white wire is neutral. The green or bare wire is ground. Your ceiling fan will have similar wires. Knowing each wire’s purpose keeps the installation safe.
Connecting Fan And Light Wires
Next, connect the fan’s wires to the house wires. Connect the fan’s black wire to the ceiling’s black wire for the fan motor. Connect the fan’s blue wire to the black or red wire from the ceiling for the light. Join all white wires together for neutral. Finally, connect all ground wires. Use wire nuts to secure connections. Double-check each connection before turning power back on.
Mounting The Ceiling Fan
Mounting the ceiling fan is an important step for a safe and stable installation. It needs care and attention to ensure the fan stays secure and balanced. Follow the steps carefully to avoid any problems later.
Installing The Ceiling Bracket
Start by attaching the ceiling bracket to the electrical box. Use screws that come with the fan to secure the bracket tightly. Make sure the bracket is flush against the ceiling. This part holds the entire weight of the fan. Check that the electrical box is strong enough to support the fan. A metal box is best for safety and durability.
Securing The Fan Assembly
Next, lift the fan assembly and hang it on the ceiling bracket. Most fans have a hook or slot for temporary support. This frees your hands for wiring. Align the fan’s downrod or base with the bracket holes. Insert the screws and tighten them firmly. Do not leave screws loose or the fan may wobble. Confirm the fan is level before finishing the installation.
Testing The Installation
Testing the installation is an important step after wiring your ceiling fan to an existing light switch. This process ensures everything works safely and correctly before you use the fan daily. Careful testing avoids electrical problems and protects your home.
Restoring Power
First, turn the circuit breaker back on to restore power to the room. Check the breaker panel and switch it to the ON position. Avoid touching any wires or metal parts during this step. Use a voltage tester to confirm the power is live at the switch and fan location. If power is not restored, recheck your wiring connections.
Operating The Fan And Light
Next, test the ceiling fan and light using the wall switch. Turn the switch ON and OFF to see if the fan blades start spinning. Confirm the fan speed changes if you installed a multi-speed control. Then, switch the fan light ON and OFF to check its function. Listen for unusual sounds or flickering lights. These signs may indicate wiring or motor issues that need fixing.
Troubleshooting Common Issues
Adding a ceiling fan to an existing light switch can sometimes bring small problems. These issues can stop your fan or light from working properly. Knowing how to fix common problems saves time and effort. Here are simple steps to troubleshoot typical issues.
Fan Not Turning On
Check if the fan is properly connected to the power source. Loose wires often cause this problem. Turn off the power before inspecting wires inside the switch box. Tighten any loose connections carefully. Ensure the circuit breaker is on and not tripped. Test the wall switch to confirm it works correctly. Some fans have a pull chain. Make sure the chain is pulled to the “on” position.
Light Flickering
Flickering lights usually mean a loose bulb or wiring issue. Turn off the fan and light power first. Tighten the light bulbs firmly in their sockets. Replace any old or damaged bulbs. Inspect the wiring connections inside the fan canopy. Loose or damaged wires can cause flickering. Use wire nuts to secure loose wires. Check the wall switch for any damage or wear. Replacing the switch may stop flickering.

Credit: www.doityourself.com
Frequently Asked Questions
How Do I Wire A Ceiling Fan To An Existing Switch?
Turn off power first. Connect fan wires to switch wires using wire nuts. Match black to black, white to white, and ground to ground. Secure connections and mount the fan. Restore power and test the fan and light.
Can I Control A Ceiling Fan And Light Separately?
Yes, by installing a dual switch or a remote control. Use a dual switch to control fan and light independently. Alternatively, a remote control allows separate operation without rewiring the switch.
What Tools Are Needed To Add A Ceiling Fan To A Switch?
You need a voltage tester, wire strippers, screwdrivers, wire nuts, electrical tape, and a ladder. These tools help safely connect the fan to the existing switch and secure all wiring properly.
Is It Safe To Add A Ceiling Fan To An Existing Light Circuit?
Yes, if the circuit can handle the fan’s power load. Always turn off electricity before working. Follow electrical codes and consider consulting a professional electrician for safety.
Conclusion
Adding a ceiling fan to your existing light switch can save space and add comfort. It takes some basic tools and safety steps to do it right. Follow the instructions carefully and take your time. You will enjoy better air flow and lighting in your room.
This small project can make a big difference in your home’s feel. Try it yourself, and see how easy it is to improve your space.