Are you looking to brighten up your space by adding another light to your existing 3-way switch? It might sound tricky, but with the right steps, you can do it yourself without calling an electrician.
Imagine controlling multiple lights from the same switch setup, making your home more convenient and stylish. In this guide, you’ll discover simple, clear instructions that make the process easy to follow. Keep reading, and soon you’ll have that extra light working perfectly—no confusion, no hassle.

Credit: www.youtube.com
Tools And Materials Needed
Adding another light to a 3 way switch needs the right tools and materials. Using proper equipment makes the job safer and easier. Prepare everything before starting the work.
Tools Required
- Screwdriver set: flathead and Phillips
- Wire stripper and cutter
- Voltage tester
- Needle-nose pliers
- Electrical tape
- Drill with bits (optional for mounting)
- Flashlight or work light
Materials Needed
- Additional light fixture
- 3-way switch compatible wiring
- Wire nuts/connectors
- Electrical boxes (if needed)
- Romex cable (14/3 or 12/3 gauge, depending on circuit)
- Light bulbs matching fixture specifications
Safety Gear
- Insulated gloves
- Safety glasses
- Dust mask (if drilling)
How A 3 Way Switch Works
A 3 way switch lets you control one light from two different places. It is common in hallways or large rooms. Understanding how it works helps when adding another light.
This switch type has two special switches connected by wires. They work together to turn the light on or off.
Basic Components Of A 3 Way Switch
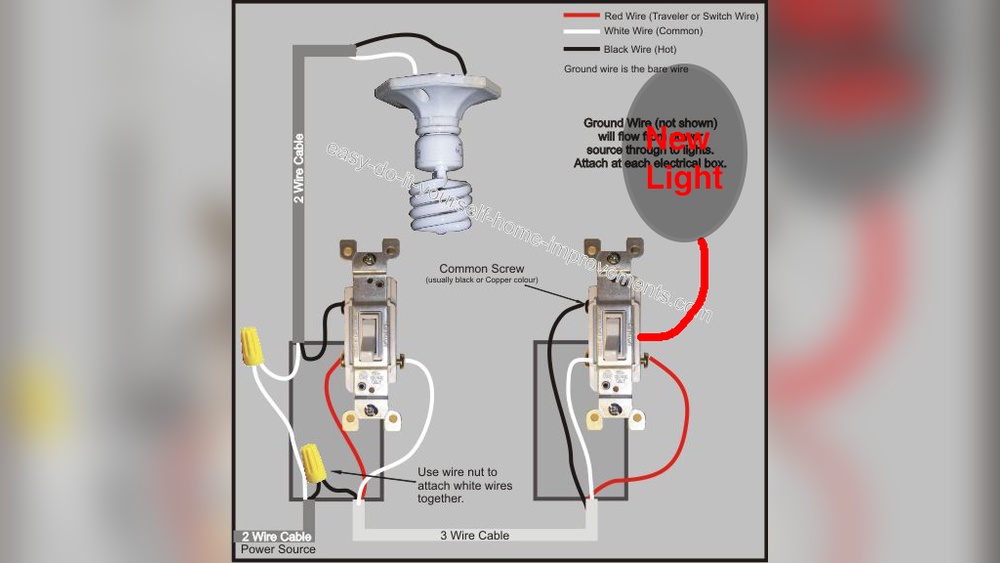
A 3 way switch setup includes two switches and one light fixture. Each switch has three terminals. Two traveler terminals and one common terminal.
The traveler terminals connect the two switches. The common terminal connects to the power source or the light.
The Role Of Traveler Wires
Traveler wires carry electricity between the two switches. They allow the switches to communicate. Electricity flows through one traveler or the other.
Changing the switch flips the flow between travelers. This controls if the light is on or off.
How Switching Controls The Light
Each switch toggles the connection between travelers. This changes the circuit path. When the circuit is complete, the light turns on.
Breaking the circuit turns the light off. Both switches work together to open or close the circuit.
Safety Tips Before Starting
Turn off the power at the circuit breaker before starting any work. Use a voltage tester to ensure wires are not live. Wear insulated gloves to protect yourself from electric shocks.
Turn Off The Power
Always switch off the power at the circuit breaker before starting work.
Do not rely on the wall switch alone. Use a voltage tester to confirm no electricity flows.
Wear Safety Gear
Wear insulated gloves to protect from electric shock.
Use safety goggles to shield your eyes from dust and sparks.
Use The Right Tools
Choose tools with insulated handles for electrical work.
A voltage tester, wire stripper, and screwdriver are essential for this task.
Understand Your Wiring
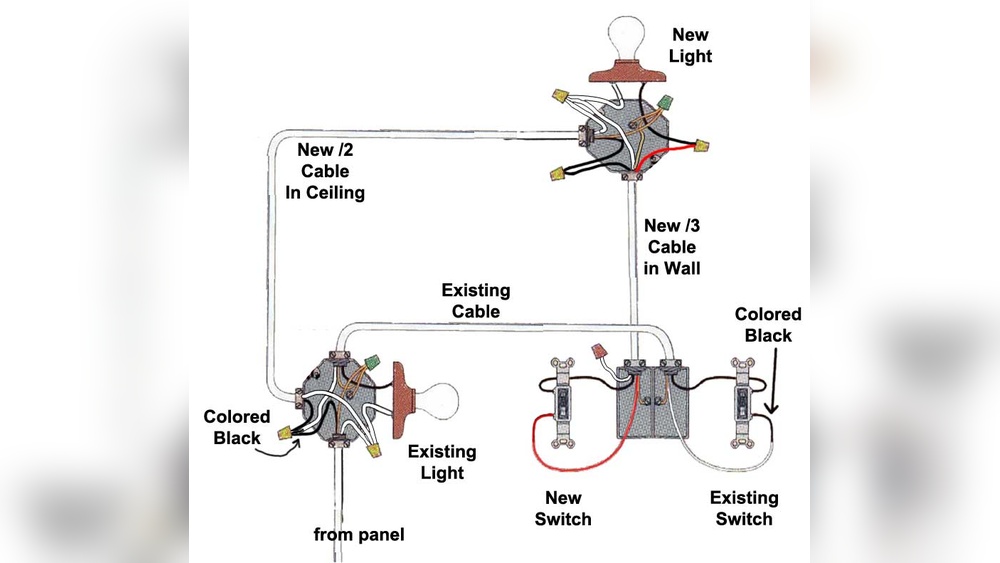
Study the wiring diagram of your 3 way switch setup.
Label wires to avoid confusion during installation.
Do Not Work Alone
Have someone nearby in case of emergencies.
They can help or call for help if needed.
Planning Your Wiring Layout
Planning your wiring layout is the first step to add another light to a 3-way switch. It helps you understand how wires run between switches and lights. A clear plan prevents mistakes and keeps your work safe.
Start by studying your current switch and light setup. Note the position of switches and the light they control. This information guides where to place the new light.
Think about the path your wires will take. Keep wires neat and follow building codes. Plan for enough wire length to connect all parts easily.
Understanding Existing Wiring
Check the wires connected to your current 3-way switches. Identify the traveler wires and common terminals. This knowledge shows how current wiring controls the light.
Choosing The Location For The New Light
Pick a spot that is easy to wire and fits well with your room’s design. Make sure the new light is close to the existing wiring path. This reduces the need for long wires.
Mapping The Wire Paths
Draw a simple map of your wiring layout. Mark switch boxes, lights, and wire routes. This map helps avoid confusion during installation.
Ensuring Safety And Code Compliance
Use wires and materials that meet local electrical codes. Plan for proper grounding and secure connections. Safety is crucial in every step of your project.
Turning Off The Power
Before starting any electrical work, safety is the top priority. Turning off the power stops electricity from flowing. This prevents shocks and accidents. Working with live wires is dangerous. Always make sure the power is fully off before touching switches or wires.
Double-checking power off saves lives. It also protects your tools and the house wiring. Take your time and follow the steps carefully. No shortcuts.
Locate The Circuit Breaker
Find the main electrical panel in your home. This is usually in a basement or utility room. Look for the breaker that controls the 3-way switch circuit. It may be labeled or you may need to guess.
Switch Off The Correct Breaker
Flip the breaker to the OFF position. This cuts power to the switch and connected lights. Test the switch to confirm the lights do not work. If the light still turns on, try another breaker.
Use A Voltage Tester
Always use a voltage tester on the wires before touching them. This device shows if electricity is still present. Place the tester on the switch terminals. No light or beep means safe to proceed.
Inform Others In The House
Tell family members or roommates that you turned off the power. This avoids accidental breaker switching. Place a note on the panel to warn others. Safety is a shared responsibility.
Credit: www.finehomebuilding.com
Removing The Existing Fixtures
Removing the existing fixtures is the first step in adding another light to a 3-way switch setup. This step lets you access the wiring and prepare the space for the new fixture. Taking off the current light fixtures carefully ensures you do not damage the wires or the electrical box.
Turn off the power at the circuit breaker before starting. Safety is the most important concern. Use a voltage tester to confirm there is no electricity in the wires.
Gather Necessary Tools
Collect tools like a screwdriver, voltage tester, wire nuts, and pliers. Having everything ready saves time and effort. Make sure your tools are insulated for safety.
Remove The Light Bulbs And Covers
Start by unscrewing the light bulbs from the fixture. Then gently remove any glass covers or shades. Place them safely aside to avoid breakage.
Unscrew The Fixture Base
Locate the screws holding the fixture to the ceiling or wall. Use a screwdriver to remove these screws. Hold the fixture with one hand to prevent it from falling.
Disconnect The Wiring
Carefully pull the fixture away to expose the wires. Use a voltage tester again to check for power. Unscrew wire connectors or nuts to detach the fixture wires.
Inspect The Electrical Box
Look inside the electrical box for wire conditions. Check for any damage or loose connections. Tighten or repair wires before installing the new light fixture.
Running New Wiring For Additional Light
Running new wiring for an additional light in a 3-way switch setup requires careful planning and safety. It involves extending electrical cables from the existing switch or light box to the new light fixture. This process ensures the new light works seamlessly with the current 3-way switch system.
Proper wiring helps maintain safe and efficient electrical flow. It also prevents issues like flickering lights or switch malfunctions. Understanding basic wiring principles makes this task easier and safer for DIY enthusiasts.
Planning The Wiring Route
Start by choosing the best path for the new wiring. Look for a route that avoids obstacles like pipes or beams. Measure the distance from the switch or light box to the new fixture location. Keep the wire length as short as possible to reduce voltage drop.
Choosing The Right Wire
Select wire with the correct gauge for your home’s electrical load. Use 14-gauge wire for 15-amp circuits or 12-gauge for 20-amp circuits. Make sure the wire is rated for indoor use and matches existing wiring types. This ensures compatibility and safety.
Turning Off Power
Before handling any wiring, switch off the power at the breaker box. Use a voltage tester to confirm power is off. Never work on live wires to avoid electric shock. Safety first.
Connecting The New Wiring
Run the new wire from the switch or light box to the new fixture location. Strip the wire ends carefully to expose the copper. Connect the wires according to color codes: black to black, white to white, and ground to ground. Use wire nuts to secure connections tightly.
Testing The New Light
After wiring, turn the power back on at the breaker. Test the switch to confirm the new light works correctly. Check for any flickering or unusual behavior. Fix any issues before closing switch or fixture boxes.
Connecting The New Light To The Circuit
Connecting the new light to the circuit is a key step in adding another light to a 3-way switch setup. This task requires careful attention to wiring and safety. The goal is to integrate the new light so it works seamlessly with the existing switches.
Start by turning off the power at the breaker box. Safety first. Use a voltage tester to confirm no electricity flows through the wires before touching them.
Locate The Existing 3-way Switch Wiring
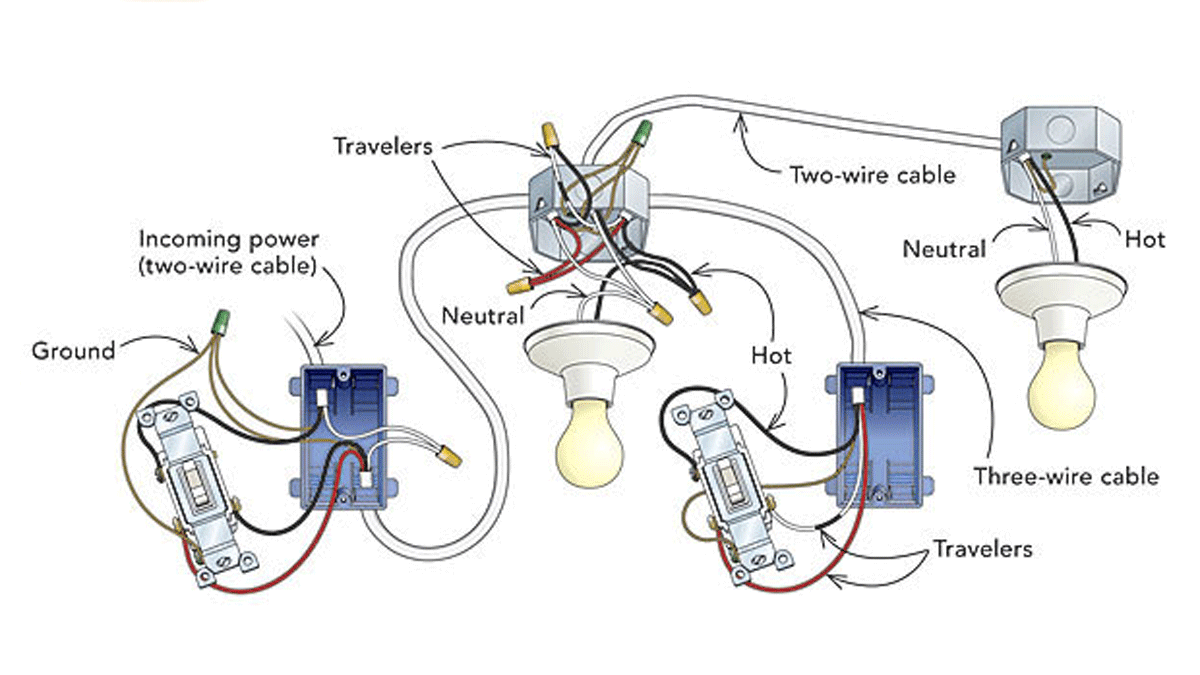
Find the wires connected to the two 3-way switches. Identify the common wire, traveler wires, and the ground wire. The common wire usually connects to the power source or the light fixture. Travelers connect the two switches.
Run The New Wiring To The Light Fixture
Use electrical cable rated for your home’s wiring system. Run the cable from the switch box or the existing light fixture to the new light’s location. Leave enough wire length for easy connections. Secure the cable properly along the way.
Connect The New Light To The Circuit
Connect the black wire from the new light to the existing hot wire or traveler wire, depending on your setup. Attach the white wire to the neutral wire bundle. Connect the ground wire to the grounding system in the box. Use wire nuts to secure all connections firmly.
Testing The New Setup
Testing the new setup is a key step after adding another light to a 3-way switch. It ensures everything works safely and correctly. Proper testing helps avoid electrical problems and confirms the new light turns on and off as expected.
Check each switch’s function carefully. Both switches should control all connected lights smoothly. Testing finds any wiring mistakes early. It also guarantees the installation is safe before regular use.
Turn On Power And Inspect The Circuit
Restore power to the circuit at the breaker box. Watch for sparks or unusual sounds. A quick visual check helps spot wiring errors or loose connections. If you see any issues, turn off power immediately.
Test Each Switch Position
Operate each 3-way switch in all positions. The new light and old lights must turn on and off properly. Check that the lights respond from both switch locations. This confirms the wiring is correct and complete.
Use A Voltage Tester For Safety
Use a voltage tester to check wires and switches. Make sure no wires are live when switches are off. This prevents shocks and electrical hazards. Testing voltage adds an extra safety layer.
Confirm Light Brightness And Stability
Observe the brightness of all lights. They should glow steadily without flickering. Flickering can signal wiring or bulb problems. Replace bulbs or tighten connections if needed.
Final Safety Check
Ensure all switch plates and fixtures are secure. No exposed wires should be visible. Clean up tools and debris from the work area. Safe surroundings reduce accident risks during use.
Troubleshooting Common Issues
Adding another light to a 3-way switch can sometimes cause problems. Troubleshooting these issues helps you find quick fixes. Understanding common problems avoids frustration and saves time.
Many issues arise from wiring mistakes or faulty parts. Careful checks and simple tests often solve the problems. Let’s explore the common problems and how to fix them.
Incorrect Wiring Connections
Wrong wiring is the most common cause of issues. Double-check all wire connections against the wiring diagram. Make sure travelers and common wires connect correctly. Loose or swapped wires can stop the lights from working.
Faulty Switches Or Components
Sometimes the switch itself is broken. Test each switch with a voltage tester or replace it temporarily. Old or damaged switches often fail to send power properly. Replace any faulty parts for smooth operation.
Power Supply Problems
Power might not reach the switch or the new light. Check the circuit breaker to ensure it is on. Inspect the fuse box for blown fuses. Use a multimeter to confirm power flows correctly through wires.
Improper Grounding
Ground wires keep the system safe and working well. Missing or loose ground wires can cause flickering or no light. Connect all ground wires securely. Verify grounding with a tester if unsure.
Using The Wrong Bulbs
Not all bulbs work with 3-way switches. Use bulbs rated for 3-way fixtures only. Wrong bulbs may flicker or not turn on. Check the bulb base and wattage before installing.

Credit: diy.stackexchange.com
Frequently Asked Questions
How Do You Wire An Additional Light On A 3 Way Switch?
To add a light, connect its wires to the existing traveler wires. Ensure power is off and follow wiring codes. Use a junction box if needed. Test switches for proper operation after installation.
Can I Add A Light Without Rewiring The Whole Circuit?
Yes, you can add a light by tapping into the traveler wires. Use wire nuts and a junction box for safety. This avoids rewiring the entire circuit while maintaining switch control.
What Tools Are Needed For Adding A Light To 3 Way Switch?
You need a voltage tester, wire strippers, screwdrivers, wire nuts, electrical tape, and a junction box. These tools ensure safe and proper installation of the new light fixture.
Is It Necessary To Turn Off Power Before Adding A Light?
Absolutely. Always turn off power at the breaker panel. This prevents electric shock and ensures safe wiring when adding a new light to a 3 way switch.
Conclusion
Adding another light to a 3-way switch can brighten your space easily. Follow the steps carefully to stay safe and organized. Use the right tools and check all connections twice. Take your time and don’t rush the work. This project helps you control lights from different spots.
Enjoy the convenience and improved lighting in your home. Keep learning simple electrical tasks to save money and gain confidence. Small changes make a big difference in your living space.