Are you looking to control an outlet with a light switch but aren’t sure where to start? Connecting a light switch to an outlet might sound tricky, but with the right diagram and simple steps, you can do it yourself.
Imagine turning your lamp on and off from a switch on the wall—no more fumbling for plugs in the dark. In this guide, you’ll find clear, easy-to-follow instructions and a detailed diagram to help you make the connection safely and confidently.
Keep reading, and you’ll be able to upgrade your space with just a few tools and a little know-how.

Credit: www.youtube.com
Basic Electrical Components
Understanding basic electrical components helps you connect a light switch to an outlet. These parts work together to control power safely and efficiently. Knowing their functions makes wiring easier and safer.
Light Switch Types
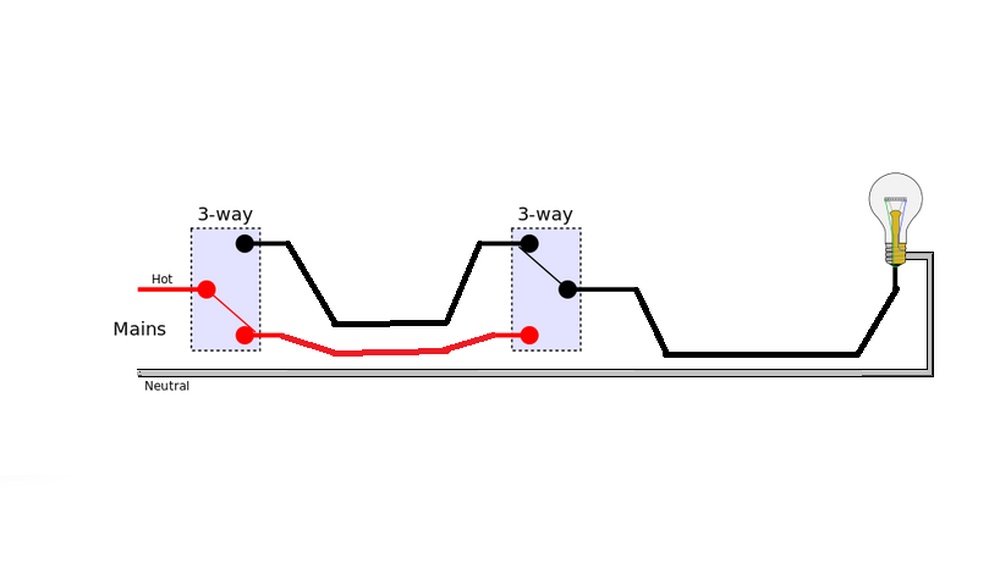
There are several types of light switches. The most common is the single-pole switch, which controls one light or outlet. A three-way switch controls a light from two locations. Dimmer switches adjust the light brightness. Choose the right switch for your needs.
Outlet Varieties
Outlets come in different forms. Standard outlets provide power to devices. GFCI outlets protect against electrical shocks near water. USB outlets allow charging electronic devices. Select the correct outlet type for your room.
Wiring Essentials
Wiring connects switches and outlets to the power source. Use copper wires for better conductivity. Black wires carry power; white wires are neutral. Green or bare wires connect to the ground. Follow wiring codes to avoid hazards.
Tools And Safety Gear
Before starting to connect a light switch to an outlet, you need the right tools and safety gear. This ensures the job is done correctly and safely. Using proper tools makes the work easier and faster. Safety gear protects you from electric shocks and injuries. Let’s look at what tools and safety gear you need for this task.
Required Tools
You will need a few basic tools for this job. A flathead screwdriver and a Phillips screwdriver are essential. Wire strippers help to remove insulation from wires without damage. A voltage tester checks if wires are live, keeping you safe. Needle-nose pliers help bend and hold wires. A wire cutter trims wires to the right length. Electrical tape secures wire connections. A flashlight can be useful in dim places.
Safety Precautions
Always turn off the power at the circuit breaker before starting. Use a voltage tester to double-check no electricity flows. Wear insulated gloves to protect your hands from shocks. Avoid working in wet or damp areas. Keep your workspace clean and organized. Do not touch exposed wires with bare hands. Follow local electrical codes and guidelines for safety.
Wiring Diagram Breakdown
Understanding the wiring diagram is important before connecting a light switch to an outlet. It shows how wires link the switch and outlet safely. The diagram helps avoid mistakes that can cause problems or danger. Simple steps guide you through the process clearly. Each part of the wiring has a specific role. Knowing these parts makes the task easier and safer.
Switch To Outlet Connections
The switch controls power to the outlet. A hot wire runs from the power source to the switch. Another hot wire goes from the switch to the outlet. This setup lets the switch turn the outlet on or off. The neutral wire connects directly from the power source to the outlet. It completes the electrical circuit. A ground wire links all metal parts for safety.
Wire Color Codes
Wire colors show their purpose. Black wires carry the hot current. White wires are neutral and return the current. Green or bare wires are ground wires for safety. These colors help identify each wire quickly. Proper connections depend on matching colors correctly. Mixing wires can cause shorts or shocks.
Common Circuit Layouts
Most circuits use a simple layout with power, switch, and outlet. Power comes into the switch box or outlet box first. The switch interrupts the hot wire to control the outlet. Some layouts send power to the outlet first, then to the switch. Each layout requires careful wire placement. Following the diagram closely ensures safe and correct wiring.

Credit: www.angi.com
Step-by-step Connection Process
Connecting a light switch to an outlet requires a clear, simple process. Following each step carefully ensures a safe and working setup. This guide breaks down the key actions to make the wiring correct and easy.
Turn Off Power
Always start by turning off power at the circuit breaker. This stops electricity flow and keeps you safe. Use a voltage tester to confirm no power remains in the wires.
Prepare Wires
Strip about half an inch of insulation from each wire end. Straighten the wires to make connecting easier. Check for any damaged wires and replace them if needed.
Connect Switch Wires
Attach the black (hot) wire from the power source to the switch’s input terminal. Connect the black wire going to the outlet to the switch’s output terminal. Tighten screws firmly to hold wires in place.
Attach Outlet Wires
Connect the white (neutral) wires together with a wire nut. Attach the ground wires to the green grounding screw on both the switch and outlet. Make sure all wire connections are tight and secure.
Secure Connections
Push all wires carefully back into the electrical box. Screw the switch and outlet into place. Finish by attaching the cover plate to protect the connections and keep the setup neat.
Testing The Setup
Testing the setup is a crucial step after connecting a light switch to an outlet. It ensures everything works safely and correctly. This process checks the power flow, switch function, and outlet operation. Follow these steps carefully to avoid any issues.
Restore Power
First, turn the power back on at the circuit breaker. This restores electricity to your wiring. Make sure the breaker switch is fully flipped to the ON position. Never test without power restored, as the setup won’t respond.
Check Switch Operation
Next, test the light switch itself. Flip the switch on and off a few times. The connected outlet should react to the switch’s movement. If the outlet is controlled by the switch, it will turn on and off accordingly.
Verify Outlet Functionality
Finally, plug a device or lamp into the outlet. Turn the switch on and see if the device powers up. Switch it off to confirm the device loses power. This step confirms the outlet works with the switch controlling it.

Credit: www.electrical-online.com
Troubleshooting Tips
Troubleshooting is key when connecting a light switch to an outlet. Small mistakes can cause big problems. Knowing what to check saves time and effort. This section covers common issues and simple fixes. It helps you avoid damage and ensures safety.
Common Wiring Errors
One common error is mixing up the hot and neutral wires. This mistake can stop the outlet or switch from working. Another issue is reversing the line and load wires. It causes flickering or no power at all. Incorrect grounding is also a frequent problem. It can create a shock hazard or trip breakers.
Fixing Loose Connections
Loose wires cause intermittent power or sparks. Check all wire nuts and terminal screws. Tighten them securely but avoid over-tightening. Gently tug wires to confirm they are snug. Use electrical tape for extra safety around connections. Loose connections often cause switches or outlets to fail.
When To Call A Professional
Call an electrician if wiring looks damaged or burnt. Complex wiring setups need expert handling. If breakers keep tripping after fixing wires, get help. Avoid risks like electrical shocks or fire. Professionals ensure code compliance and safe operation. Trust experts for peace of mind and lasting repairs.
Frequently Asked Questions
How Do I Wire A Light Switch To An Outlet Safely?
To wire a light switch to an outlet safely, always turn off power first. Use a voltage tester to confirm. Connect the switch’s line wire to the outlet’s hot wire. Follow local electrical codes and use proper tools for safety.
Can I Control An Outlet With A Single Switch?
Yes, you can control an outlet with a single switch by wiring the switch to the outlet’s hot wire. This setup allows you to turn the outlet on and off using the switch, ideal for lamps or devices.
What Tools Do I Need For This Wiring Project?
Essential tools include a voltage tester, wire stripper, screwdriver, electrical tape, and wire nuts. These tools help ensure safe and secure connections when connecting a light switch to an outlet.
Is It Legal To Wire A Switch To An Outlet?
Wiring a switch to an outlet is legal if done according to local electrical codes. Always check local regulations and, if unsure, consult a licensed electrician to ensure compliance and safety.
Conclusion
Connecting a light switch to an outlet is simple with the right diagram. Follow each step carefully and take safety seriously. Double-check your wiring before turning on the power. This guide helps avoid common mistakes and keeps your home safe.
Practice patience and move slowly through the process. Soon, you will control your outlet with a switch easily. Keep learning and stay confident with basic electrical tasks. Safety first, always.