Are you staring at that stubborn wall hook and wondering how to remove it without damaging your walls? You’re not alone.
Taking off wall hooks can be tricky, especially if you want to keep your paint and drywall intact. But don’t worry—this guide will show you simple, effective ways to get those hooks off quickly and safely. By the end, you’ll feel confident tackling this task without stress or mess.
Keep reading to discover the easiest methods that anyone can follow!

Credit: www.youtube.com
Types Of Wall Hooks
Wall hooks come in different types, each with a unique way to attach to walls. Knowing the type helps you remove them safely. Some hooks use glue, others use nails or screws. Some are reusable, while others stay fixed. Understanding these types saves time and protects your walls.
Adhesive Hooks
Adhesive hooks stick to walls using a sticky pad. They do not need nails or screws. These hooks are easy to place and remove. Pulling the tab slowly takes them off without damage. They work best on smooth surfaces like tiles or painted walls.
Nail And Screw Hooks
Nail and screw hooks use small metal fasteners. Nails or screws hold the hook tightly to the wall. Removing these hooks needs tools like a screwdriver or hammer. Care is needed to avoid leaving holes or marks. Patching holes after removal keeps walls neat.
Command Strips
Command strips use strong, double-sided tape. They hold items firmly without nails or screws. To remove, pull the strip down slowly. This stretches the strip and releases the hook. The wall stays clean and free from marks.
Magnetic Hooks
Magnetic hooks work on metal surfaces only. They use a strong magnet to hold the hook. No tools or damage occur when removing them. These hooks are great for metal doors or boards. Just lift the hook off to remove.
Credit: www.familyhandyman.com
Tools You Might Need
Taking off wall hooks can be tricky without the right tools. Using the proper tools helps you remove hooks safely. It also keeps your walls in good shape. Here are some tools you might need for the job.
Hair Dryer
A hair dryer heats the adhesive behind the hook. Warm glue becomes soft and easier to peel off. Hold the dryer close but not too hot. Heat for about 30 seconds before trying to remove the hook.
Plastic Card
A plastic card, like an old credit card, helps slide under the hook. It gently lifts the hook without damaging the wall. Use it to loosen the adhesive slowly and carefully.
Putty Knife
A putty knife works well to scrape off any leftover glue. Use the flat edge to lift stubborn bits. Be gentle to avoid scratching the wall surface.
Cleaning Supplies
Cleaning supplies remove sticky residue after the hook is off. Rubbing alcohol or mild soap works well. Use a soft cloth to wipe the area clean. This prepares the wall for new paint or hooks.
Removing Adhesive Hooks
Removing adhesive hooks can be tricky if not done carefully. These hooks stick strongly to walls and surfaces. Pulling them off too fast can damage paint or leave sticky residue behind. Follow these simple steps to remove adhesive hooks safely and cleanly.
Heating The Adhesive
Heat softens the glue behind the hook. Use a hairdryer on low heat. Hold it close to the hook for about 30 seconds. This makes the adhesive easier to peel off without damage.
Peeling Off Slowly
Start by lifting one edge of the hook. Pull the hook slowly and evenly. Stretch the adhesive strip sideways, not outward. This helps to release the glue without tearing the wall surface.
Cleaning Residue
Some sticky residue may remain after removal. Use warm soapy water and a soft cloth to clean it. For tougher spots, try rubbing alcohol or a gentle adhesive remover. Wipe gently to protect the wall finish.
Taking Off Nail And Screw Hooks
Removing nail and screw hooks from your wall is simple. It takes care and the right tools. Doing it right stops damage to your wall. It also keeps your hooks in good shape for reuse. Follow these easy steps to remove hooks safely and cleanly.
Unscrewing Carefully
Use a screwdriver that fits the screw head well. Turn the screw slowly to avoid stripping it. Hold the hook steady as you unscrew. Stop if the screw feels stuck. Try a little oil to loosen it. Keep the screw and hook together once removed.
Removing Nails
Use a claw hammer or a pair of pliers. Place the tool under the nail head gently. Pull the nail straight out to avoid wall damage. Work slowly to stop the wall from cracking. Use a small block of wood for leverage if needed. Save the nails if you want to reuse them.
Filling Holes
Fill nail or screw holes with spackling paste or wall filler. Use a putty knife to spread the filler evenly. Let the filler dry completely before sanding it smooth. Sand lightly to blend the patch with the wall. Paint over the patch to match your wall color. This step makes your wall look clean and fresh again.
Using Command Strip Removal Techniques
Using Command Strip removal techniques is the best way to take off wall hooks. These strips stick firmly but come off cleanly. They do not leave sticky marks or damage the wall. The key is to pull the strip gently and correctly. This helps protect your paint and keeps your walls smooth.
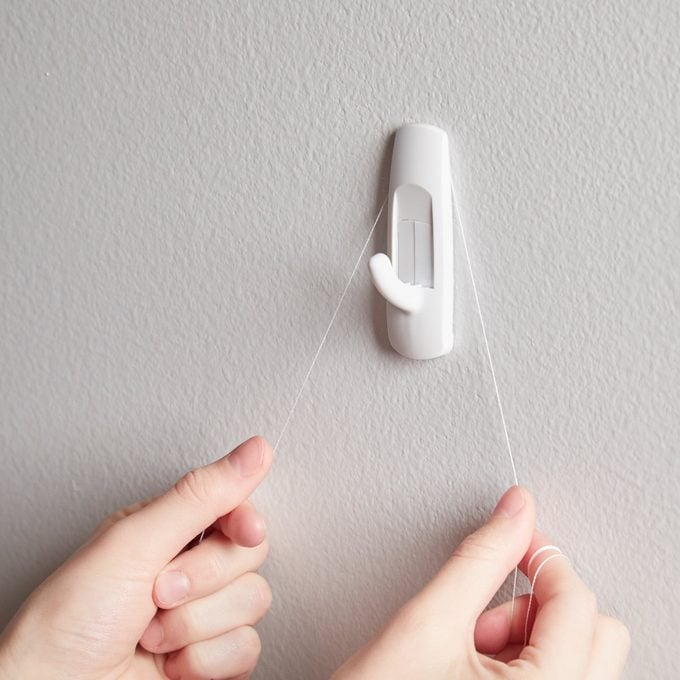
Stretching The Strip
To remove the hook, hold the base of the strip. Pull the strip straight down slowly. Stretch the strip along the wall, not away from it. Keep pulling until the strip releases. Do not yank or pull sideways. Stretching the strip weakens the glue and frees the hook easily.
Avoiding Paint Damage
Always pull the strip slowly to protect paint. Quick or sharp pulls can peel paint off. Keep your hand steady and stretch the strip gently. Avoid using tools that might scratch the wall. If the strip feels stuck, try warming it with your hand. Warmth softens the glue and helps strip removal.

Credit: www.reddit.com
Tips For Preventing Wall Damage
Removing wall hooks can cause damage if not done carefully. Preventing marks, holes, or peeled paint is important. Use simple methods to keep walls looking clean and smooth. Follow these tips to protect your wall while taking off hooks.
Removing Hooks Gently
Pull the hook slowly. Avoid yanking or twisting too hard. Soft, steady pressure works best. Let the adhesive loosen before removing. Use your fingers to press around the hook. This helps reduce stress on the wall.
Choosing The Right Tools
Use tools made for hook removal. A plastic putty knife or a credit card works well. Avoid metal tools that can scratch walls. A hairdryer helps soften glue or adhesive. Heat makes removal easier and safer for paint.
Protecting Paint
Cover paint edges with painter’s tape. This stops paint from peeling. Remove tape carefully after taking off hooks. Clean the wall with a soft cloth. Avoid strong chemicals that can damage paint.
Fixing Minor Wall Damage
After removing wall hooks, small holes and marks often remain. Fixing these minor damages helps restore your wall’s smooth look. Simple tools and steps can make the wall look as good as new. This section guides you through easy ways to repair small wall damage.
Filling Small Holes
Use a small amount of spackling paste or wall filler. Apply it carefully into the hole with a putty knife. Press the filler so it fills the hole completely. Let it dry for the time recommended on the package. This step creates a flat surface ready for sanding.
Sanding And Painting
After the filler dries, sand the area gently with fine sandpaper. Sand until the wall feels smooth and even. Wipe away dust with a clean cloth. Paint over the repaired spot using matching wall paint. Use a small brush for precise coverage. This restores the wall’s original color and finish.
Using Touch-up Kits
Touch-up kits include filler, sandpaper, and paint samples. They are useful for quick repairs on small holes. Follow the kit instructions step-by-step. Kits help match your wall color closely. Keep a kit handy for easy wall maintenance after removing hooks.
When To Call A Professional
Removing wall hooks might seem easy. Sometimes, the damage is more than expected. Calling a professional can save time and prevent more harm. Knowing when to get expert help is important for good results.
Large Damage Repair
Big holes or cracks need special care. Professionals have tools to fix deep damage. They can restore walls to look like new. Trying to fix large damage alone can make it worse. Experts know how to handle these problems safely.
Special Wall Surfaces
Some walls have delicate surfaces like plaster or wallpaper. These walls can break or peel easily. Professionals understand how to work gently on special surfaces. They use the right methods to protect the wall. Calling a pro helps keep your walls beautiful and intact.
Frequently Asked Questions
How Do I Safely Remove Wall Hooks Without Damage?
To safely remove wall hooks, gently twist or pull the hook while supporting the wall. Use a hairdryer to soften adhesive if needed. Avoid force to prevent wall damage. Patch any small holes with spackle for a smooth finish.
What Tools Are Needed To Take Off Wall Hooks?
Common tools include a hairdryer, putty knife, adhesive remover, and cleaning cloth. These help loosen adhesive and remove hooks without damaging the wall. Having these tools ready ensures a smooth and safe removal process.
Can I Reuse Wall Hooks After Removal?
Yes, many wall hooks can be reused if removed carefully. Avoid bending or breaking the hook during removal. Clean off any leftover adhesive before reapplying to ensure a strong hold on the wall.
How To Remove Adhesive Residue After Taking Off Hooks?
Use a gentle adhesive remover or rubbing alcohol on a cloth. Rub the residue until it loosens and wipes away cleanly. Avoid harsh chemicals that may damage wall paint or wallpaper.
Conclusion
Removing wall hooks is simple with the right tools and care. Take your time and avoid rushing to protect your walls. Use gentle methods to prevent damage and keep surfaces clean. Small steps make the process easier and safer. Now, you can remove hooks without stress or mess.
Try these tips next time you want a smooth wall. A little patience goes a long way in home care.