Are you tired of fumbling with multiple switches every time you want to use your extractor fan? Imagine controlling both your light and fan with a single flick of a switch—simple, convenient, and efficient.
Connecting your extractor fan to your light switch might sound tricky, but with the right steps, you can easily do it yourself. In this guide, you’ll discover exactly how to make the connection safely and effectively, saving you time and hassle.
Keep reading, and soon you’ll enjoy a smarter, more streamlined setup in your home.
Tools And Materials Needed
Gathering the right tools and materials makes connecting an extractor fan to a light switch easier and safer. Proper preparation saves time and prevents mistakes. Use items that fit the job well. This ensures a good electrical connection and long-lasting results.
Essential Tools
- Screwdriver set (flathead and Phillips)
- Wire stripper
- Voltage tester
- Drill with bits
- Electrician’s pliers
- Measuring tape
- Insulation tape
- Spirit level
Required Materials
- Extractor fan unit
- Light switch compatible with your wiring
- Electrical cable (correct gauge)
- Wire connectors or terminal blocks
- Wall plugs and screws
- Plastic back box for switch
- Electrical junction box (if needed)

Credit: wiki.diyfaq.org.uk
Safety Precautions
Safety is the first step in connecting an extractor fan to a light switch. Taking the right precautions protects you from electric shocks and accidents. Always prepare carefully before starting any electrical work.
Power Off Procedures
Turn off the main power supply at the circuit breaker. Double-check that the power is off using a voltage tester. Do not rely only on the switch being off. This step stops electricity from flowing to the wires.
Keep the power off for the entire work period. Never work on live wires. This rule is the most important safety measure to avoid shocks or injury.
Protective Gear
Wear insulated gloves to protect your hands from electric shocks. Use safety goggles to shield your eyes from dust and debris. Avoid loose clothing that might catch on wires or tools.
Use tools with insulated handles. These tools reduce the risk of electric shock. Always keep your work area dry and well-lit to prevent slips and mistakes.
Preparing The Wiring
Preparing the wiring is a key step before connecting your extractor fan to the light switch. This stage ensures safety and proper function of the fan. Taking time here reduces risks and future issues.
Focus on understanding the wires and checking their voltage. This helps you know what you are working with. Correct preparation makes installation smoother and safer.
Identifying Wires
First, find the wires coming from the fan and the switch. Commonly, wires are color-coded. Black or brown wires usually carry power. Blue or white wires often serve as neutral. Green or yellow-green wires are for grounding.
Use a visual check to spot each wire. Look for labels or markings on the cable. Knowing which wire does what is crucial for safe connections.
Checking Voltage
Before touching any wires, test their voltage. Use a voltage tester or multimeter for this task. This step confirms if wires carry live electricity.
Turn off the main power supply before testing. Carefully test the wires to avoid electric shock. Only work with voltage-free wires to stay safe.

Credit: wiki.diyfaq.org.uk
Connecting The Extractor Fan To The Light Switch
Connecting the extractor fan to the light switch helps control both with one switch. This setup saves space and adds convenience. You can turn on the fan and light together easily.
It requires some basic wiring skills. Safety is very important. Always turn off the power before starting any electrical work. Follow the steps carefully to connect the fan and switch properly.
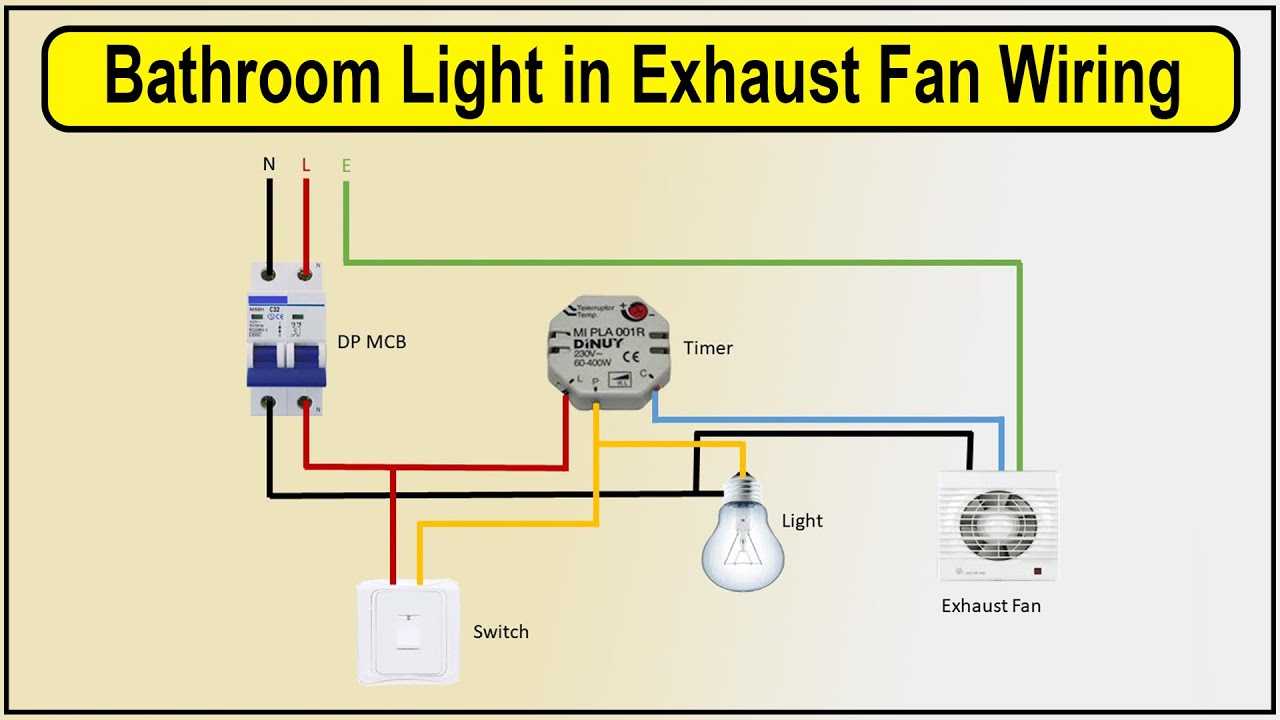
Wiring The Switch
First, identify the wires in your wall. Usually, there is a live wire, a neutral wire, and a ground wire. The live wire carries power to the switch.
Connect the live wire from the power source to the switch’s input terminal. Then connect the output terminal of the switch to the fan’s live wire. This lets the switch control the power flow.
Make sure all connections are tight and secure. Use wire connectors or terminal blocks for safety. Ground wires should connect to the switch’s grounding point or the electrical box.
Connecting Fan Wires
The fan usually has three wires: live, neutral, and ground. Connect the fan’s live wire to the switch output wire. Connect the fan’s neutral wire to the neutral wire from the power source.
Attach the fan’s ground wire to the grounding wire in the wall. This prevents electrical shocks. Double-check all connections before restoring power.
After wiring, test the switch. Turn it on and off. The fan should start and stop with the light switch. This confirms a correct connection.
Testing The Connection
Testing the connection is an important step after wiring your extractor fan to the light switch. It ensures everything works safely and correctly. This step helps you avoid electrical faults or damage to the fan and light. Follow these simple checks for a smooth setup.
Powering On
Turn on the main power supply to the circuit. Flip the light switch to the ON position. Watch if the extractor fan starts running immediately. Listen for any unusual noises from the fan motor. Check if the light also turns on as expected. If both work, the connection is successful. If not, turn off the power and check your wiring again.
Troubleshooting Common Issues
If the fan does not run, check the wiring connections. Make sure no wires are loose or disconnected. Confirm the fan’s power cable is correctly attached to the switch. Test the light switch itself with a voltage tester. Replace the switch if it is faulty. Look for any blown fuses or tripped breakers in your fuse box. Clear those issues and repeat the power test.
Tips For Efficient Installation
Installing an extractor fan with a light switch needs care and planning. Simple steps can make the process smooth and safe. Follow these tips to get a neat and efficient installation that works well every day.
Optimizing Switch Placement
Place the switch where it is easy to reach. Near the door is often best. This lets you turn on the fan and light quickly. Avoid spots that are too high or low. Think about who will use it most.
Keep the switch away from water sources. This reduces the risk of electric shocks. Make sure the wiring path is clear and short. This saves time and helps avoid mistakes.
Maintaining The Fan
Check the fan regularly to keep it working well. Clean dust and dirt from the blades often. This helps the fan run quietly and last longer. Look for any loose wires or parts. Fix them before they cause problems.
Test the fan and light switch after installation. Make sure both turn on and off smoothly. Regular maintenance prevents breakdowns and keeps your bathroom fresh.
Credit: www.youtube.com
Frequently Asked Questions
How Do I Wire An Extractor Fan To A Light Switch?
To wire an extractor fan to a light switch, connect the fan’s live wire to the switch output. The neutral and earth wires go directly to the power supply. This setup allows the fan to operate when the light switch is turned on.
Can I Control The Extractor Fan And Light Separately?
Yes, you can control them separately by installing a double switch or separate switches. This setup requires additional wiring but offers independent control over the fan and light functions.
Is It Safe To Connect An Extractor Fan To A Light Switch?
Yes, it is safe if done correctly. Ensure power is off before wiring, use proper connectors, and follow electrical codes. If unsure, consult a licensed electrician to avoid hazards.
What Tools Do I Need To Connect An Extractor Fan To A Switch?
You need a screwdriver, wire stripper, voltage tester, electrical tape, and connectors. These tools help safely strip wires, check power, and secure connections for proper installation.
Conclusion
Connecting an extractor fan to a light switch is simple with clear steps. Always turn off the power before starting work. Use the right tools and check all wires carefully. This setup helps save space and control both devices easily.
Take your time and follow safety rules closely. Soon, you will enjoy better ventilation with one switch. Feel confident to try this task at home. It makes your bathroom or kitchen more comfortable and fresh.