Are you looking to brighten up your home’s exterior with stylish wall sconces? Installing outdoor wall sconces can instantly boost your curb appeal and create a warm, inviting atmosphere.
But if you’re unsure where to start or worried about the wiring, you’re not alone. This guide will walk you through every step, making the process simple and stress-free. By the end, you’ll have the confidence to hook up your own exterior wall sconces safely and beautifully.
Ready to transform your outdoor space? Let’s dive in!
Choosing The Right Wall Sconces
Choosing the right wall sconces is key to enhancing your home’s exterior. The right fixtures provide good lighting and add charm. Consider the style, durability, and function before buying. This guide helps you pick sconces that fit your needs perfectly.
Types Of Exterior Wall Sconces
Wall sconces come in many shapes and sizes. Some shine light upward, others downward, or both ways. Lantern-style sconces give a classic look. Modern sconces have clean lines and simple shapes. Choose one that fits your outdoor lighting needs and looks good on your wall.
Materials And Finishes
Outdoor sconces face weather elements. Materials like aluminum, brass, and stainless steel last longer. Rust-resistant finishes protect the fixture from rain and sun. Matte, glossy, or textured finishes change the look. Pick a material and finish that stand up to your climate.
Matching Your Home’s Style
The sconce should match your home’s design. Traditional homes suit lantern or vintage-style sconces. Modern homes look best with sleek, minimal fixtures. Rustic or farmhouse styles pair well with bronze or black finishes. Matching sconces create a balanced and welcoming appearance.

Credit: www.youtube.com
Tools And Materials Needed
Installing exterior wall sconces requires the right tools and materials. Having everything prepared makes the job easier and safer. This section lists the essential items you need to complete the wiring and mounting process smoothly.
Essential Tools
- Screwdriver set (flathead and Phillips)
- Wire stripper and cutter
- Voltage tester to check power
- Drill with bits for mounting holes
- Measuring tape for precise placement
- Level to keep sconces straight
- Ladder to reach high spots
Electrical Components
- Exterior-rated wall sconces
- Electrical wire (usually 14/2 or 12/2 gauge)
- Wire connectors (wire nuts)
- Outdoor electrical box
- Weatherproof cover plate
- Electrical tape for insulation
Safety Gear
- Insulated gloves to prevent shocks
- Safety goggles to protect eyes
- Dust mask if drilling into old walls
- Non-slip shoes for ladder work
- Flashlight for dark areas
Preparing The Installation Area
Preparing the installation area is the first step in setting up exterior wall sconces. Proper preparation ensures a safe and smooth installation. It also helps the lights work well and last longer.
Start by checking where the power source is located. Then, mark the spots for mounting the sconces. Finally, turn off the power to avoid accidents during installation.
Locating Power Source
Find the nearest power source to your installation spot. This is usually an outdoor electrical box or existing wiring. Knowing the power location helps you plan the wiring path. It also prevents unnecessary damage to walls or plants.
Marking Mounting Points
Use a pencil or marker to mark where the sconces will go. Measure the height and distance carefully. Make sure the spots are level and even. Correct marking saves time and keeps the sconces aligned.
Turning Off Power
Switch off the electricity at the main breaker box. Double-check with a tester to confirm no power flows. This step protects you from electric shock. Never skip turning off the power before starting work.
Wiring The Wall Sconces
Wiring wall sconces outside needs careful attention. Safety and weatherproofing are key. This section explains how to wire exterior wall sconces correctly. Follow these steps for a secure and lasting setup.
Running Electrical Wires
Start by planning the wire path from your power source to the sconces. Use outdoor-rated cables designed for wet locations. Bury wires underground if needed, or run them through conduit for protection. Keep wires away from sharp edges and heat sources.
Connecting Wires Safely
Turn off power at the breaker before handling wires. Match wire colors: black to black, white to white, and green or bare wire to ground. Twist wires tightly together and secure with wire nuts. Check each connection to avoid loose ends or exposed copper.
Using Waterproof Connectors
Use waterproof connectors to prevent moisture damage. These connectors seal the wire joints from rain and humidity. Choose connectors rated for outdoor use. Proper sealing extends the life of your wiring and keeps the connection safe.
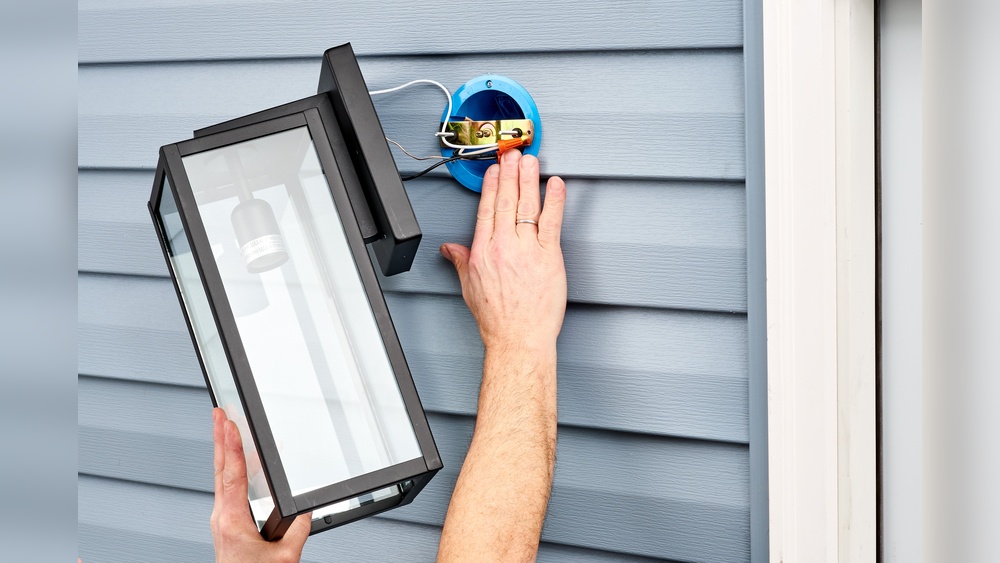
Mounting The Wall Sconces
Mounting wall sconces outside is an important step to ensure they stay secure and work well. Proper installation helps the lights last longer and look better on your home’s exterior. This section guides you through the main steps of mounting your wall sconces safely and correctly.
Attaching Mounting Brackets
Start by fixing the mounting brackets to the wall. Use a drill to make holes in the right spots. Insert wall anchors if you need extra support. Screw the brackets tightly so they do not move. Check that the brackets are level before tightening fully.
Securing The Fixture
Next, hold the sconce fixture against the mounted bracket. Align the fixture holes with the bracket screws. Use the provided screws to attach the fixture firmly. Make sure the fixture is stable and does not wobble. Tighten all screws carefully to avoid damage.
Adjusting Angle And Position
Adjust the sconce angle to aim light where needed. Some sconces have adjustable arms or heads. Loosen the adjustment screws to move the fixture. Set the angle for best lighting and appearance. Tighten the screws again to lock the position.

Credit: www.youtube.com
Testing And Final Touches
After installing your exterior wall sconces, the final steps are crucial. Testing and adding finishing touches ensure your lighting works well and lasts long. These steps protect the fixture and your home from damage.
Restoring Power And Testing
Turn the power back on at the circuit breaker. Check if the sconces light up without flickering. Test each switch connected to the sconces. Make sure the bulbs fit properly and shine bright. If any light does not work, double-check your wiring and connections. Safety first: never test with wet hands or standing water nearby.
Sealing For Weather Protection
Apply waterproof caulk around the base of each sconce. Seal gaps where water or moisture can enter. Use silicone sealant for the best protection. This step prevents water damage and rust. Let the sealant dry completely before exposure to rain. Proper sealing extends the life of your sconces outdoors.
Maintaining Your Wall Sconces
Clean your sconces regularly to avoid dirt buildup. Use a soft cloth and mild soap solution. Avoid harsh chemicals that can damage the finish. Check bulbs and wiring every few months. Replace any worn parts immediately. Proper care keeps your sconces bright and safe for years.

Credit: www.amazon.com
Frequently Asked Questions
How Do I Wire Exterior Wall Sconces Safely?
Turn off power at the breaker before wiring. Use waterproof connectors and exterior-rated cables. Follow local electrical codes for safety and durability.
What Tools Are Needed To Hook Up Wall Sconces Outside?
You need a voltage tester, wire strippers, screwdrivers, drill, electrical tape, and waterproof connectors. These tools ensure safe and efficient installation.
Can I Install Exterior Sconces Without A Junction Box?
No, a junction box is required for safety and secure wiring. It protects connections from weather and prevents fire hazards.
How High Should Exterior Wall Sconces Be Mounted?
Mount sconces 60 to 66 inches above the ground for optimal lighting and aesthetic appeal. Adjust height based on porch or wall size.
Conclusion
Installing exterior wall sconces adds style and safety to your home. Follow each step carefully for a secure fit. Always turn off power before starting any electrical work. Use the right tools to make the job easier. Test the lights after installation to ensure they work well.
Enjoy the warm glow and improved curb appeal. With patience and care, anyone can hook up wall sconces outside. Brighten your space safely and beautifully.