If you need a strong and permanent solution to secure items to a concrete wall, knowing how to install concrete non-removable anchors is essential. These anchors are designed to stay put, giving you a reliable hold that won’t loosen over time.
Whether you’re hanging heavy shelves, mounting equipment, or reinforcing structures, mastering this technique can save you time and frustration. In this guide, you’ll discover step-by-step instructions that make the process straightforward—even if you’re new to DIY projects. Keep reading to learn how to get a solid, lasting hold on your concrete walls with confidence.
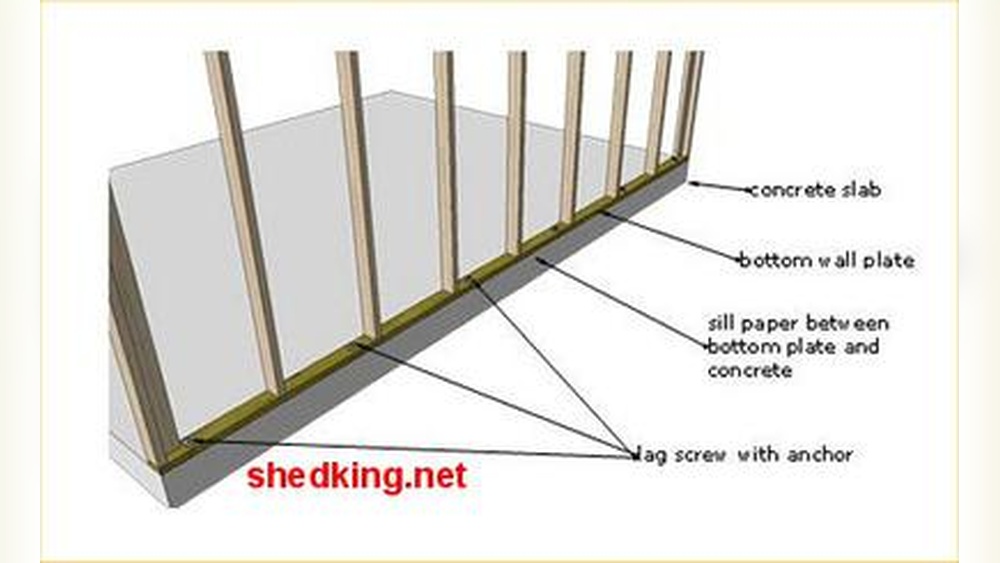
Choosing The Right Anchors
Preparing the wall surface is the first step to install concrete non-removable anchors. This step ensures strong hold and long-lasting results. A well-prepared surface helps anchors stay fixed and safe. Follow these key steps before starting the installation.
Cleaning The Area
Remove dust and dirt from the wall. Use a wire brush or broom for tough spots. Clear loose particles to create a clean surface. A clean wall helps anchors grip better. Avoid wetting the wall, as moisture can weaken the hold.
Marking Anchor Positions
Measure and mark exact points for each anchor. Use a pencil or chalk for clear marks. Keep marks visible but easy to erase later. Proper spacing avoids cracks and ensures balance. Double-check measurements before drilling holes.
Safety Precautions
Wear safety glasses and gloves to protect yourself. Use a dust mask to avoid inhaling concrete dust. Clear the work area from obstacles and tripping hazards. Follow tool instructions carefully to prevent accidents. Safety first for a smooth installation process.

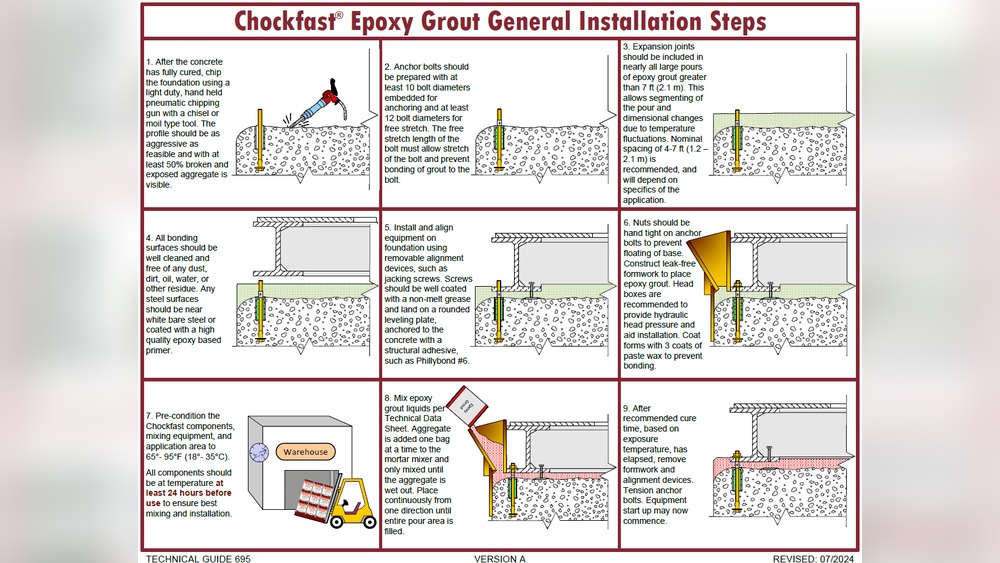
Credit: m.made-in-china.com
Preparing The Wall Surface
Drilling holes in concrete is the first critical step for installing non-removable anchors. Precise holes ensure strong anchor holding and safe wall mounting. Use the right tools and methods for clean, accurate holes.
Selecting The Drill Bit
Choose a carbide-tipped masonry drill bit. It cuts through concrete efficiently. Match the bit size with the anchor diameter for a snug fit. Avoid using dull or worn bits to prevent cracking.
Drilling Techniques
Use a hammer drill for best results. Keep the drill steady and perpendicular to the wall. Start at low speed to create a guide hole. Increase speed gradually while applying firm, even pressure.
Depth And Diameter Accuracy
Measure the required hole depth before drilling. Use a tape or drill bit marker to avoid over-drilling. Check the hole diameter regularly. The hole should be slightly larger than the anchor for easy insertion.
Drilling Holes In Concrete
Finishing touches are important after installing concrete non-removable anchors. They ensure the anchors work well and last longer. Proper finishing also gives a clean, safe appearance.
Take time to clean debris, test the anchor strength, and follow maintenance tips. These steps protect your work and improve safety.
Cleaning Excess Debris
Remove all dust and concrete pieces around the anchors. Use a brush or vacuum to clear the hole and surface. Clean anchors hold better and avoid damage.
Check for leftover debris inside the hole. Clear it fully before the next step. A clean anchor surface helps secure the bond.
Testing Anchor Strength
Test each anchor to ensure it holds tightly. Use a pull test tool or apply pressure carefully. Strong anchors keep your installation safe and stable.
Test multiple anchors for consistent results. Replace any anchors that feel loose or weak. Safety depends on proper anchor strength.
Maintenance Tips
Inspect anchors regularly for rust, cracks, or movement. Clean around them to prevent dirt buildup. Early care extends anchor life and performance.
Apply rust protection if needed. Avoid heavy impacts near the anchors. Simple maintenance keeps your anchors secure for years.

Credit: beeaccess.com
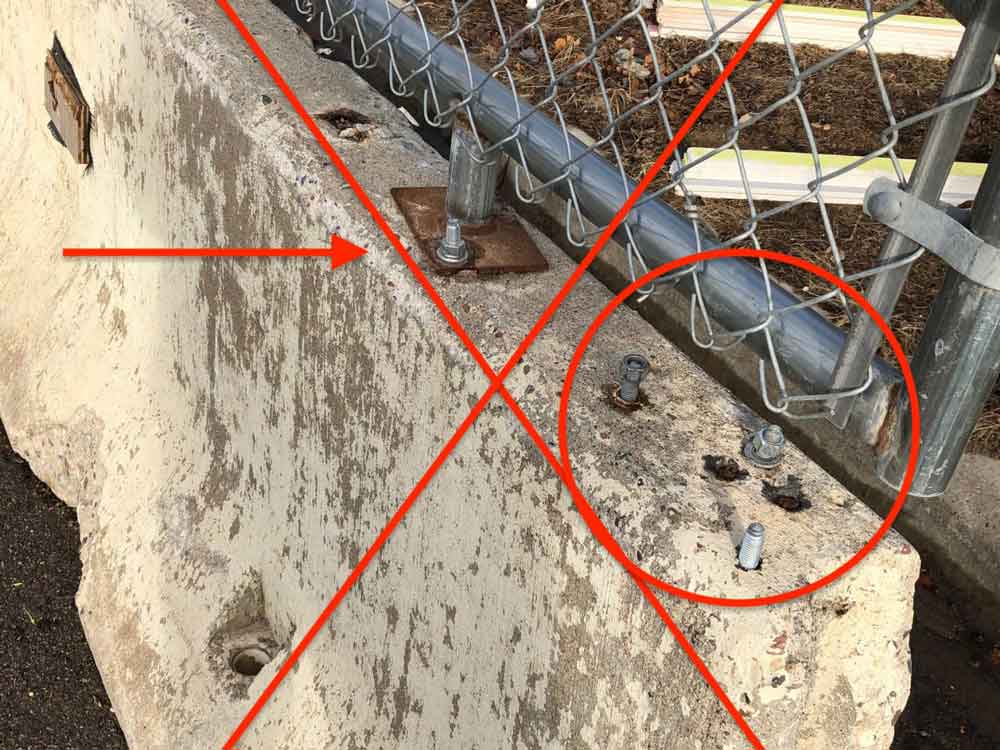
Credit: hilmersonsafety.com
Frequently Asked Questions
What Tools Are Needed To Install Concrete Non-removable Anchors?
You need a hammer drill, masonry bit, hammer, and wrench. Safety gear like goggles and gloves is essential. These tools ensure precise drilling and secure anchor installation on concrete walls.
How Deep Should I Drill For Non-removable Anchors?
Drill to the anchor manufacturer’s specified depth, typically 1. 5 to 2 inches deeper than anchor length. Proper depth ensures strong anchoring and prevents damage to the wall.
Can I Remove Concrete Non-removable Anchors Later?
No, these anchors are designed to stay permanently. Attempting removal may damage the wall or anchor. Plan installation carefully to avoid future issues.
How Do I Ensure Anchors Hold Heavy Loads Securely?
Choose anchors rated for your load. Drill accurate holes and clean out debris before installation. Tighten anchors firmly but avoid over-tightening to maintain strength.
Conclusion
Installing concrete non-removable anchors on a wall is simple and effective. Follow each step carefully to ensure strong support. Use the right tools and materials for best results. Always measure and mark before drilling to avoid mistakes. Tighten anchors firmly but avoid overdoing it.
This method keeps fixtures secure and stable for a long time. Practice safety by wearing protective gear during installation. With patience and care, you can complete the job successfully. Trust the process and enjoy a sturdy, reliable hold on your wall.